Yamaha AW16G Owner's Manual - Page 146
up. Then move the cursor to the ENABLE, or sample library data that you want to back
 |
View all Yamaha AW16G manuals
Add to My Manuals
Save this manual to your list of manuals |
Page 146 highlights
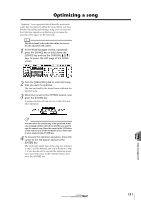
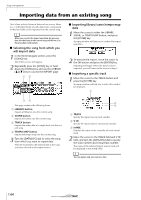
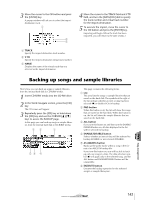
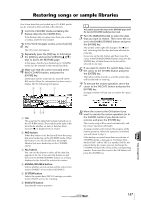
Song management 4 Turn the [DATA/JOG] dial to select the song or sample library data that you want to back up. Then move the cursor to the ENABLE/ DISABLE button and press the [ENTER] key. The symbol for the selected data will change to the ● symbol, indicating that this data has been selected for backup. You can repeat this step to select multiple items of data for backup. If you turn on the ALL button and then move the cursor to the ENABLE/DISABLE button and press the [ENTER] key, you can select all data in the list in one step. Tip! If you turn on the NAME or OLD button, the data in the list will be sorted alphabetically or by the order in which it was saved. 5 To execute the backup, move the cursor to the EXECUTE button and press the [ENTER] key. A popup window will ask you to confirm the operation. Note • If previously-recorded CD-RW media is inserted in the CD-RW drive, a popup window will ask you if it is OK to erase the media first. Move the cursor to the OK button and press the [ENTER] key, and the media will be erased. • If a CD-ROM or previously-recorded CD-R media is inserted in the CD-RW drive, a popup window with a message of "Change Media, Please" will appear, and the media will be ejected. Remove the media, and replace it with writable media. 6 Move the cursor to the OK button and press the [ENTER] key. Writing to the CD-R/RW media will begin. If you decide to cancel the backup operation, move the cursor to the CANCEL button and press the [ENTER] key. While the backup operation is being executed, a popup window will indicate the progress. When the backup has been completed, you will return to step 3. If the backup data does not fit on a single volume of media, a message of "Note Label, Exchange Next" will appear, and the media will be ejected. Insert a new volume of media. Then move the cursor to the OK button and press the [ENTER] key. Note • You cannot execute the backup operation without selecting data. • If you execute the backup operation with the AS AW2816 button turned off, system data (the settings you make in the UTILITY screen) will be backed up on the media together with the selected data. • If you execute the backup operation with the AS AW2816 button turned on, data other than audio tracks will not be backed up. All virtual tracks for tracks 1-16 will be backed up. For the stereo track, only the current track will be backed up. • When you restore data that was backed up to more than one volume of media, you must insert the media in the order in which it was backed up. Be sure to make a note of the backup sequence on the label surface of each CD-R/RW media. 146
-
 1
1 -
2
-
3
-
4
-
5
-
6
-
7
-
8
-
9
-
10
-
11
-
12
-
13
-
14
-
15
-
16
-
17
-
18
-
19
-
20
-
21
-
22
-
23
-
24
-
25
-
26
-
27
-
28
-
29
-
30
-
31
-
32
-
33
-
34
-
35
-
36
-
37
-
38
-
39
-
40
-
41
-
42
-
43
-
44
-
45
-
46
-
47
-
48
-
49
-
50
-
51
-
52
-
53
-
54
-
55
-
56
-
57
-
58
-
59
-
60
-
61
-
62
-
63
-
64
-
65
-
66
-
67
-
68
-
69
-
70
-
71
-
72
-
73
-
74
-
75
-
76
-
77
-
78
-
79
-
80
-
81
-
82
-
83
-
84
-
85
-
86
-
87
-
88
-
89
-
90
-
91
-
92
-
93
-
94
-
95
-
96
-
97
-
98
-
99
-
100
-
101
-
102
-
103
-
104
-
105
-
106
-
107
-
108
-
109
-
110
-
111
-
112
-
113
-
114
-
115
-
116
-
117
-
118
-
119
-
120
-
121
-
122
-
123
-
124
-
125
-
126
-
127
-
128
-
129
-
130
-
131
-
132
-
133
-
134
-
135
-
136
-
137
-
138
-
139
-
140
-
 141
141 -
 142
142 -
 143
143 -
 144
144 -
 145
145 -
 146
146 -
 147
147 -
 148
148 -
 149
149 -
 150
150 -
 151
151 -
152
-
153
-
154
-
155
-
156
-
157
-
158
-
159
-
160
-
161
-
162
-
163
-
164
-
165
-
166
-
167
-
168
-
169
-
170
-
171
-
172
-
173
-
174
-
175
-
176
-
177
-
178
-
179
-
180
-
181
-
182
-
183
-
184
-
185
-
186
-
187
-
188
-
189
-
190
-
191
-
192
-
193
-
194
-
195
-
196
-
197
-
198
-
199
-
200
-
201
-
202
-
203
-
204
-
205
-
206
-
207
-
208
-
209
-
210
-
211
-
212
-
213
-
214
-
215
-
216
-
217
-
218
-
219
 |
 |