Yamaha AW16G Owner's Manual - Page 132
Exporting WAV files and importing audio CD or WAV files, Exporting WAV files
 |
View all Yamaha AW16G manuals
Add to My Manuals
Save this manual to your list of manuals |
Page 132 highlights
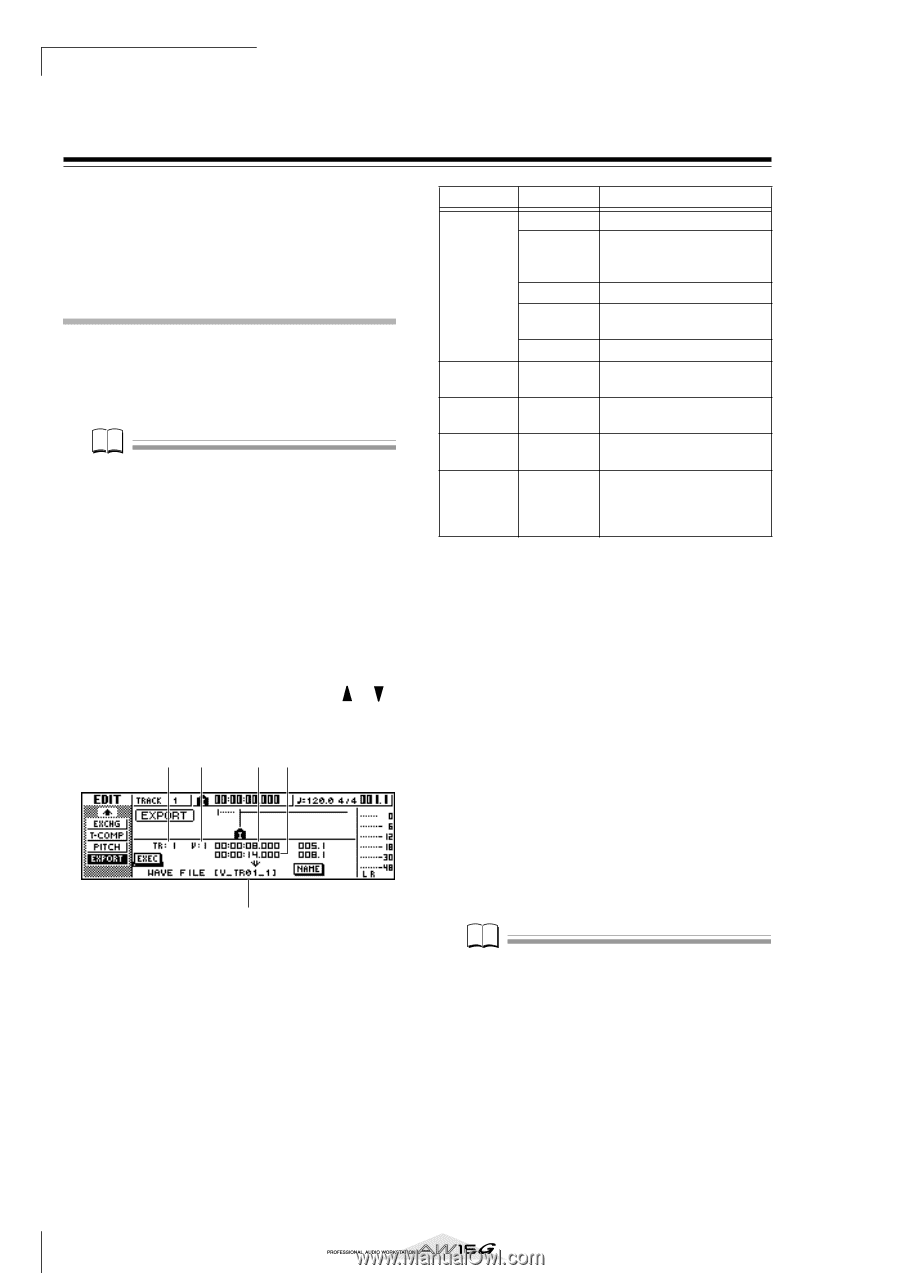
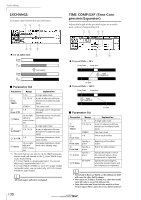
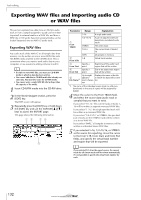
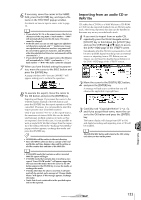
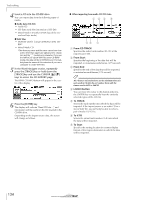
Track editing Exporting WAV files and importing audio CD or WAV files This section explains how data from an AW16G audio track or from a sample assigned to a pad can be written (exported) to external media as a WAV file, and how a WAV file or CD audio data from external media can be loaded (imported) into an AW16G audio track. Exporting WAV files Any audio track of the AW16G or all sample data from memory can be written as one or more WAV files onto CD-R/RW media inserted in the CD-RW drive. This is convenient when you want to send audio data to your computer, or use waveform editing software to edit it. Note • In order to write WAV files, you must use CD-R/RW media to which no data has been written. • You cannot add data to CD-RW media that already contains data. You must first erase the CD-RW media. • You cannot write a single WAV file that is larger than the capacity of the media. 1 Insert CD-R/RW media into the CD-RW drive. 2 In the Work Navigate section, press the [EDIT] key. The EDIT screen will appear. 3 Repeatedly press the [EDIT] key or hold down the [EDIT] key and use the CURSOR [ ]/[ ] keys to access the EXPORT page. This page shows the following information. 12 34 5 Parameter Range Explanation 1-16 A single audio track 1 From TRACK 1/2-15/16 STEREO Tr1-16 A pair of adjacent odd-numbered/even-numbered audio tracks The stereo track The current track of tracks 1- 16 SMPL All samples in memory 2 1-8 From V.TR Virtual track number 3 Specify a From Start point Beginning of the audio track region that will be written 4 From End Specify a point End of the audio track region that will be written 5 File Name*1 Up to eight Displays the name of the file alphanu- to which the data will be writ- meric charac- ten ters *1. The name of the individual source track (or odd-numbered track in the case of a pair) will be assigned by default. 4 Move the cursor to the From TRACK field, and select the source data (audio track or sample) that you want to write. If you select "Tr1-16," the current tracks of tracks 1- 16 will be written as separate monaural WAV files. If you select "1-16," the single specified track will be written as a monaural WAV file. If you select "1/2-15/16" or STEREO, the specified pair of tracks (or the STEREO track) will be written as a stereo WAV file. If you select "SMPL," all samples in memory will be written as individual stereo WAV files. 5 If you selected 1-16, 1/2-15/16, or STEREO as the source for exporting, move the cursor to the From V.TR, From Start, and From End fields, and specify the virtual track number and region that will be exported. Note If you selected Tr1-16 as the export-source, the current tracks for all sixteen tracks will be written automatically. It is not possible to specify the virtual track number for each. 132
-
 1
1 -
2
-
3
-
4
-
5
-
6
-
7
-
8
-
9
-
10
-
11
-
12
-
13
-
14
-
15
-
16
-
17
-
18
-
19
-
20
-
21
-
22
-
23
-
24
-
25
-
26
-
27
-
28
-
29
-
30
-
31
-
32
-
33
-
34
-
35
-
36
-
37
-
38
-
39
-
40
-
41
-
42
-
43
-
44
-
45
-
46
-
47
-
48
-
49
-
50
-
51
-
52
-
53
-
54
-
55
-
56
-
57
-
58
-
59
-
60
-
61
-
62
-
63
-
64
-
65
-
66
-
67
-
68
-
69
-
70
-
71
-
72
-
73
-
74
-
75
-
76
-
77
-
78
-
79
-
80
-
81
-
82
-
83
-
84
-
85
-
86
-
87
-
88
-
89
-
90
-
91
-
92
-
93
-
94
-
95
-
96
-
97
-
98
-
99
-
100
-
101
-
102
-
103
-
104
-
105
-
106
-
107
-
108
-
109
-
110
-
111
-
112
-
113
-
114
-
115
-
116
-
117
-
118
-
119
-
120
-
121
-
122
-
123
-
124
-
125
-
126
-
 127
127 -
 128
128 -
 129
129 -
 130
130 -
 131
131 -
 132
132 -
 133
133 -
 134
134 -
 135
135 -
 136
136 -
 137
137 -
138
-
139
-
140
-
141
-
142
-
143
-
144
-
145
-
146
-
147
-
148
-
149
-
150
-
151
-
152
-
153
-
154
-
155
-
156
-
157
-
158
-
159
-
160
-
161
-
162
-
163
-
164
-
165
-
166
-
167
-
168
-
169
-
170
-
171
-
172
-
173
-
174
-
175
-
176
-
177
-
178
-
179
-
180
-
181
-
182
-
183
-
184
-
185
-
186
-
187
-
188
-
189
-
190
-
191
-
192
-
193
-
194
-
195
-
196
-
197
-
198
-
199
-
200
-
201
-
202
-
203
-
204
-
205
-
206
-
207
-
208
-
209
-
210
-
211
-
212
-
213
-
214
-
215
-
216
-
217
-
218
-
219
 |
 |