Yamaha AW16G Owner's Manual - Page 115
Sampling an external input signal
 |
View all Yamaha AW16G manuals
Add to My Manuals
Save this manual to your list of manuals |
Page 115 highlights
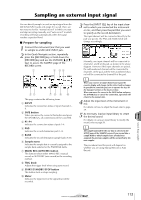
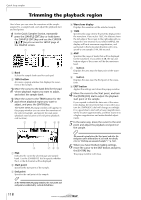
Sampling an external input signal You can directly sample (record) an input signal from the MIC/LINE INPUT jacks and assign it to a pad. There are two ways to do this; "manual record" in which you start and stop recording manually, and "auto record" in which recording will begin automatically when the signal reaches a specified level. ■ Prepare for sampling 1 Connect the instrument/mic that you want to sample to a MIC/LINE INPUT jack. 2 In the Quick Navigate section, repeatedly press the [RECORD] key or hold down the [RECORD] key and use the CURSOR [ ]/[ ] keys to access the SAMPLE page of the RECORD screen. 1 4 56 23 79 8 J This page contains the following items. 1 INPUT Indicates the connection status of input channels 1- 8. B SAFE button When you move the cursor to this button and press the [ENTER] key, all connections will be cancelled. C P1-P4 Indicates the connection status of pads 1-4. D PAD Indicates the record-destination pad (1-4). E BANK Indicates the record-destination sample bank (A-D). F Sample name Indicates the sample that is currently assigned to the sample bank selected in the PAD/BANK fields. G MANU REC/AUTO REC button This buttons selects either MANU REC (manual record) or AUTO REC (auto record) as the recording method. H TRIG knob Adjusts the trigger level when using auto record. I START/STANDBY/STOP button This button starts or stops sampling. J Meter Indicates the input level of the signal that will be recorded. 3 Press the [INPUT SEL] key of the input channel to which you connected the instrument or mic, and then press the pad that you want to specify as the record-destination. The input channel will be connected directly to the pad you specify. The PAD and NAME fields will change accordingly. Normally, one input channel will be connected to channels L and R of the pad, as shown in the above diagram. However if the input channels are paired, the odd-numbered channel will be connected to channel L of the pad, and the even-numbered channel will be connected to channel R of the pad. Note When you connect an input channel and a pad, the counter display will change. In this state it will no longer be possible to sound the pad, nor to operate the keys of the transport section or the locate section. When you move the cursor to the SAFE button and press the [ENTER] key to cancel the connection, operation will return to the normal state. 4 Adjust the input level of the instrument or mic. For details on how to adjust the level, refer to page 34. 5 As necessary, load an input library to create the desired sound. For details on using an input library to modify the sound, refer to page 50. 11 Quick loop sampler Note The sample bank will be the one that is selected in the SETUP page of the SAMPLE screen. If you record into a sample bank to which samples have already been assigned, the previous samples will be overwritten by the new samples. The procedure from this point will depend on whether you are using Manual Record or Auto Record. 115
-
 1
1 -
2
-
3
-
4
-
5
-
6
-
7
-
8
-
9
-
10
-
11
-
12
-
13
-
14
-
15
-
16
-
17
-
18
-
19
-
20
-
21
-
22
-
23
-
24
-
25
-
26
-
27
-
28
-
29
-
30
-
31
-
32
-
33
-
34
-
35
-
36
-
37
-
38
-
39
-
40
-
41
-
42
-
43
-
44
-
45
-
46
-
47
-
48
-
49
-
50
-
51
-
52
-
53
-
54
-
55
-
56
-
57
-
58
-
59
-
60
-
61
-
62
-
63
-
64
-
65
-
66
-
67
-
68
-
69
-
70
-
71
-
72
-
73
-
74
-
75
-
76
-
77
-
78
-
79
-
80
-
81
-
82
-
83
-
84
-
85
-
86
-
87
-
88
-
89
-
90
-
91
-
92
-
93
-
94
-
95
-
96
-
97
-
98
-
99
-
100
-
101
-
102
-
103
-
104
-
105
-
106
-
107
-
108
-
109
-
 110
110 -
 111
111 -
 112
112 -
 113
113 -
 114
114 -
 115
115 -
 116
116 -
 117
117 -
 118
118 -
 119
119 -
 120
120 -
121
-
122
-
123
-
124
-
125
-
126
-
127
-
128
-
129
-
130
-
131
-
132
-
133
-
134
-
135
-
136
-
137
-
138
-
139
-
140
-
141
-
142
-
143
-
144
-
145
-
146
-
147
-
148
-
149
-
150
-
151
-
152
-
153
-
154
-
155
-
156
-
157
-
158
-
159
-
160
-
161
-
162
-
163
-
164
-
165
-
166
-
167
-
168
-
169
-
170
-
171
-
172
-
173
-
174
-
175
-
176
-
177
-
178
-
179
-
180
-
181
-
182
-
183
-
184
-
185
-
186
-
187
-
188
-
189
-
190
-
191
-
192
-
193
-
194
-
195
-
196
-
197
-
198
-
199
-
200
-
201
-
202
-
203
-
204
-
205
-
206
-
207
-
208
-
209
-
210
-
211
-
212
-
213
-
214
-
215
-
216
-
217
-
218
-
219
 |
 |
