Yamaha AW16G Owner's Manual - Page 143
Adding a tempo map event, Song management
 |
View all Yamaha AW16G manuals
Add to My Manuals
Save this manual to your list of manuals |
Page 143 highlights
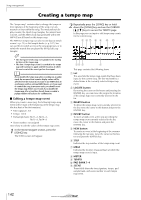
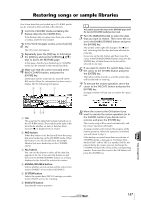
3 Move the cursor to the item that you want to edit, and turn the [DATA/JOG] dial to edit the value. If the METER, TEMPO, PAD BANK 1-4, or SCENE value is "-", move the cursor to the item and press the [ENTER] key before you edit the value. Note • The METER, TEMPO, and PAD BANK 1-4 at the beginning of the song cannot be set to "-". • You cannot change the METER value to other than "-" for a step that is not located at beat 1. The range for each item is as follows. Event METER TEMPO PAD BANK 1-4 SCENE Range Content 1/4 to 8/4, - Specifies the time signature of the song. 30.0 to 250.0, - Specifies the tempo of the song. You can set the tempo in units of 0.1 over a range of 30.0-250.0 BPM. A to D, - Selects the sample bank that will be used for each pad 1-4. 00 to 96, - Switches the scene number used by the song. Tip! • You cannot delete the tempo map event located at the beginning of the song, or change its location. If you want to change the tempo or time signature during the song, you can insert a new event. • If you set METER, TEMPO, PAD BANK 1-4, or SCENE to a value of "-", that event will be disabled. For example if you want to specify only the time signature and tempo, you should set the pad bank and scene to "-". ■ Adding a tempo map event 1 Access the TEMPO page, move the cursor to the NEW button, and press the [ENTER] key. A blank tempo map event will be created after the last step that is currently input. Tip! If you use the INSERT button instead of the NEW button, a blank tempo map event will be inserted before the currently selected step. However, you cannot insert an event before the tempo map event at the beginning of the song (i.e., the tempo map event that is input when you create the song). 2 Make sure that the cursor is outside the list, and turn the [DATA/JOG] dial to select a tempo map event that you created. When the cursor is located outside the list, you can turn the [DATA/JOG] dial to scroll the contents of the list. 3 Move the cursor to the MEAS field of the event that is selected in the list, and turn the [DATA/JOG] dial to specify the location of the event. You can adjust the location of a tempo map event in units of measures or beats. However, you cannot move an event past the preceding or following event. 4 Move the cursor to the item that you want to edit, and turn the [DATA/JOG] dial to adjust the value. If necessary, you can play back the song to check that the tempo map event works as you expect. 5 In the same way, use the NEW or INSERT button to add new events, and set their parameters. ■ Deleting a tempo map event Here's how to delete an unwanted event from the tempo map. (However, you cannot delete the event that is located at the beginning of the song.) 1 Access the TEMPO page, and scroll the list to select the tempo map event that you want to delete. 2 Move the cursor to the DELETE button and press the [ENTER] key. The selected event will be deleted. 13 Song management 143
-
 1
1 -
2
-
3
-
4
-
5
-
6
-
7
-
8
-
9
-
10
-
11
-
12
-
13
-
14
-
15
-
16
-
17
-
18
-
19
-
20
-
21
-
22
-
23
-
24
-
25
-
26
-
27
-
28
-
29
-
30
-
31
-
32
-
33
-
34
-
35
-
36
-
37
-
38
-
39
-
40
-
41
-
42
-
43
-
44
-
45
-
46
-
47
-
48
-
49
-
50
-
51
-
52
-
53
-
54
-
55
-
56
-
57
-
58
-
59
-
60
-
61
-
62
-
63
-
64
-
65
-
66
-
67
-
68
-
69
-
70
-
71
-
72
-
73
-
74
-
75
-
76
-
77
-
78
-
79
-
80
-
81
-
82
-
83
-
84
-
85
-
86
-
87
-
88
-
89
-
90
-
91
-
92
-
93
-
94
-
95
-
96
-
97
-
98
-
99
-
100
-
101
-
102
-
103
-
104
-
105
-
106
-
107
-
108
-
109
-
110
-
111
-
112
-
113
-
114
-
115
-
116
-
117
-
118
-
119
-
120
-
121
-
122
-
123
-
124
-
125
-
126
-
127
-
128
-
129
-
130
-
131
-
132
-
133
-
134
-
135
-
136
-
137
-
 138
138 -
 139
139 -
 140
140 -
 141
141 -
 142
142 -
 143
143 -
 144
144 -
 145
145 -
 146
146 -
 147
147 -
 148
148 -
149
-
150
-
151
-
152
-
153
-
154
-
155
-
156
-
157
-
158
-
159
-
160
-
161
-
162
-
163
-
164
-
165
-
166
-
167
-
168
-
169
-
170
-
171
-
172
-
173
-
174
-
175
-
176
-
177
-
178
-
179
-
180
-
181
-
182
-
183
-
184
-
185
-
186
-
187
-
188
-
189
-
190
-
191
-
192
-
193
-
194
-
195
-
196
-
197
-
198
-
199
-
200
-
201
-
202
-
203
-
204
-
205
-
206
-
207
-
208
-
209
-
210
-
211
-
212
-
213
-
214
-
215
-
216
-
217
-
218
-
219
 |
 |
