Yamaha AW16G Owner's Manual - Page 24
Switching a button on/off, Editing a value in the display, Inputting text, Text input box
 |
View all Yamaha AW16G manuals
Add to My Manuals
Save this manual to your list of manuals |
Page 24 highlights
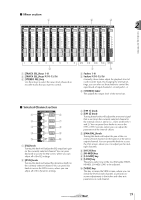
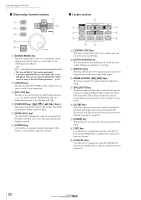
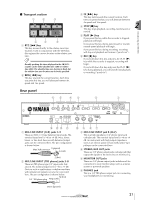
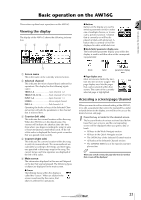
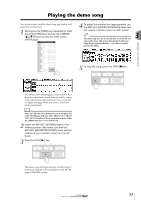
Introducing the AW16G 2 To switch pages within a screen, you can either repeatedly press the same key as in step 1, or hold down the same key as in step 1 and use the CURSOR [ ]/[ ] keys. If there are more pages than can be shown in one screen, an arrow like the following will appear in the page display area. This arrow means that one or more additional hidden pages exist in that direction. To access a hidden page, hold down the same key as in step 1, and press the [CURSOR] key of the same direction as the arrow. In pages that display a list of parameters for multiple channels, the screen may be divided into a page for the input channels/pad channels and a page for the track channels, since not all of the parameters can be shown in a single screen. In this case, use the [INPUT SEL] keys, pads 1-4, or [TRACK SEL] keys to select the channels that you want to view. Switching a button on/off Here's how to switch a button in the screen on/off. 1 Use the [CURSOR] keys to move the cursor to the desired button in the screen. 2 Press the [ENTER] key. The button will be switched on/ off. If you move the cursor to a button that executes a specific function and then press the [ENTER] key, that function will be executed. Editing a value in the display Here's how to edit the value of a fader, knob, or parameter shown in the display. 1 Use the [CURSOR] keys to move the cursor to the desired fader, knob, or parameter value. 2 Turn the [DATA/JOG] dial to edit the value. Inputting text When you create a new song or save a scene memory or library setting, a popup window will appear, allowing you to assign a name for the song or setting. 2 1 3 4 56 7 This popup window contains the following items and functions. 1 Text input box This box lets you input characters, numerals, and symbols. When you save the data for the first time, the box will contain a default name. You can input a scene/library name or song name of up to twelve characters. B Text palette This displays the characters, numerals, and symbols that can be input in the text input box. C CANCEL button If you move the cursor to this button and press the [ENTER] key, you will return to the previous screen without changing the name. D OK button If you move the cursor to this button and press the [ENTER] key, the scene/library will be saved or the new song will be created. E button If you move the cursor to this button and press the [ENTER] key, the character that is currently selected in the text input box will be switched between uppercase and lowercase. F INS button When you move the cursor to this button and press the [ENTER] key, a space will be inserted at the location of the currently selected character (underlined), and subsequent characters will move one character backward. G DEL button When you move the cursor to this button and press the [ENTER] key, the currently selected character (underlined) will be deleted, and subsequent characters will move one character forward. To assign a new name, use the [CURSOR] keys to move the cursor in the text input box to the character that you want to change, and turn the [DATA/ JOG] dial to select a character. When you have finished inputting the name, move the cursor to the OK button and press the [ENTER] key to apply the new name. 24
-
 1
1 -
2
-
3
-
4
-
5
-
6
-
7
-
8
-
9
-
10
-
11
-
12
-
13
-
14
-
15
-
16
-
17
-
18
-
 19
19 -
 20
20 -
 21
21 -
 22
22 -
 23
23 -
 24
24 -
 25
25 -
 26
26 -
 27
27 -
 28
28 -
 29
29 -
30
-
31
-
32
-
33
-
34
-
35
-
36
-
37
-
38
-
39
-
40
-
41
-
42
-
43
-
44
-
45
-
46
-
47
-
48
-
49
-
50
-
51
-
52
-
53
-
54
-
55
-
56
-
57
-
58
-
59
-
60
-
61
-
62
-
63
-
64
-
65
-
66
-
67
-
68
-
69
-
70
-
71
-
72
-
73
-
74
-
75
-
76
-
77
-
78
-
79
-
80
-
81
-
82
-
83
-
84
-
85
-
86
-
87
-
88
-
89
-
90
-
91
-
92
-
93
-
94
-
95
-
96
-
97
-
98
-
99
-
100
-
101
-
102
-
103
-
104
-
105
-
106
-
107
-
108
-
109
-
110
-
111
-
112
-
113
-
114
-
115
-
116
-
117
-
118
-
119
-
120
-
121
-
122
-
123
-
124
-
125
-
126
-
127
-
128
-
129
-
130
-
131
-
132
-
133
-
134
-
135
-
136
-
137
-
138
-
139
-
140
-
141
-
142
-
143
-
144
-
145
-
146
-
147
-
148
-
149
-
150
-
151
-
152
-
153
-
154
-
155
-
156
-
157
-
158
-
159
-
160
-
161
-
162
-
163
-
164
-
165
-
166
-
167
-
168
-
169
-
170
-
171
-
172
-
173
-
174
-
175
-
176
-
177
-
178
-
179
-
180
-
181
-
182
-
183
-
184
-
185
-
186
-
187
-
188
-
189
-
190
-
191
-
192
-
193
-
194
-
195
-
196
-
197
-
198
-
199
-
200
-
201
-
202
-
203
-
204
-
205
-
206
-
207
-
208
-
209
-
210
-
211
-
212
-
213
-
214
-
215
-
216
-
217
-
218
-
219
 |
 |
