Yamaha AW16G Owner's Manual - Page 114
Importing from an audio track/stereo track to a pad
 |
View all Yamaha AW16G manuals
Add to My Manuals
Save this manual to your list of manuals |
Page 114 highlights
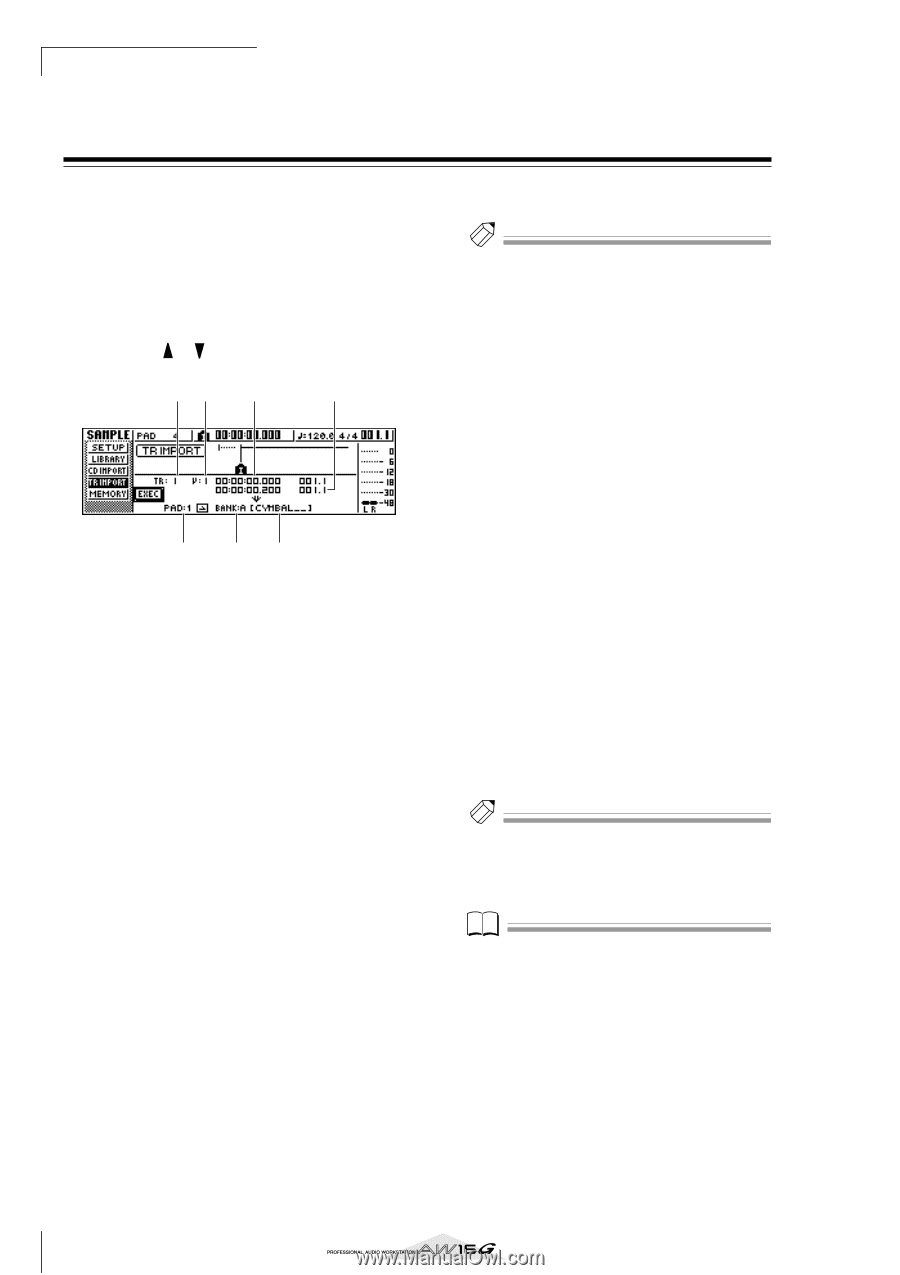
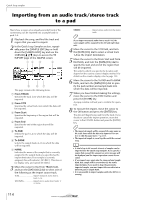
Quick loop sampler Importing from an audio track/stereo track to a pad Here's how a region of an already-recorded track of the current song can be imported into a sample bank for pads 1-4. 1 Play back the song, and find the track and region that you want to import. 2 In the Quick Loop Sampler section, repeatedly press the [SAMPLE EDIT] key or hold down the [SAMPLE EDIT] key and use the CURSOR [ ]/[ ] keys to access the TR IMPORT page of the SAMPLE screen. 12 3 4 5 67 This page contains the following items. 1 From TRACK Specifies the track from which the data will be imported. B From V.TR Specifies the virtual track from which the data will be imported. C From Start Specifies the beginning of the region that will be imported. D From End Specifies the end of the region that will be imported. E To PAD Selects the pad (1-4) to which the data will be imported. F To BANK Selects the sample bank (A-D) to which the data will be imported. G NAME Indicates the name of the sample that is currently assigned to the sample bank you specified as the import destination. If no sample is currently assigned, this will indicate [-NO REC-]. This item is for display only, and cannot be edited. 3 Move the cursor to the From TRACK field, and turn the [DATA/JOG] dial to select one of the following as the import source track. 1-16 Import monaural audio from a track 1-16. 1/2-15/16 Import stereo audio from tracks 1/ 2-15/16. STEREO Import stereo audio from the stereo track. Tip! If you import monaural audio from a track 1-16, the same sample will be assigned to the left and right channels. 4 Move the cursor to the V.TR field, and turn the [DATA/JOG] dial to select a virtual track 1-8 as the import destination. 5 Move the cursor to the From Start and From End fields, and turn the [DATA/JOG] dial to specify the start and end of the region that will be imported. The units by which you specify the location will depend on the current counter display method. For details on the counter display, refer to page 139. 6 Move the cursor to the To PAD and To BANK fields, and turn the [DATA/JOG] dial to specify the pad number and sample bank into which the data will be imported. 7 When you have finished making the settings, move the cursor to the EXEC button and press the [ENTER] key. A popup window will ask you to confirm the operation. 8 To execute the import, move the cursor to the OK button and press the [ENTER] key. The data will begin being read from the track. If you decide to cancel the import operation, move the cursor to the CANCEL button and press the [ENTER] key. Tip! • The imported sample will be assigned the same name as the track from which the data was imported. You are free to edit this name later (→ p. 117). • The imported sample is saved together with the current song. Note • A total of up to 44 seconds (stereo) of samples can be imported into the Quick Loop Sampler. If you specify a region that exceeds this amount, an error message will be displayed, and the import operation cannot be executed. • If you import once again into the same pad and sample bank, that sample will be overwritten by the newly imported data. If you want to keep the previouslyimported sample, you must import the new data into a different pad or sample bank. • It is not possible to import samples while the AW16G is running. 114
-
 1
1 -
2
-
3
-
4
-
5
-
6
-
7
-
8
-
9
-
10
-
11
-
12
-
13
-
14
-
15
-
16
-
17
-
18
-
19
-
20
-
21
-
22
-
23
-
24
-
25
-
26
-
27
-
28
-
29
-
30
-
31
-
32
-
33
-
34
-
35
-
36
-
37
-
38
-
39
-
40
-
41
-
42
-
43
-
44
-
45
-
46
-
47
-
48
-
49
-
50
-
51
-
52
-
53
-
54
-
55
-
56
-
57
-
58
-
59
-
60
-
61
-
62
-
63
-
64
-
65
-
66
-
67
-
68
-
69
-
70
-
71
-
72
-
73
-
74
-
75
-
76
-
77
-
78
-
79
-
80
-
81
-
82
-
83
-
84
-
85
-
86
-
87
-
88
-
89
-
90
-
91
-
92
-
93
-
94
-
95
-
96
-
97
-
98
-
99
-
100
-
101
-
102
-
103
-
104
-
105
-
106
-
107
-
108
-
 109
109 -
 110
110 -
 111
111 -
 112
112 -
 113
113 -
 114
114 -
 115
115 -
 116
116 -
 117
117 -
 118
118 -
 119
119 -
120
-
121
-
122
-
123
-
124
-
125
-
126
-
127
-
128
-
129
-
130
-
131
-
132
-
133
-
134
-
135
-
136
-
137
-
138
-
139
-
140
-
141
-
142
-
143
-
144
-
145
-
146
-
147
-
148
-
149
-
150
-
151
-
152
-
153
-
154
-
155
-
156
-
157
-
158
-
159
-
160
-
161
-
162
-
163
-
164
-
165
-
166
-
167
-
168
-
169
-
170
-
171
-
172
-
173
-
174
-
175
-
176
-
177
-
178
-
179
-
180
-
181
-
182
-
183
-
184
-
185
-
186
-
187
-
188
-
189
-
190
-
191
-
192
-
193
-
194
-
195
-
196
-
197
-
198
-
199
-
200
-
201
-
202
-
203
-
204
-
205
-
206
-
207
-
208
-
209
-
210
-
211
-
212
-
213
-
214
-
215
-
216
-
217
-
218
-
219
 |
 |