Yamaha AW16G Owner's Manual - Page 74
Basic operation for libraries and scene memories, Storing library or scene data
 |
View all Yamaha AW16G manuals
Add to My Manuals
Save this manual to your list of manuals |
Page 74 highlights
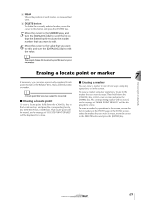
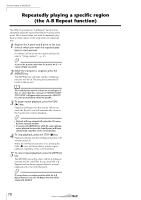
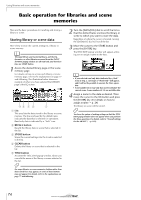
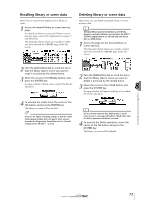
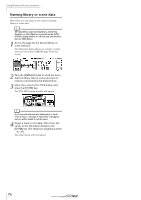
Using libraries and scene memories Basic operation for libraries and scene memories Here are the basic procedures for recalling and storing a library or scene. Storing library or scene data Here's how to store the current settings in a library or scene memory. Note The input library and mastering library, and the EQ, dynamics, or effect libraries accessed from the INPUT SETTING popup window are all read-only, and therefore have no STORE button. 1 Access the desired library page or the scene memory page. For details on how to access each library or scene memory page, refer to the explanations on page 77 and following. The illustration below shows an example of when you have selected the LIBRARY page of the EQ screen. 45 3 2 1 1 List This area lists the data stored in the library or scene memory. The line enclosed by the dotted frame indicates the data that is selected for operations. Read-only data is indicated by a "lock" icon. B RECALL button Recalls the library data or scene that is selected in the list. C STORE button Stores the current settings into the location selected in the list. D CLEAR button Deletes the library or scene that is selected in the list. E TITLE button Accesses the TITLE EDIT popup window, where you can edit the name of the library or scene selected in the list. Tip! For some libraries or scene memories, buttons other than those listed here may appear, or some of these buttons may not appear. For details, refer to the explanations on page 77 and following. 2 Turn the [DATA/JOG] dial to scroll the list so that the dotted frame encloses the library or scene to which you want to store the data. Regardless of where the cursor is located, turning the [DATA/JOG] dial will scroll the list. 3 Move the cursor to the STORE button and press the [ENTER] key. The TITLE EDIT popup window will appear, allowing you to assign a name to the data. Note • If you selected read-only data (indicated by a "lock" icon) in step 2, a message of "Read Only" will appear, and it will not be possible to execute the Store operation. • Scene number 00 is read-only data used to initialize the current scene. Scene numbers 01-96 are writable data. 4 Assign a name to the data as desired. Then move the cursor to the OK button and press the [ENTER] key. (For details on how to assign a name → p. 24) The library or scene will be stored. Tip! You have the option of making settings so that the TITLE EDIT popup window does not appear when you perform the Store operation. For details, refer to "Overall settings for the AW16G" (→ p. 162). 74
-
 1
1 -
2
-
3
-
4
-
5
-
6
-
7
-
8
-
9
-
10
-
11
-
12
-
13
-
14
-
15
-
16
-
17
-
18
-
19
-
20
-
21
-
22
-
23
-
24
-
25
-
26
-
27
-
28
-
29
-
30
-
31
-
32
-
33
-
34
-
35
-
36
-
37
-
38
-
39
-
40
-
41
-
42
-
43
-
44
-
45
-
46
-
47
-
48
-
49
-
50
-
51
-
52
-
53
-
54
-
55
-
56
-
57
-
58
-
59
-
60
-
61
-
62
-
63
-
64
-
65
-
66
-
67
-
68
-
 69
69 -
 70
70 -
 71
71 -
 72
72 -
 73
73 -
 74
74 -
 75
75 -
 76
76 -
 77
77 -
 78
78 -
 79
79 -
80
-
81
-
82
-
83
-
84
-
85
-
86
-
87
-
88
-
89
-
90
-
91
-
92
-
93
-
94
-
95
-
96
-
97
-
98
-
99
-
100
-
101
-
102
-
103
-
104
-
105
-
106
-
107
-
108
-
109
-
110
-
111
-
112
-
113
-
114
-
115
-
116
-
117
-
118
-
119
-
120
-
121
-
122
-
123
-
124
-
125
-
126
-
127
-
128
-
129
-
130
-
131
-
132
-
133
-
134
-
135
-
136
-
137
-
138
-
139
-
140
-
141
-
142
-
143
-
144
-
145
-
146
-
147
-
148
-
149
-
150
-
151
-
152
-
153
-
154
-
155
-
156
-
157
-
158
-
159
-
160
-
161
-
162
-
163
-
164
-
165
-
166
-
167
-
168
-
169
-
170
-
171
-
172
-
173
-
174
-
175
-
176
-
177
-
178
-
179
-
180
-
181
-
182
-
183
-
184
-
185
-
186
-
187
-
188
-
189
-
190
-
191
-
192
-
193
-
194
-
195
-
196
-
197
-
198
-
199
-
200
-
201
-
202
-
203
-
204
-
205
-
206
-
207
-
208
-
209
-
210
-
211
-
212
-
213
-
214
-
215
-
216
-
217
-
218
-
219
 |
 |