Yamaha AW16G Owner's Manual - Page 112
Importing from an audio CD/WAV file to a pad
 |
View all Yamaha AW16G manuals
Add to My Manuals
Save this manual to your list of manuals |
Page 112 highlights
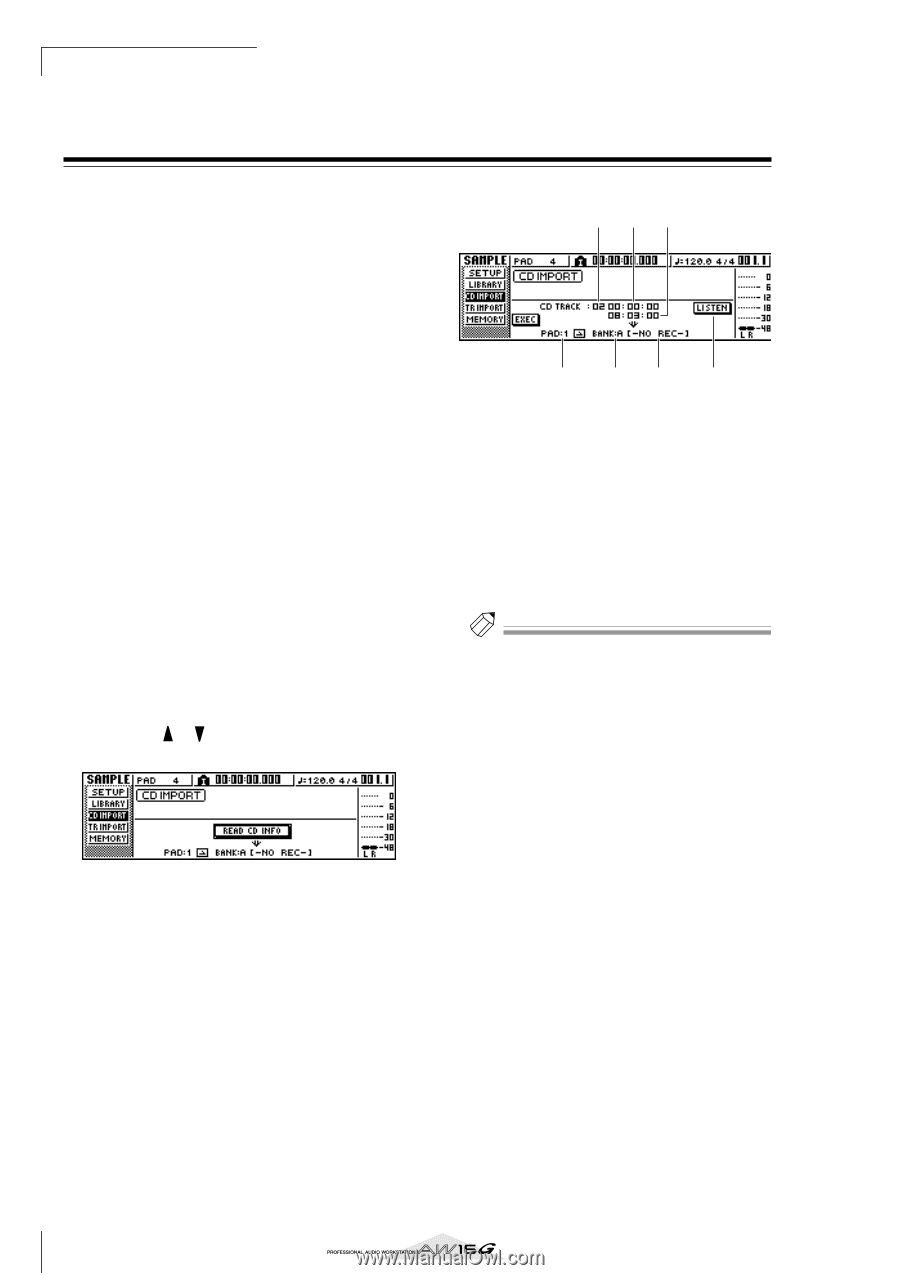
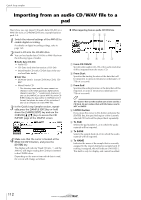
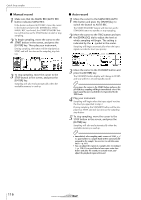
Quick loop sampler Importing from an audio CD/WAV file to a pad Here's how you can import CD audio data (CD-DA) or a WAV file from a CD-ROM/CD-R into a sample bank for pads 1-4. 1 Switch the internal settings of the AW16G to enable digital recording. For details on digital recording settings, refer to page 160. 2 Insert a CD into the CD-RW drive. You can load audio data (CD-DA) or WAV files from the following types of media. ● Audio data (CD-DA) • Audio CD • CD-Extra (only the first session of CD-DA) • Mixed Mode CD (only CD-DA data of the second and later tracks) ● WAV files • ISO9660 Level 1 format CD-ROM, CD-R, CDRW* • Mixed Mode CD * The directory name and file name cannot use characters other than uppercase alphanumeric characters and the "_" (underscore) character. If you use the AW16G to export WAV files onto CDR/RW media, the data will be in ISO9660 Level 1 format, but please be aware of this restriction if you use a computer to create WAV files. 3 In the Quick Loop Sampler section, repeatedly press the [SAMPLE EDIT] key or hold down the [SAMPLE EDIT] key and use the CURSOR [ ]/[ ] keys to access the CD IMPORT page of the SAMPLE screen. 4 Make sure that the cursor is located at the READ CD INFO button, and press the [ENTER] key. The display will indicate "Read CD info...", and the AW16G will begin reading the CD that is inserted in the CD-RW drive. Depending on the source from which data is read, the screen will change as follows. ● When importing from an audio CD/CD-Extra 123 5 67 4 1 From CD TRACK Specifies the number (01-99) of the audio track that will be imported from the source CD. B From Start Specifies the starting location of the data that will be imported, in units of minutes/seconds/frames (1/ 75th of a second). C From End Specifies the ending location of the data that will be imported, in units of minutes/seconds/frames (1/ 75th of a second). Tip! The "frames" here are the smallest unit of time used by a CD track. Do not confuse them with the frames used in MTC or SMPTE. D LISTEN button If you move the cursor to this button and press the [ENTER] key, the specified region of the currently selected CD track will be played back repeatedly. E To PAD Selects the pad number (1-4) to which the audio material will be imported. F To BANK Selects the sample bank (A-D) to which the audio material will be imported. G To NAME Indicates the name of the sample that is currently assigned to the import-destination sample bank. If nothing is assigned, this will indicate [-NO REC-]. This field is only for display, and cannot be edited. 112
-
 1
1 -
2
-
3
-
4
-
5
-
6
-
7
-
8
-
9
-
10
-
11
-
12
-
13
-
14
-
15
-
16
-
17
-
18
-
19
-
20
-
21
-
22
-
23
-
24
-
25
-
26
-
27
-
28
-
29
-
30
-
31
-
32
-
33
-
34
-
35
-
36
-
37
-
38
-
39
-
40
-
41
-
42
-
43
-
44
-
45
-
46
-
47
-
48
-
49
-
50
-
51
-
52
-
53
-
54
-
55
-
56
-
57
-
58
-
59
-
60
-
61
-
62
-
63
-
64
-
65
-
66
-
67
-
68
-
69
-
70
-
71
-
72
-
73
-
74
-
75
-
76
-
77
-
78
-
79
-
80
-
81
-
82
-
83
-
84
-
85
-
86
-
87
-
88
-
89
-
90
-
91
-
92
-
93
-
94
-
95
-
96
-
97
-
98
-
99
-
100
-
101
-
102
-
103
-
104
-
105
-
106
-
 107
107 -
 108
108 -
 109
109 -
 110
110 -
 111
111 -
 112
112 -
 113
113 -
 114
114 -
 115
115 -
 116
116 -
 117
117 -
118
-
119
-
120
-
121
-
122
-
123
-
124
-
125
-
126
-
127
-
128
-
129
-
130
-
131
-
132
-
133
-
134
-
135
-
136
-
137
-
138
-
139
-
140
-
141
-
142
-
143
-
144
-
145
-
146
-
147
-
148
-
149
-
150
-
151
-
152
-
153
-
154
-
155
-
156
-
157
-
158
-
159
-
160
-
161
-
162
-
163
-
164
-
165
-
166
-
167
-
168
-
169
-
170
-
171
-
172
-
173
-
174
-
175
-
176
-
177
-
178
-
179
-
180
-
181
-
182
-
183
-
184
-
185
-
186
-
187
-
188
-
189
-
190
-
191
-
192
-
193
-
194
-
195
-
196
-
197
-
198
-
199
-
200
-
201
-
202
-
203
-
204
-
205
-
206
-
207
-
208
-
209
-
210
-
211
-
212
-
213
-
214
-
215
-
216
-
217
-
218
-
219
 |
 |