Yamaha AW16G Owner's Manual - Page 47
Enabling the metronome - midi
 |
View all Yamaha AW16G manuals
Add to My Manuals
Save this manual to your list of manuals |
Page 47 highlights
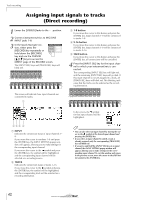
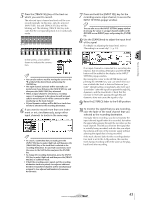
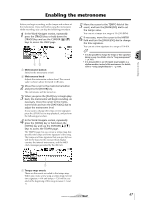
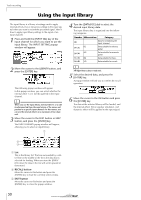
Track recording Enabling the metronome Before you begin recording, set the tempo and volume of the metronome. If you will not be using the metronome while recording, you can skip the following procedure. 1 In the Work Navigate section, repeatedly press the [TRACK] key or hold down the [TRACK] key and use the CURSOR [ ]/[ ] keys to access the VIEW page. 12 1 Metronome button Switches the metronome on/off. B Metronome knob Adjusts the metronome volume level. The current value is shown above the knob in dB units. 2 Move the cursor to the metronome button and press the [ENTER] key. The metronome will be turned on. 3 When you press the [PLAY] key to begin playback, the metronome will begin sounding. As necessary, move the cursor to the metronome knob and turn the [DATA/JOG] dial to adjust the metronome level. If you want to change the tempo or time signature, press the [STOP] key to stop playback, and perform the following procedure. 4 In the Work Navigate section, repeatedly press the [SONG] key or hold down the [SONG] key and use the CURSOR [ ]/[ ] keys to access the TEMPO page. The TEMPO page lets you create a tempo map that specifies the tempo and time signature of the song. The tempo and time signature that you specify here will be the basis for the measure/beat display counter, the internal metronome, and the MIDI clock messages generated by the AW16G. 5 Move the cursor to the TEMPO field of the event, and turn the [DATA/JOG] dial to set the tempo value. You can set a tempo in a range of 30-250 (BPM). 6 If necessary, move the cursor to the METER field and turn the [DATA/JOG] dial to change the time signature. You can set a time signature in a range of 1/4-8/4. Tip! • It is also possible to change the tempo or time signature during a song. For details, refer to "Song management" (→ p. 137). • It is also possible to use the Quick Loop Sampler as a rhythm machine, instead of the metronome. For details, refer to "Using sample libraries" (→ p. 109). 5 1 1 Tempo map events These are the events recorded in the tempo map. When you create a new song, a tempo map event of time signature = 4/4 and tempo = 120 will be created at the beginning of the song (measure 1, beat 1). 47
-
 1
1 -
2
-
3
-
4
-
5
-
6
-
7
-
8
-
9
-
10
-
11
-
12
-
13
-
14
-
15
-
16
-
17
-
18
-
19
-
20
-
21
-
22
-
23
-
24
-
25
-
26
-
27
-
28
-
29
-
30
-
31
-
32
-
33
-
34
-
35
-
36
-
37
-
38
-
39
-
40
-
41
-
 42
42 -
 43
43 -
 44
44 -
 45
45 -
 46
46 -
 47
47 -
 48
48 -
 49
49 -
 50
50 -
 51
51 -
 52
52 -
53
-
54
-
55
-
56
-
57
-
58
-
59
-
60
-
61
-
62
-
63
-
64
-
65
-
66
-
67
-
68
-
69
-
70
-
71
-
72
-
73
-
74
-
75
-
76
-
77
-
78
-
79
-
80
-
81
-
82
-
83
-
84
-
85
-
86
-
87
-
88
-
89
-
90
-
91
-
92
-
93
-
94
-
95
-
96
-
97
-
98
-
99
-
100
-
101
-
102
-
103
-
104
-
105
-
106
-
107
-
108
-
109
-
110
-
111
-
112
-
113
-
114
-
115
-
116
-
117
-
118
-
119
-
120
-
121
-
122
-
123
-
124
-
125
-
126
-
127
-
128
-
129
-
130
-
131
-
132
-
133
-
134
-
135
-
136
-
137
-
138
-
139
-
140
-
141
-
142
-
143
-
144
-
145
-
146
-
147
-
148
-
149
-
150
-
151
-
152
-
153
-
154
-
155
-
156
-
157
-
158
-
159
-
160
-
161
-
162
-
163
-
164
-
165
-
166
-
167
-
168
-
169
-
170
-
171
-
172
-
173
-
174
-
175
-
176
-
177
-
178
-
179
-
180
-
181
-
182
-
183
-
184
-
185
-
186
-
187
-
188
-
189
-
190
-
191
-
192
-
193
-
194
-
195
-
196
-
197
-
198
-
199
-
200
-
201
-
202
-
203
-
204
-
205
-
206
-
207
-
208
-
209
-
210
-
211
-
212
-
213
-
214
-
215
-
216
-
217
-
218
-
219
 |
 |
