Yamaha AW16G Owner's Manual - Page 113
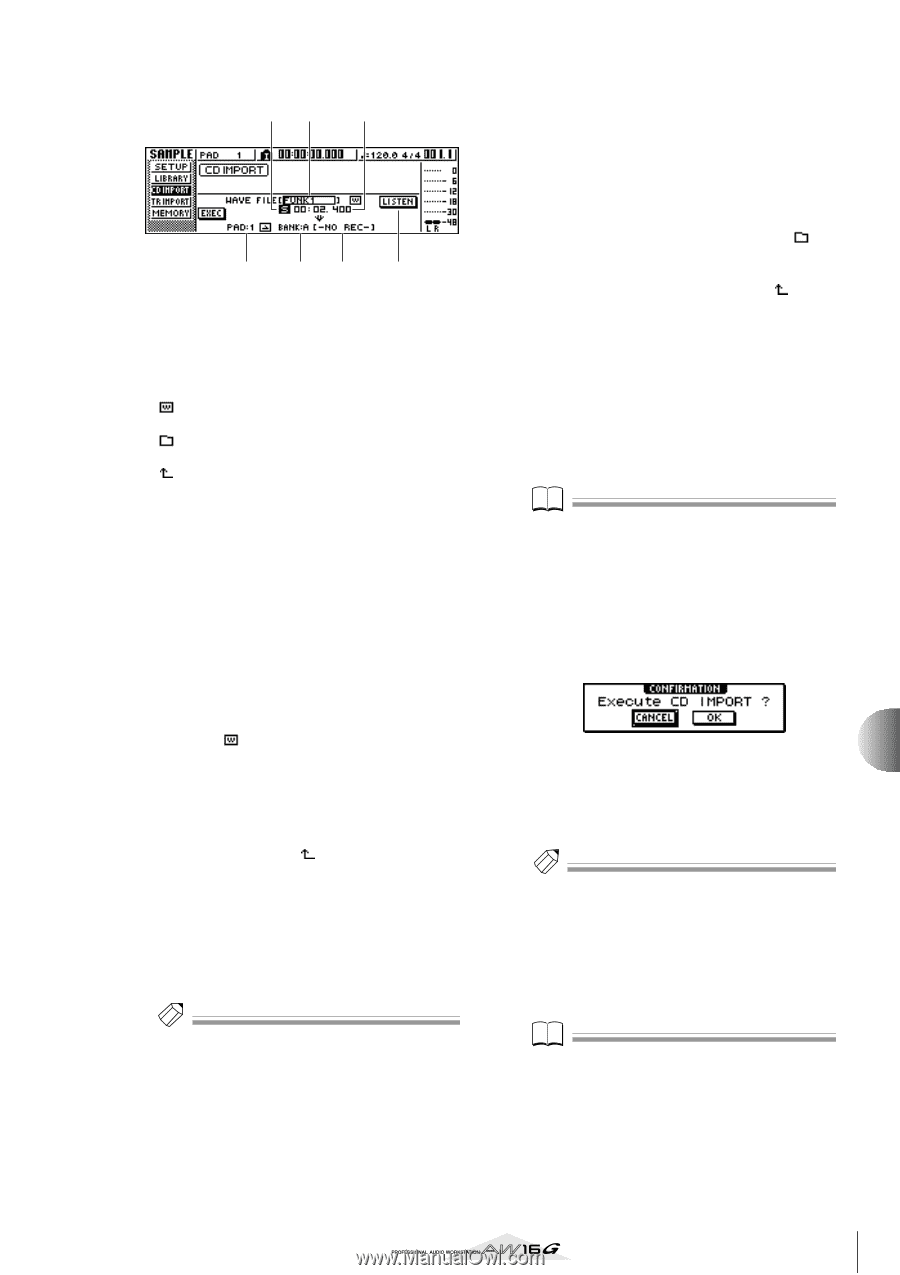
From WAV File, Mono/Stereo, LISTEN/ENTER/UP buttons, To PAD, To BANK, To NAME, CD-Extra
 |
View all Yamaha AW16G manuals
Add to My Manuals
Save this manual to your list of manuals |
Page 113 highlights
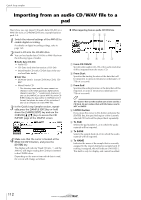
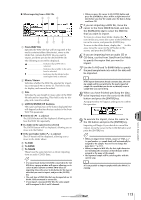
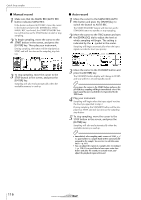
● When importing from a WAV file 21 3 5 67 4 1 From WAV File Specifies the WAV file that will be imported. If the media contains folders (directories), move to the folder that contains the WAV file you want to import, and then specify the desired WAV file. The following icons will be displayed. Indicates that a WAV file is selected. Indicates that a folder in the same level is selected. Indicates that the folder for the next higher level is selected. B Mono/Stereo Indicates whether the WAV file selected for importing is monaural (M) or stereo (S). This field is only for display, and cannot be edited. C Size Indicates the size (length in msec units) of the WAV file selected for importing. This field is only for display, and cannot be edited. D LISTEN/ENTER/UP buttons The name and function of the button displayed here will depend on the item that you select for the From WAV File parameter. ● If WAV file ( ) is selected The LISTEN button will be displayed, allowing you to hear the WAV file repeatedly. ● If a folder in the same level is selected The ENTER button will be displayed, allowing you to move into that folder. ● If the next higher folder ( ) is selected The UP button will be displayed, allowing you to move to the folder above. E To PAD F To BANK G To NAME These have the same function as when importing from an audio CD/CD-Extra. Tip! • If a mixed mode format CD-ROM is inserted in the CDRW drive, a popup window will appear, allowing you to select AUDIO (CD-DA) or WAVE (WAV files) for importing. Move the cursor to the button for the type of data that you want to import, and press the [ENTER] key. • The only type of WAV files that can be imported are 16 bit/44.1 kHz monaural or stereo files. • If you import a monaural WAV file, the same sample will be assigned to the L and R channels. • When you move the cursor to the LISTEN button and press the [ENTER] key, there will be a slight interval of time before you hear the sound, since the data is being read from CD. 5 If you are importing a WAV file, move the cursor to the From WAVE file field, and turn the [DATA/JOG] dial to select the WAV file that you want to import. To move to a lower-level folder, display the ( ) icon in this area, move the cursor to the ENTER button in the screen, and press the [ENTER] key. To move to the folder above, display the ( ) in this area, move the cursor to the UP button in the screen, and press the [ENTER] key. 6 If you are importing from an audio CD or CD-Extra, use the From Start/From End fields to specify the region that you want to import. 7 Use the To PAD and To BANK fields to specify the pad/sample bank into which the data will be imported. Note If the import destination already contains data, the existing sample will be overwritten by the newly imported sample. Be careful that you do not accidentally erase a sample that you want to keep. 8 When you have finished specifying the data to be imported, move the cursor to the EXEC button and press the [ENTER] key. A popup window will appear, asking you to confirm the operation. Quick loop sampler 9 To execute the import, move the cursor to the OK button and press the [ENTER] key. Importing will begin. If you decide to cancel the import, move the cursor to the CANCEL button and press the [ENTER] key. 11 Tip! • When you import from CD-DA, a name of "PAD_x_y" (x= pad number, y= sample bank) will automatically be assigned to the sample. You are free to change this name later (→ p. 117). • When you import a WAV file, the first eight characters (not including the extension) of that filename will be assigned as the name of the sample. • The imported sample will be saved together with the current song. Note It is not possible to import samples while the AW16G is running. 113
-
 1
1 -
2
-
3
-
4
-
5
-
6
-
7
-
8
-
9
-
10
-
11
-
12
-
13
-
14
-
15
-
16
-
17
-
18
-
19
-
20
-
21
-
22
-
23
-
24
-
25
-
26
-
27
-
28
-
29
-
30
-
31
-
32
-
33
-
34
-
35
-
36
-
37
-
38
-
39
-
40
-
41
-
42
-
43
-
44
-
45
-
46
-
47
-
48
-
49
-
50
-
51
-
52
-
53
-
54
-
55
-
56
-
57
-
58
-
59
-
60
-
61
-
62
-
63
-
64
-
65
-
66
-
67
-
68
-
69
-
70
-
71
-
72
-
73
-
74
-
75
-
76
-
77
-
78
-
79
-
80
-
81
-
82
-
83
-
84
-
85
-
86
-
87
-
88
-
89
-
90
-
91
-
92
-
93
-
94
-
95
-
96
-
97
-
98
-
99
-
100
-
101
-
102
-
103
-
104
-
105
-
106
-
107
-
 108
108 -
 109
109 -
 110
110 -
 111
111 -
 112
112 -
 113
113 -
 114
114 -
 115
115 -
 116
116 -
 117
117 -
 118
118 -
119
-
120
-
121
-
122
-
123
-
124
-
125
-
126
-
127
-
128
-
129
-
130
-
131
-
132
-
133
-
134
-
135
-
136
-
137
-
138
-
139
-
140
-
141
-
142
-
143
-
144
-
145
-
146
-
147
-
148
-
149
-
150
-
151
-
152
-
153
-
154
-
155
-
156
-
157
-
158
-
159
-
160
-
161
-
162
-
163
-
164
-
165
-
166
-
167
-
168
-
169
-
170
-
171
-
172
-
173
-
174
-
175
-
176
-
177
-
178
-
179
-
180
-
181
-
182
-
183
-
184
-
185
-
186
-
187
-
188
-
189
-
190
-
191
-
192
-
193
-
194
-
195
-
196
-
197
-
198
-
199
-
200
-
201
-
202
-
203
-
204
-
205
-
206
-
207
-
208
-
209
-
210
-
211
-
212
-
213
-
214
-
215
-
216
-
217
-
218
-
219
 |
 |