Yamaha AW16G Owner's Manual - Page 68
Adjusting the position of a locate point or marker
 |
View all Yamaha AW16G manuals
Add to My Manuals
Save this manual to your list of manuals |
Page 68 highlights
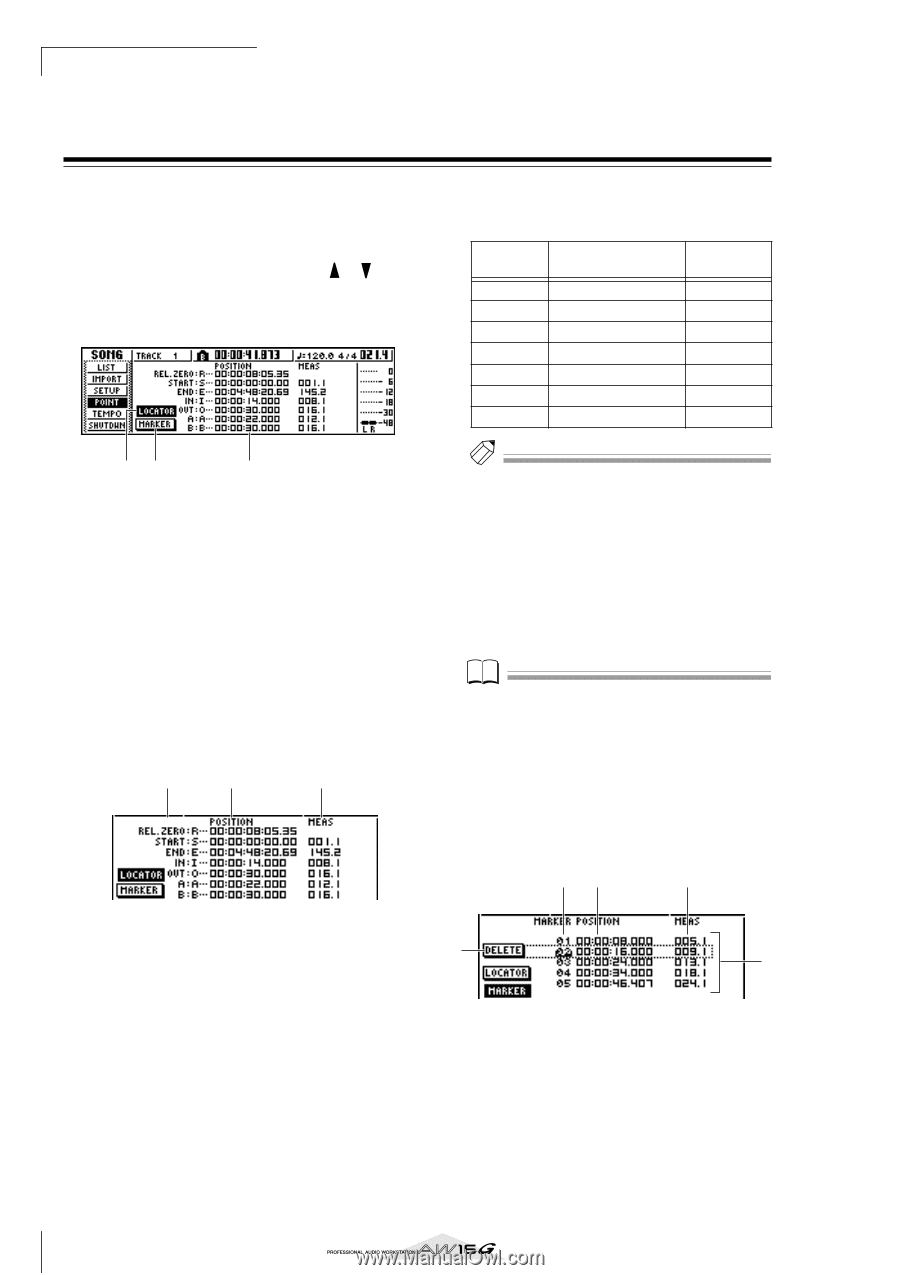
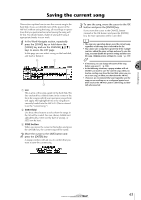
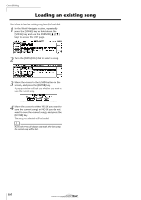
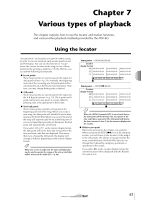
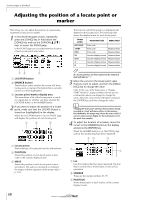
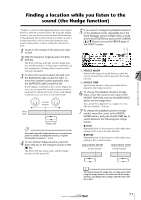
Various types of playback Adjusting the position of a locate point or marker Here's how you can adjust the position of a previouslyregistered locate point or marker. 1 In the Work Navigate section, repeatedly press the [SONG] key or hold down the [SONG] key and use the CURSOR [ ]/[ ] keys to access the POINT page. In the POINT page you can adjust the time location of each locate point and marker. 12 3 1 LOCATOR button B MARKER button These buttons select whether the screen will show locate points or markers. The button that is currently turned on will be highlighted. C Locator point/marker display area This area shows a list of the locate points or markers, depending on whether you have selected the LOCATOR button or the MARKER button. 2 If you want to adjust the position of a locate point, make sure that the LOCATE button is turned on (highlighted) in the display. When the LOCATOR button is on, the POINT page will display the positions of each locate point. 1 2 3 1 Locate points Shows the type of locate point and its abbreviation. B POSITION Shows the position of each locate point as time code or the counter display format. C MEAS Shows the position of each locate point as measures/beats. This value is calculated according to the tempo and time signature of the tempo map (→ p. 142). The format in which the position is displayed will depend on the locate point. The following table shows the display format for each locate point. Locate point REL.ZERO START END IN OUT A B POSITION field MEAS field Time code Time code Measure/beat Time code Measure/beat Counter display format Measure/beat Counter display format Measure/beat Counter display format Measure/beat Counter display format Measure/beat Tip! If a locate point has not been registered, the numerical field will indicate "-". 3 Move the cursor to the locate point value that you want to adjust, and turn the [DATA/ JOG] dial to change the value. Only in the case of the Start point, a "Change START Position?" popup window will ask you for confirmation when you attempt to change the value. Move the cursor to the OK button and press the [ENTER] key, and then change the value. Note Changing the Start point will mean that locations already recorded in a track will move relative to the measure lines defined by the tempo map. Please be aware of this if you are using measure display for the metronome or for the quick loop sampler. 4 To adjust the location of a marker, move the cursor to the MARKER button in the display and press the [ENTER] key. When the MARKER button is on, the POINT page will list the markers that have been registered. 23 4 5 1 1 List Lists the markers that have been registered. The line that is enclosed by a dotted frame is selected for operations. B MARKER These are the marker numbers 01-99. C POSITION Shows the position of each marker, in the counter display format. 68
-
 1
1 -
2
-
3
-
4
-
5
-
6
-
7
-
8
-
9
-
10
-
11
-
12
-
13
-
14
-
15
-
16
-
17
-
18
-
19
-
20
-
21
-
22
-
23
-
24
-
25
-
26
-
27
-
28
-
29
-
30
-
31
-
32
-
33
-
34
-
35
-
36
-
37
-
38
-
39
-
40
-
41
-
42
-
43
-
44
-
45
-
46
-
47
-
48
-
49
-
50
-
51
-
52
-
53
-
54
-
55
-
56
-
57
-
58
-
59
-
60
-
61
-
62
-
 63
63 -
 64
64 -
 65
65 -
 66
66 -
 67
67 -
 68
68 -
 69
69 -
 70
70 -
 71
71 -
 72
72 -
 73
73 -
74
-
75
-
76
-
77
-
78
-
79
-
80
-
81
-
82
-
83
-
84
-
85
-
86
-
87
-
88
-
89
-
90
-
91
-
92
-
93
-
94
-
95
-
96
-
97
-
98
-
99
-
100
-
101
-
102
-
103
-
104
-
105
-
106
-
107
-
108
-
109
-
110
-
111
-
112
-
113
-
114
-
115
-
116
-
117
-
118
-
119
-
120
-
121
-
122
-
123
-
124
-
125
-
126
-
127
-
128
-
129
-
130
-
131
-
132
-
133
-
134
-
135
-
136
-
137
-
138
-
139
-
140
-
141
-
142
-
143
-
144
-
145
-
146
-
147
-
148
-
149
-
150
-
151
-
152
-
153
-
154
-
155
-
156
-
157
-
158
-
159
-
160
-
161
-
162
-
163
-
164
-
165
-
166
-
167
-
168
-
169
-
170
-
171
-
172
-
173
-
174
-
175
-
176
-
177
-
178
-
179
-
180
-
181
-
182
-
183
-
184
-
185
-
186
-
187
-
188
-
189
-
190
-
191
-
192
-
193
-
194
-
195
-
196
-
197
-
198
-
199
-
200
-
201
-
202
-
203
-
204
-
205
-
206
-
207
-
208
-
209
-
210
-
211
-
212
-
213
-
214
-
215
-
216
-
217
-
218
-
219
 |
 |