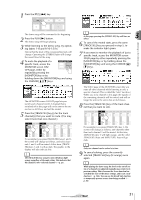
Yamaha AW16G Owner's Manual - Page 33
Recording to a sound clip, Connecting your instrument or mic, - connect to computer
 |
View all Yamaha AW16G manuals
Add to My Manuals
Save this manual to your list of manuals |
Page 33 highlights
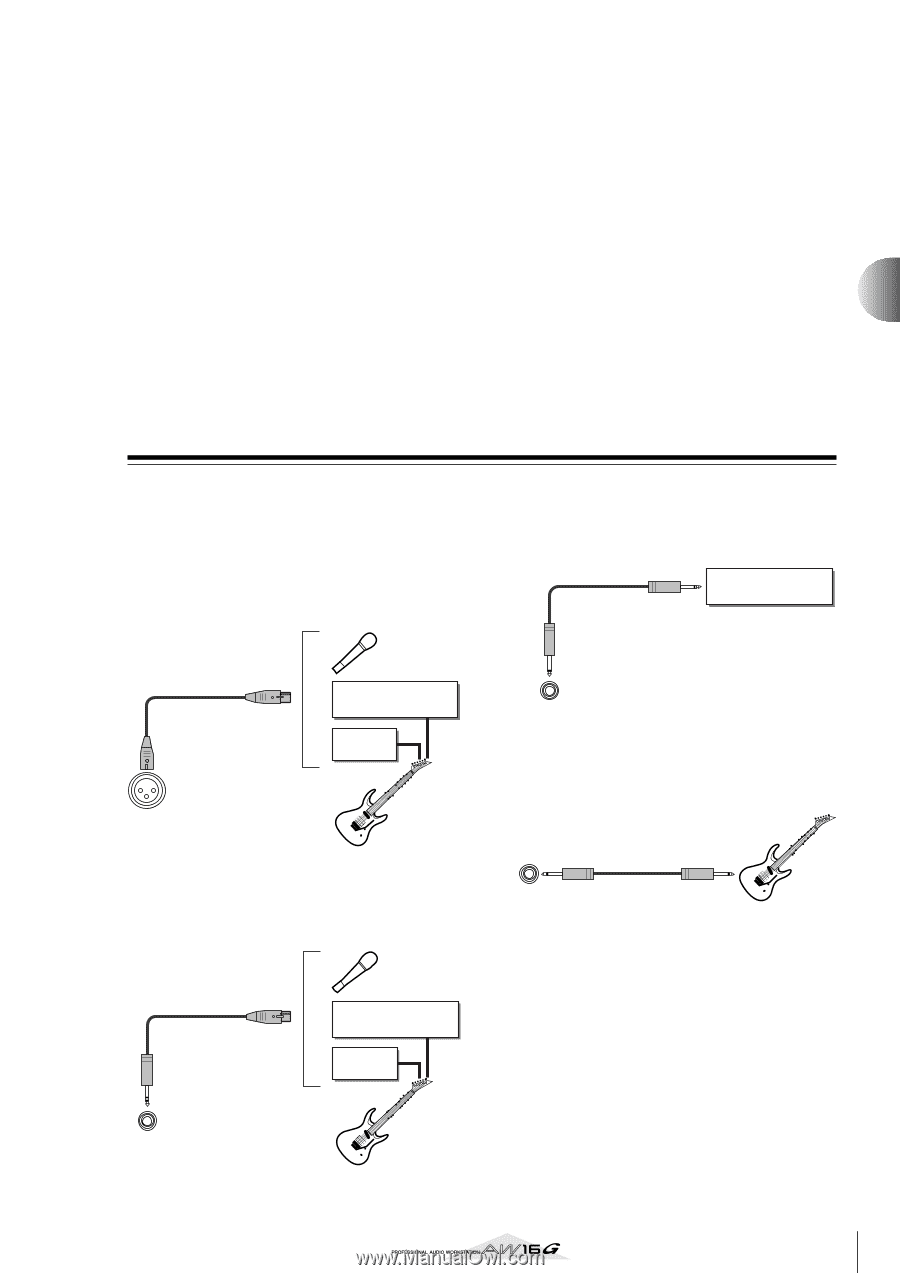
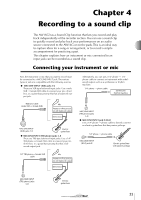
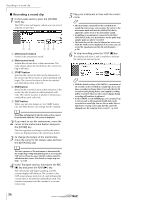
Chapter 4 Recording to a sound clip The AW16G has a Sound Clip function that lets you record and play back independently of the recorder section. You can use a sound clip to quickly record and play back your performances on an audio source connected to the AW16G or on the pads. This is an ideal way to capture ideas for a song or arrangement, or to record a simple accompaniment for practicing a part. This chapter explains how an instrument or mic connected to an input jack can be recorded as a sound clip. Connecting your instrument or mic First, the instrument or mic that you want to record must be connected to a MIC/LINE INPUT jack. The various types of jack are compatible with the following sources. ● MIC/LINE INPUT (XLR) jacks 1/2 These are XLR-type balanced input jacks. Use a male XLR ↔ female XLR cable to connect your mic, direct box, or a guitar/bass preamp that has a balanced output jack. Balanced cable (male XLR ↔ female XLR) Mic Preamp or effect processor with balanced output Direct box MIC/LINE INPUT (XLR) jacks 1/2 Electric guitar/bass ● MIC/LINE INPUT (TRS phone) jacks 3-8 These are TRS-type balanced input jacks. Use a 1/4" TRS phone ↔ female XLR cable to connect your mic, direct box, or a guitar/bass preamp that has a balanced output jack. 1/4" TRS phone ↔ female XLR cable Mic Preamp or effect processor with balanced output Direct box Alternatively, you can use a 1/4" phone ↔ 1/4" phone cable to connect an instrument with unbalanced output, such as a synthesizer or rhythm machine. 1/4" phone ↔ phone cable Synthesizer/ rhythm machine MIC/LINE INPUT (TRS phone) jacks 3-8 ● MIC/LINE INPUT jack 8 (Hi-Z) Use a 1/4" phone ↔ phone cable to directly connect an electric guitar/bass that has passive pickups. 1/4" phone ↔ phone cable MIC/LINE INPUT (HI-Z) jacks 8 Electric guitar/bass with passive pickups MIC/LINE INPUT (TRS phone) jacks 3-8 Electric guitar/bass 33
-
 1
1 -
2
-
3
-
4
-
5
-
6
-
7
-
8
-
9
-
10
-
11
-
12
-
13
-
14
-
15
-
16
-
17
-
18
-
19
-
20
-
21
-
22
-
23
-
24
-
25
-
26
-
27
-
 28
28 -
 29
29 -
 30
30 -
 31
31 -
 32
32 -
 33
33 -
 34
34 -
 35
35 -
 36
36 -
 37
37 -
 38
38 -
39
-
40
-
41
-
42
-
43
-
44
-
45
-
46
-
47
-
48
-
49
-
50
-
51
-
52
-
53
-
54
-
55
-
56
-
57
-
58
-
59
-
60
-
61
-
62
-
63
-
64
-
65
-
66
-
67
-
68
-
69
-
70
-
71
-
72
-
73
-
74
-
75
-
76
-
77
-
78
-
79
-
80
-
81
-
82
-
83
-
84
-
85
-
86
-
87
-
88
-
89
-
90
-
91
-
92
-
93
-
94
-
95
-
96
-
97
-
98
-
99
-
100
-
101
-
102
-
103
-
104
-
105
-
106
-
107
-
108
-
109
-
110
-
111
-
112
-
113
-
114
-
115
-
116
-
117
-
118
-
119
-
120
-
121
-
122
-
123
-
124
-
125
-
126
-
127
-
128
-
129
-
130
-
131
-
132
-
133
-
134
-
135
-
136
-
137
-
138
-
139
-
140
-
141
-
142
-
143
-
144
-
145
-
146
-
147
-
148
-
149
-
150
-
151
-
152
-
153
-
154
-
155
-
156
-
157
-
158
-
159
-
160
-
161
-
162
-
163
-
164
-
165
-
166
-
167
-
168
-
169
-
170
-
171
-
172
-
173
-
174
-
175
-
176
-
177
-
178
-
179
-
180
-
181
-
182
-
183
-
184
-
185
-
186
-
187
-
188
-
189
-
190
-
191
-
192
-
193
-
194
-
195
-
196
-
197
-
198
-
199
-
200
-
201
-
202
-
203
-
204
-
205
-
206
-
207
-
208
-
209
-
210
-
211
-
212
-
213
-
214
-
215
-
216
-
217
-
218
-
219
 |
 |