Yamaha AW16G Owner's Manual - Page 122
Deleting an unwanted sample
 |
View all Yamaha AW16G manuals
Add to My Manuals
Save this manual to your list of manuals |
Page 122 highlights
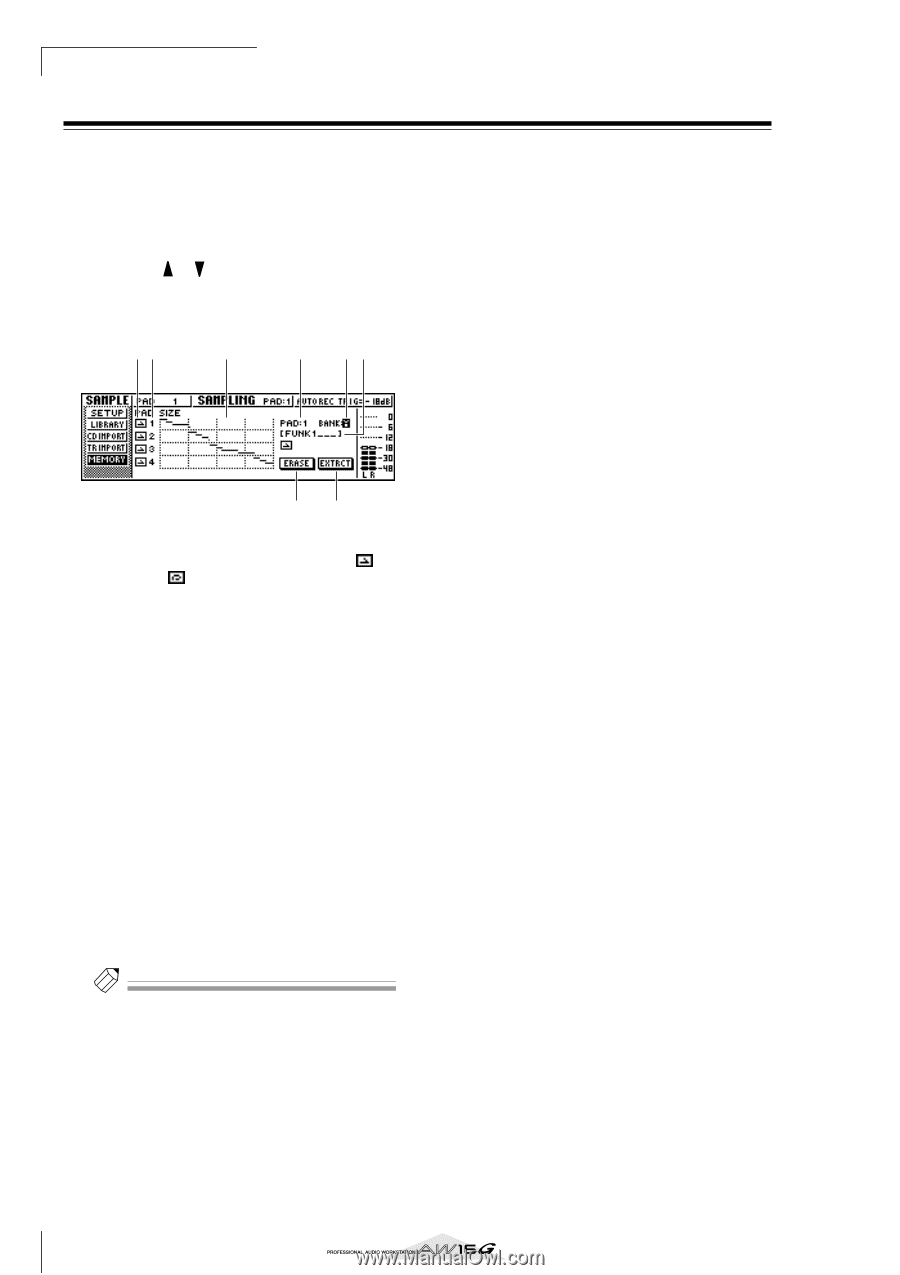
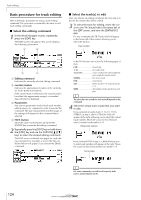
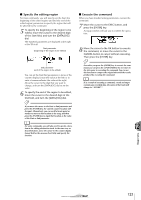
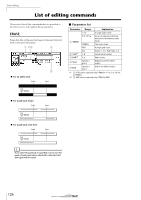
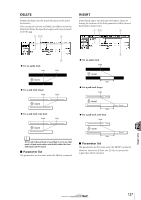
Quick loop sampler Deleting an unwanted sample Here's how you can delete unused data (before the start point and after the end point) from a specific sample, or completely erase an individual sample. 1 In the Quick Loop Sampler section, repeatedly press the [SAMPLE EDIT] key or hold down the [SAMPLE EDIT] key and use the CURSOR [ ]/[ ] keys to access the MEMORY page of the SAMPLE screen. In this page you can delete the unused portion of a sample, or erase an unwanted sample. 12 3 4 56 78 1 One Shot/Loop mode This icon indicates whether One Shot mode ( ) or Loop Mode ( ) is selected for the sample assigned to the pad. B Pad number Indicates the pad number 1-4. C Size This area graphically indicates the memory size of each sample. The horizontal line indicates the amount of memory used by each pad. D PAD E BANK These select the pad (1-4) and sample bank (A-D) to which the operation will apply. F Sample name Indicates the name of the sample for the pad and sample selected in 4 and 5. G ERASE button Erases the specified sample. H EXTRACT button Discards the unused portions (before the start point and after the end point) of the specified sample. Tip! For details on how to adjust the start point and end point of a sample, refer to page 118. 2 Move the cursor to the PAD/BANK fields, and turn the [DATA/JOG] dial to select the pad and sample bank. The procedure after this point will depend on the function that you want to execute. ■ To erase the entire sample 1 To erase the entire selected sample, move the cursor to the ERASE button and press the [ENTER] key. A popup window will ask you to confirm that you want to erase the sample. 2 To execute the erasure, move the cursor to the OK button and press the [ENTER] key. If you decide to cancel, move the cursor to the CANCEL button and press the [ENTER] key. ■ To delete the unused portions of the selected sample 1 Move the cursor to the EXTRACT button and press the [ENTER] key. A popup window will ask you to confirm that you want to delete the data. 2 To execute the deletion, move the cursor to the OK button and press the [ENTER] key. If you decide to cancel, move the cursor to the CANCEL button and press the [ENTER] key. 122
-
 1
1 -
2
-
3
-
4
-
5
-
6
-
7
-
8
-
9
-
10
-
11
-
12
-
13
-
14
-
15
-
16
-
17
-
18
-
19
-
20
-
21
-
22
-
23
-
24
-
25
-
26
-
27
-
28
-
29
-
30
-
31
-
32
-
33
-
34
-
35
-
36
-
37
-
38
-
39
-
40
-
41
-
42
-
43
-
44
-
45
-
46
-
47
-
48
-
49
-
50
-
51
-
52
-
53
-
54
-
55
-
56
-
57
-
58
-
59
-
60
-
61
-
62
-
63
-
64
-
65
-
66
-
67
-
68
-
69
-
70
-
71
-
72
-
73
-
74
-
75
-
76
-
77
-
78
-
79
-
80
-
81
-
82
-
83
-
84
-
85
-
86
-
87
-
88
-
89
-
90
-
91
-
92
-
93
-
94
-
95
-
96
-
97
-
98
-
99
-
100
-
101
-
102
-
103
-
104
-
105
-
106
-
107
-
108
-
109
-
110
-
111
-
112
-
113
-
114
-
115
-
116
-
 117
117 -
 118
118 -
 119
119 -
 120
120 -
 121
121 -
 122
122 -
 123
123 -
 124
124 -
 125
125 -
 126
126 -
 127
127 -
128
-
129
-
130
-
131
-
132
-
133
-
134
-
135
-
136
-
137
-
138
-
139
-
140
-
141
-
142
-
143
-
144
-
145
-
146
-
147
-
148
-
149
-
150
-
151
-
152
-
153
-
154
-
155
-
156
-
157
-
158
-
159
-
160
-
161
-
162
-
163
-
164
-
165
-
166
-
167
-
168
-
169
-
170
-
171
-
172
-
173
-
174
-
175
-
176
-
177
-
178
-
179
-
180
-
181
-
182
-
183
-
184
-
185
-
186
-
187
-
188
-
189
-
190
-
191
-
192
-
193
-
194
-
195
-
196
-
197
-
198
-
199
-
200
-
201
-
202
-
203
-
204
-
205
-
206
-
207
-
208
-
209
-
210
-
211
-
212
-
213
-
214
-
215
-
216
-
217
-
218
-
219
 |
 |