Yamaha AW16G Owner's Manual - Page 118
Trimming the playback region
 |
View all Yamaha AW16G manuals
Add to My Manuals
Save this manual to your list of manuals |
Page 118 highlights
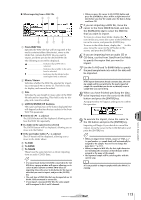
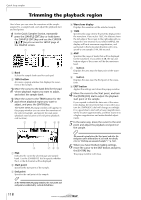
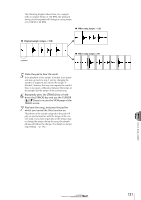
Quick loop sampler Trimming the playback region Here's how you can view the waveform of the sample assigned to a sample bank, and adjust the playback start and end points. 1 In the Quick Sampler Section, repeatedly press the [SAMPLE EDIT] key or hold down the [SAMPLE EDIT] key and use the CURSOR [ ]/[ ] keys to access the SETUP page of the SAMPLE screen. 1 2 1 Bank Selects the sample bank used for each pad. B TRIM button Accesses a popup window that displays the waveform of the sample. 2 Move the cursor to the bank field for the pad whose playback region you want to adjust, and select the sample bank. 3 Move the cursor to the TRIM button for the pad whose playback region you want to adjust, and press the [ENTER] key. The WAVE DISPLAY popup window will appear. In this popup window you can view the waveform of the selected sample, and specify the start point (playback start location) and end point (playback end location). 1 2 3 56 4 7 98 1 PAD Indicates the currently selected pad and sample bank. Use the [DATA/JOG] dial to specify whether the L or the R channel will be displayed. B Start point Specifies the start point of the sample. C End point Specifies the end point of the sample. Tip! In the WAVE DISPLAY popup window, the start point and end point are indicated by vertical dotted lines. D Waveform display Displays the waveform of the selected sample. E TIME Specifies the range of time that will be displayed for the waveform. If you select 1SEC, the distance from the left edge of the screen to the right edge will correspond to one second. If you select SAMPLE, the display will be at maximum magnification, and each pixel in the horizontal direction will correspond to one sample (1/44,100 second). F AMP Specifies the range of levels that will be displayed for the waveform. If you select 0 dB, the top and bottom edges of the screen will be the maximum level. G ← button Displays the area near the Start point of the waveform. H → button Displays the area near the End point of the waveform. I EXIT button Applies the settings and closes the popup window. 4 Move the cursor to the Start point, and turn the [DATA/JOG] dial to adjust the playback start point of the sample. If you expand or shrink the time axis of the waveform display, the movement that occurs when you turn the [DATA/JOG] dial will change accordingly. It is a good idea to start with a lower magnification, set the location approximately, and then zoom in to a higher magnification and make detailed adjustments. 5 In the same way, move the cursor to the end point and adjust the playback end point of the sample. Tip! The unused region before the Start point and after the End point can be deleted later if you wish. For details, refer to "Deleting an unwanted sample" (→ p. 122). 6 When you have finished making settings, move the cursor to the EXIT button and press the [ENTER] key. The popup window will close. 118
-
 1
1 -
2
-
3
-
4
-
5
-
6
-
7
-
8
-
9
-
10
-
11
-
12
-
13
-
14
-
15
-
16
-
17
-
18
-
19
-
20
-
21
-
22
-
23
-
24
-
25
-
26
-
27
-
28
-
29
-
30
-
31
-
32
-
33
-
34
-
35
-
36
-
37
-
38
-
39
-
40
-
41
-
42
-
43
-
44
-
45
-
46
-
47
-
48
-
49
-
50
-
51
-
52
-
53
-
54
-
55
-
56
-
57
-
58
-
59
-
60
-
61
-
62
-
63
-
64
-
65
-
66
-
67
-
68
-
69
-
70
-
71
-
72
-
73
-
74
-
75
-
76
-
77
-
78
-
79
-
80
-
81
-
82
-
83
-
84
-
85
-
86
-
87
-
88
-
89
-
90
-
91
-
92
-
93
-
94
-
95
-
96
-
97
-
98
-
99
-
100
-
101
-
102
-
103
-
104
-
105
-
106
-
107
-
108
-
109
-
110
-
111
-
112
-
 113
113 -
 114
114 -
 115
115 -
 116
116 -
 117
117 -
 118
118 -
 119
119 -
 120
120 -
 121
121 -
 122
122 -
 123
123 -
124
-
125
-
126
-
127
-
128
-
129
-
130
-
131
-
132
-
133
-
134
-
135
-
136
-
137
-
138
-
139
-
140
-
141
-
142
-
143
-
144
-
145
-
146
-
147
-
148
-
149
-
150
-
151
-
152
-
153
-
154
-
155
-
156
-
157
-
158
-
159
-
160
-
161
-
162
-
163
-
164
-
165
-
166
-
167
-
168
-
169
-
170
-
171
-
172
-
173
-
174
-
175
-
176
-
177
-
178
-
179
-
180
-
181
-
182
-
183
-
184
-
185
-
186
-
187
-
188
-
189
-
190
-
191
-
192
-
193
-
194
-
195
-
196
-
197
-
198
-
199
-
200
-
201
-
202
-
203
-
204
-
205
-
206
-
207
-
208
-
209
-
210
-
211
-
212
-
213
-
214
-
215
-
216
-
217
-
218
-
219
 |
 |
