Cisco IE-3000-8TC Administration Guide - Page 476
Using a Network Cable to Set Up Server Access to the Network, What to Do Next, Procedure
 |
View all Cisco IE-3000-8TC manuals
Add to My Manuals
Save this manual to your list of manuals |
Page 476 highlights
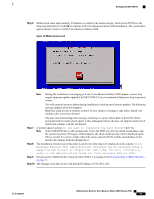
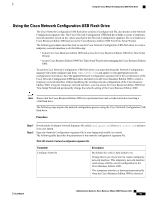
Using a Network Cable to Set Up Server Access to the Network What to Do Next To ensure that the server is recognized on the network, perform one of the following procedures: • Using a Network Cable to Set Up Server Access to the Network, on page 456 • Using the Cisco Network Configuration USB Flash Drive, on page 457 Using a Network Cable to Set Up Server Access to the Network Your server comes preinstalled with a default IP address of 192.168.1.250. To ensure that the Cisco Business Edition 3000 server is recognized by the network, you must either use the Cisco Network Configuration USB flash drive, as described in Using the Cisco Network Configuration USB Flash Drive, on page 457 or you must connect an Ethernet cable from the server to a laptop, as described in the following procedure. Procedure Step 1 On the laptop, set the IP address to 192.168.1.10 or another IP address in the same subnet. Caution Do not set the IP address of the laptop to the default IP address of the server. Step 2 Step 3 Step 4 Step 5 On the laptop, set your netmask to 255.255.255.0 and if required by your operating system, add a default-gateway address from the same network. Otherwise, leave this setting blank. Connect the Ethernet cable from the server to the laptop. You may use a crossover cable or a straight Ethernet cable. If you have a Cisco-provided country pack, licenses, and the Cisco-provided .xls data configuration file on a USB flash drive, insert the USB flash drive into the server. Log in to the Cisco Business Edition 3000 First Time Setup Wizard by using the default IP address of the server (192.168.1.250). Specify the username and password as follows: • Username: admin • Password: BE-3000 After you log in, you can update the network parameters, including the IP address of the server, In one of two ways: • On the Network page in the Cisco Business Edition 3000 First Time Setup Wizard (during the initial deployment) • By uploading the Cisco-provided .xls data configuration file in the Cisco Business Edition 3000 First Time Setup Wizard (during the initial deployment) Step 6 After you complete the Cisco Business Edition 3000 First Time Setup Wizard and the server restarts, you may disconnect the Ethernet cable from the laptop and server. Connect the laptop to the switch. If you have not already done so, connect the server to the switch so that the setup continues. Administration Guide for Cisco Business Edition 3000, Release 8.6(4) 456 OL-27022-01
-
 1
1 -
2
-
3
-
4
-
5
-
6
-
7
-
8
-
9
-
10
-
11
-
12
-
13
-
14
-
15
-
16
-
17
-
18
-
19
-
20
-
21
-
22
-
23
-
24
-
25
-
26
-
27
-
28
-
29
-
30
-
31
-
32
-
33
-
34
-
35
-
36
-
37
-
38
-
39
-
40
-
41
-
42
-
43
-
44
-
45
-
46
-
47
-
48
-
49
-
50
-
51
-
52
-
53
-
54
-
55
-
56
-
57
-
58
-
59
-
60
-
61
-
62
-
63
-
64
-
65
-
66
-
67
-
68
-
69
-
70
-
71
-
72
-
73
-
74
-
75
-
76
-
77
-
78
-
79
-
80
-
81
-
82
-
83
-
84
-
85
-
86
-
87
-
88
-
89
-
90
-
91
-
92
-
93
-
94
-
95
-
96
-
97
-
98
-
99
-
100
-
101
-
102
-
103
-
104
-
105
-
106
-
107
-
108
-
109
-
110
-
111
-
112
-
113
-
114
-
115
-
116
-
117
-
118
-
119
-
120
-
121
-
122
-
123
-
124
-
125
-
126
-
127
-
128
-
129
-
130
-
131
-
132
-
133
-
134
-
135
-
136
-
137
-
138
-
139
-
140
-
141
-
142
-
143
-
144
-
145
-
146
-
147
-
148
-
149
-
150
-
151
-
152
-
153
-
154
-
155
-
156
-
157
-
158
-
159
-
160
-
161
-
162
-
163
-
164
-
165
-
166
-
167
-
168
-
169
-
170
-
171
-
172
-
173
-
174
-
175
-
176
-
177
-
178
-
179
-
180
-
181
-
182
-
183
-
184
-
185
-
186
-
187
-
188
-
189
-
190
-
191
-
192
-
193
-
194
-
195
-
196
-
197
-
198
-
199
-
200
-
201
-
202
-
203
-
204
-
205
-
206
-
207
-
208
-
209
-
210
-
211
-
212
-
213
-
214
-
215
-
216
-
217
-
218
-
219
-
220
-
221
-
222
-
223
-
224
-
225
-
226
-
227
-
228
-
229
-
230
-
231
-
232
-
233
-
234
-
235
-
236
-
237
-
238
-
239
-
240
-
241
-
242
-
243
-
244
-
245
-
246
-
247
-
248
-
249
-
250
-
251
-
252
-
253
-
254
-
255
-
256
-
257
-
258
-
259
-
260
-
261
-
262
-
263
-
264
-
265
-
266
-
267
-
268
-
269
-
270
-
271
-
272
-
273
-
274
-
275
-
276
-
277
-
278
-
279
-
280
-
281
-
282
-
283
-
284
-
285
-
286
-
287
-
288
-
289
-
290
-
291
-
292
-
293
-
294
-
295
-
296
-
297
-
298
-
299
-
300
-
301
-
302
-
303
-
304
-
305
-
306
-
307
-
308
-
309
-
310
-
311
-
312
-
313
-
314
-
315
-
316
-
317
-
318
-
319
-
320
-
321
-
322
-
323
-
324
-
325
-
326
-
327
-
328
-
329
-
330
-
331
-
332
-
333
-
334
-
335
-
336
-
337
-
338
-
339
-
340
-
341
-
342
-
343
-
344
-
345
-
346
-
347
-
348
-
349
-
350
-
351
-
352
-
353
-
354
-
355
-
356
-
357
-
358
-
359
-
360
-
361
-
362
-
363
-
364
-
365
-
366
-
367
-
368
-
369
-
370
-
371
-
372
-
373
-
374
-
375
-
376
-
377
-
378
-
379
-
380
-
381
-
382
-
383
-
384
-
385
-
386
-
387
-
388
-
389
-
390
-
391
-
392
-
393
-
394
-
395
-
396
-
397
-
398
-
399
-
400
-
401
-
402
-
403
-
404
-
405
-
406
-
407
-
408
-
409
-
410
-
411
-
412
-
413
-
414
-
415
-
416
-
417
-
418
-
419
-
420
-
421
-
422
-
423
-
424
-
425
-
426
-
427
-
428
-
429
-
430
-
431
-
432
-
433
-
434
-
435
-
436
-
437
-
438
-
439
-
440
-
441
-
442
-
443
-
444
-
445
-
446
-
447
-
448
-
449
-
450
-
451
-
452
-
453
-
454
-
455
-
456
-
457
-
458
-
459
-
460
-
461
-
462
-
463
-
464
-
465
-
466
-
467
-
468
-
469
-
470
-
 471
471 -
 472
472 -
 473
473 -
 474
474 -
 475
475 -
 476
476 -
 477
477 -
 478
478 -
 479
479 -
 480
480 -
 481
481 -
482
-
483
-
484
-
485
-
486
-
487
-
488
-
489
-
490
-
491
-
492
-
493
-
494
-
495
-
496
 |
 |
