Cisco SA520-K9 Administration Guide - Page 106
Configuring IP Aliases for WAN interfaces, Networking > WAN > IP Alias
 |
UPC - 882658266744
View all Cisco SA520-K9 manuals
Add to My Manuals
Save this manual to your list of manuals |
Page 106 highlights
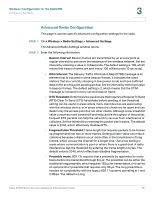
Firewall Configuration Configuring Firewall Rules to Control Inbound and Outbound Traffic 4 STEP 1 Click Firewall > Firewall > Schedules, or from the Getting Started (Advanced) page, under Firewall and NAT Rules, click Configure Schedules (Optional). The Firewall Schedules window opens. Any existing schedules appear in the List of Available Schedules table. STEP 2 To create a new schedule, click Add. Other options: Click the Edit button to edit an entry. To delete an entry, check the box and then click Delete. To select all entries, check the box in the first column of the table heading. To select all entries, check the box in the first column of the table heading. After you click Add or Edit, the Schedules window opens. STEP 3 Enter the following information: • Schedule Name: Enter a name for the schedule. The name will appear in the Select Schedule drop-down list on the Firewall Rule Configuration page. • Scheduled Days: From the drop-down list, choose All Days or Specific Days. If you choose Specific Days, also check the days for this schedule. • Schedule Time of Day: From the drop-down list, choose All Day or Specific Times. If you choose Specific Times, also enter the Start Time and the End Time by entering the hour, minute, and AM or PM. STEP 4 Click Apply to save your settings. If you are using the Getting Started (Advanced) page, click Getting Started > Advanced to continue with the list of configuration tasks under Firewall and NAT Rules. Configuring IP Aliases for WAN interfaces IP aliases are useful when you have additional public IP address provided by your ISP and you want to these addresses to reach devices on your local network. STEP 1 Click Networking > WAN > IP Alias. STEP 2 To add IP Aliases, click Add. STEP 3 Choose the WAN interface from the Interface drop-down menu. This is the interface where you will add the IP address to. Cisco SA500 Series Security Appliances Administration Guide 106
-
 1
1 -
2
-
3
-
4
-
5
-
6
-
7
-
8
-
9
-
10
-
11
-
12
-
13
-
14
-
15
-
16
-
17
-
18
-
19
-
20
-
21
-
22
-
23
-
24
-
25
-
26
-
27
-
28
-
29
-
30
-
31
-
32
-
33
-
34
-
35
-
36
-
37
-
38
-
39
-
40
-
41
-
42
-
43
-
44
-
45
-
46
-
47
-
48
-
49
-
50
-
51
-
52
-
53
-
54
-
55
-
56
-
57
-
58
-
59
-
60
-
61
-
62
-
63
-
64
-
65
-
66
-
67
-
68
-
69
-
70
-
71
-
72
-
73
-
74
-
75
-
76
-
77
-
78
-
79
-
80
-
81
-
82
-
83
-
84
-
85
-
86
-
87
-
88
-
89
-
90
-
91
-
92
-
93
-
94
-
95
-
96
-
97
-
98
-
99
-
100
-
 101
101 -
 102
102 -
 103
103 -
 104
104 -
 105
105 -
 106
106 -
 107
107 -
 108
108 -
 109
109 -
 110
110 -
 111
111 -
112
-
113
-
114
-
115
-
116
-
117
-
118
-
119
-
120
-
121
-
122
-
123
-
124
-
125
-
126
-
127
-
128
-
129
-
130
-
131
-
132
-
133
-
134
-
135
-
136
-
137
-
138
-
139
-
140
-
141
-
142
-
143
-
144
-
145
-
146
-
147
-
148
-
149
-
150
-
151
-
152
-
153
-
154
-
155
-
156
-
157
-
158
-
159
-
160
-
161
-
162
-
163
-
164
-
165
-
166
-
167
-
168
-
169
-
170
-
171
-
172
-
173
-
174
-
175
-
176
-
177
-
178
-
179
-
180
-
181
-
182
-
183
-
184
-
185
-
186
-
187
-
188
-
189
-
190
-
191
-
192
-
193
-
194
-
195
-
196
-
197
-
198
-
199
-
200
-
201
-
202
-
203
-
204
-
205
-
206
-
207
-
208
-
209
-
210
-
211
-
212
-
213
-
214
-
215
-
216
-
217
-
218
-
219
-
220
-
221
-
222
-
223
-
224
-
225
-
226
-
227
-
228
-
229
-
230
-
231
-
232
-
233
-
234
-
235
-
236
-
237
-
238
-
239
-
240
 |
 |
