Cisco SA520-K9 Administration Guide - Page 165
SSL VPN Tunnel Client Configuration, Configuring Host Name Resolution for Port Forwarding
 |
UPC - 882658266744
View all Cisco SA520-K9 manuals
Add to My Manuals
Save this manual to your list of manuals |
Page 165 highlights
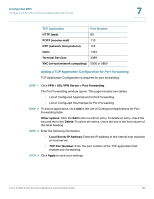
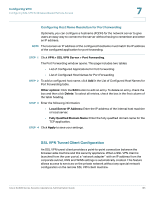
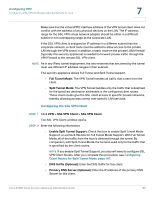
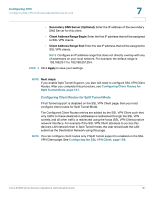
Configuring VPN Configuring SSL VPN for Browser-Based Remote Access 7 Configuring Host Name Resolution for Port Forwarding Optionally, you can configure a hostname (FQDN) for the network server to give users an easy way to connect to the server without having to remember and enter an IP address. NOTE The local server IP address of the configured hostname must match the IP address of the configured application for port forwarding. STEP 1 Click VPN > SSL VPN Server > Port Forwarding. The Port Forwarding window opens. This page includes two tables: • List of Configured Applications for Port Forwarding • List of Configured Host Names for Port Forwarding STEP 2 To add a configured host name, click Add in the List of Configured Host Names for Port Forwarding table. Other options: Click the Edit button to edit an entry. To delete an entry, check the box and then click Delete. To select all entries, check the box in the first column of the table heading. STEP 3 Enter the following information: • Local Server IP Address: Enter the IP address of the internal host machine or local server. • Fully Qualified Domain Name: Enter the fully qualified domain name for the TCP application. STEP 4 Click Apply to save your settings. SSL VPN Tunnel Client Configuration An SSL VPN tunnel client provides a point-to-point connection between the browser-side machine and this security appliance. When a SSL VPN client is launched from the user portal, a "network adapter" with an IP address from the corporate subnet, DNS and WINS settings is automatically created. This feature allows access to services on the private network without any special network configuration on the remote SSL VPN client machine. Cisco SA500 Series Security Appliances Administration Guide 165
-
 1
1 -
2
-
3
-
4
-
5
-
6
-
7
-
8
-
9
-
10
-
11
-
12
-
13
-
14
-
15
-
16
-
17
-
18
-
19
-
20
-
21
-
22
-
23
-
24
-
25
-
26
-
27
-
28
-
29
-
30
-
31
-
32
-
33
-
34
-
35
-
36
-
37
-
38
-
39
-
40
-
41
-
42
-
43
-
44
-
45
-
46
-
47
-
48
-
49
-
50
-
51
-
52
-
53
-
54
-
55
-
56
-
57
-
58
-
59
-
60
-
61
-
62
-
63
-
64
-
65
-
66
-
67
-
68
-
69
-
70
-
71
-
72
-
73
-
74
-
75
-
76
-
77
-
78
-
79
-
80
-
81
-
82
-
83
-
84
-
85
-
86
-
87
-
88
-
89
-
90
-
91
-
92
-
93
-
94
-
95
-
96
-
97
-
98
-
99
-
100
-
101
-
102
-
103
-
104
-
105
-
106
-
107
-
108
-
109
-
110
-
111
-
112
-
113
-
114
-
115
-
116
-
117
-
118
-
119
-
120
-
121
-
122
-
123
-
124
-
125
-
126
-
127
-
128
-
129
-
130
-
131
-
132
-
133
-
134
-
135
-
136
-
137
-
138
-
139
-
140
-
141
-
142
-
143
-
144
-
145
-
146
-
147
-
148
-
149
-
150
-
151
-
152
-
153
-
154
-
155
-
156
-
157
-
158
-
159
-
 160
160 -
 161
161 -
 162
162 -
 163
163 -
 164
164 -
 165
165 -
 166
166 -
 167
167 -
 168
168 -
 169
169 -
 170
170 -
171
-
172
-
173
-
174
-
175
-
176
-
177
-
178
-
179
-
180
-
181
-
182
-
183
-
184
-
185
-
186
-
187
-
188
-
189
-
190
-
191
-
192
-
193
-
194
-
195
-
196
-
197
-
198
-
199
-
200
-
201
-
202
-
203
-
204
-
205
-
206
-
207
-
208
-
209
-
210
-
211
-
212
-
213
-
214
-
215
-
216
-
217
-
218
-
219
-
220
-
221
-
222
-
223
-
224
-
225
-
226
-
227
-
228
-
229
-
230
-
231
-
232
-
233
-
234
-
235
-
236
-
237
-
238
-
239
-
240
 |
 |
