Cisco SA520-K9 Administration Guide - Page 23
Basic Tasks, Changing the Default User Name and Password - admin guide
 |
UPC - 882658266744
View all Cisco SA520-K9 manuals
Add to My Manuals
Save this manual to your list of manuals |
Page 23 highlights
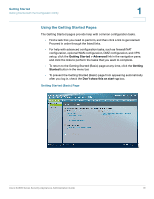
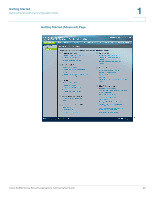
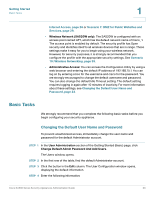
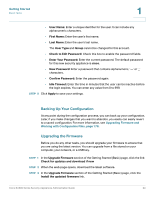
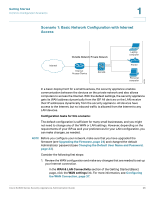
Getting Started Basic Tasks 1 Internet Access, page 26 or Scenario 7: DMZ for Public Websites and Services, page 29. • Wireless Network (SA520W only): The SA520W is configured with an access point named AP1, which has the default network name of Cisco_1. The access point is enabled by default. The security profile has Open security and identifies itself to all wireless devices that are in range. These settings make it easy for you to begin using your wireless network. However, for security purposes, it is strongly recommended that you configure the profile with the appropriate security settings. See Scenario 10: Wireless Networking, page 35. • Administrative Access: You can access the Configuration Utility by using a web browser and entering the default IP address of 192.168.75.1. You can log on by entering cisco for the username and cisco for the password. You are strongly encouraged to change the default username and password. You can also change the default Idle Timeout setting. The default setting requires logging in again after 10 minutes of inactivity. For more information about these settings, see Changing the Default User Name and Password, page 23. Basic Tasks We strongly recommend that you complete the following basic tasks before you begin configuring your security appliance. Changing the Default User Name and Password To prevent unauthorized access, immediately change the user name and password for the default Administrator account. STEP 1 In the User Administration section of the Getting Started (Basic) page, click Change Default Admin Password And Add Users. The Users window opens. STEP 2 In the first row of the table, find the default Administrator account. STEP 3 Click the button in the Edit column. The User Configuration window opens, displaying the default information. STEP 4 Enter the following information: Cisco SA500 Series Security Appliances Administration Guide 23
-
 1
1 -
2
-
3
-
4
-
5
-
6
-
7
-
8
-
9
-
10
-
11
-
12
-
13
-
14
-
15
-
16
-
17
-
 18
18 -
 19
19 -
 20
20 -
 21
21 -
 22
22 -
 23
23 -
 24
24 -
 25
25 -
 26
26 -
 27
27 -
 28
28 -
29
-
30
-
31
-
32
-
33
-
34
-
35
-
36
-
37
-
38
-
39
-
40
-
41
-
42
-
43
-
44
-
45
-
46
-
47
-
48
-
49
-
50
-
51
-
52
-
53
-
54
-
55
-
56
-
57
-
58
-
59
-
60
-
61
-
62
-
63
-
64
-
65
-
66
-
67
-
68
-
69
-
70
-
71
-
72
-
73
-
74
-
75
-
76
-
77
-
78
-
79
-
80
-
81
-
82
-
83
-
84
-
85
-
86
-
87
-
88
-
89
-
90
-
91
-
92
-
93
-
94
-
95
-
96
-
97
-
98
-
99
-
100
-
101
-
102
-
103
-
104
-
105
-
106
-
107
-
108
-
109
-
110
-
111
-
112
-
113
-
114
-
115
-
116
-
117
-
118
-
119
-
120
-
121
-
122
-
123
-
124
-
125
-
126
-
127
-
128
-
129
-
130
-
131
-
132
-
133
-
134
-
135
-
136
-
137
-
138
-
139
-
140
-
141
-
142
-
143
-
144
-
145
-
146
-
147
-
148
-
149
-
150
-
151
-
152
-
153
-
154
-
155
-
156
-
157
-
158
-
159
-
160
-
161
-
162
-
163
-
164
-
165
-
166
-
167
-
168
-
169
-
170
-
171
-
172
-
173
-
174
-
175
-
176
-
177
-
178
-
179
-
180
-
181
-
182
-
183
-
184
-
185
-
186
-
187
-
188
-
189
-
190
-
191
-
192
-
193
-
194
-
195
-
196
-
197
-
198
-
199
-
200
-
201
-
202
-
203
-
204
-
205
-
206
-
207
-
208
-
209
-
210
-
211
-
212
-
213
-
214
-
215
-
216
-
217
-
218
-
219
-
220
-
221
-
222
-
223
-
224
-
225
-
226
-
227
-
228
-
229
-
230
-
231
-
232
-
233
-
234
-
235
-
236
-
237
-
238
-
239
-
240
 |
 |
