Cisco SA520-K9 Administration Guide - Page 160
Creating the SSL VPN Policies, User Name, First Name, User Type, SSL VPN User, Select Group, SSLVPN
 |
UPC - 882658266744
View all Cisco SA520-K9 manuals
Add to My Manuals
Save this manual to your list of manuals |
Page 160 highlights
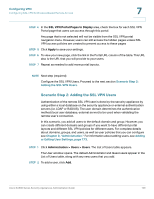
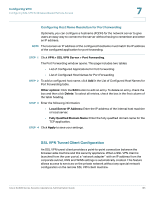
Configuring VPN Configuring SSL VPN for Browser-Based Remote Access 7 The User Configuration window opens. STEP 3 Enter the following information: • User Name: Enter a unique identifier for the user. It can include any alphanumeric characters. • First Name: Enter the user's first name. • Last Name: Enter the user's last name. • User Type: Choose SSL VPN User. • Select Group: Choose SSLVPN. • Password: Enter a password that contains alphanumeric, '-' or '_' characters. • Confirm Password: Enter the password again. • Idle Timeout: Enter the time in minutes that the user can be inactive before the session is disconnected. Enter any value from 0 to 999. The timeout value for the individual user has precedence over the timeout for the group. If the user's timeout value is set to 0, the group timeout setting applies. NOTE Every user is added as a local user with password, and when the user is assigned to an external authentication mechanism based on the group, certain attributes such as the local password are ignored. STEP 4 Click Apply to save your settings. Creating the SSL VPN Policies SSL VPN Policies give configured SSL users access to services and network resources. A policy applies to a specific network resource, IP address, or IP address range on the LAN, or to other SSL VPN services that are supported by the security appliance. By default, a global PERMIT policy (not displayed) is preconfigured over all addresses and over all services and ports. You can create user, group, and global policies. Policies are applied based on the following levels of precedence: • User-level policies take precedence over Group-level policies. • Group-level policies take precedence over Global policies. Cisco SA500 Series Security Appliances Administration Guide 160
-
 1
1 -
2
-
3
-
4
-
5
-
6
-
7
-
8
-
9
-
10
-
11
-
12
-
13
-
14
-
15
-
16
-
17
-
18
-
19
-
20
-
21
-
22
-
23
-
24
-
25
-
26
-
27
-
28
-
29
-
30
-
31
-
32
-
33
-
34
-
35
-
36
-
37
-
38
-
39
-
40
-
41
-
42
-
43
-
44
-
45
-
46
-
47
-
48
-
49
-
50
-
51
-
52
-
53
-
54
-
55
-
56
-
57
-
58
-
59
-
60
-
61
-
62
-
63
-
64
-
65
-
66
-
67
-
68
-
69
-
70
-
71
-
72
-
73
-
74
-
75
-
76
-
77
-
78
-
79
-
80
-
81
-
82
-
83
-
84
-
85
-
86
-
87
-
88
-
89
-
90
-
91
-
92
-
93
-
94
-
95
-
96
-
97
-
98
-
99
-
100
-
101
-
102
-
103
-
104
-
105
-
106
-
107
-
108
-
109
-
110
-
111
-
112
-
113
-
114
-
115
-
116
-
117
-
118
-
119
-
120
-
121
-
122
-
123
-
124
-
125
-
126
-
127
-
128
-
129
-
130
-
131
-
132
-
133
-
134
-
135
-
136
-
137
-
138
-
139
-
140
-
141
-
142
-
143
-
144
-
145
-
146
-
147
-
148
-
149
-
150
-
151
-
152
-
153
-
154
-
 155
155 -
 156
156 -
 157
157 -
 158
158 -
 159
159 -
 160
160 -
 161
161 -
 162
162 -
 163
163 -
 164
164 -
 165
165 -
166
-
167
-
168
-
169
-
170
-
171
-
172
-
173
-
174
-
175
-
176
-
177
-
178
-
179
-
180
-
181
-
182
-
183
-
184
-
185
-
186
-
187
-
188
-
189
-
190
-
191
-
192
-
193
-
194
-
195
-
196
-
197
-
198
-
199
-
200
-
201
-
202
-
203
-
204
-
205
-
206
-
207
-
208
-
209
-
210
-
211
-
212
-
213
-
214
-
215
-
216
-
217
-
218
-
219
-
220
-
221
-
222
-
223
-
224
-
225
-
226
-
227
-
228
-
229
-
230
-
231
-
232
-
233
-
234
-
235
-
236
-
237
-
238
-
239
-
240
 |
 |
