Cisco SA520-K9 Administration Guide - Page 187
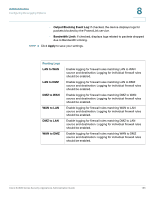
IPv6 Logging, Administration, > Logging > IPv6 Logging, Accepted Packets, LAN to WAN
 |
UPC - 882658266744
View all Cisco SA520-K9 manuals
Add to My Manuals
Save this manual to your list of manuals |
Page 187 highlights
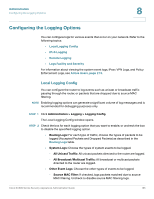
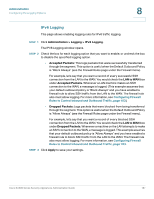
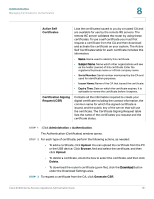
Administration Configuring the Logging Options 8 IPv6 Logging This page allows enabling logging rules for IPv6 traffic logging. STEP 1 Click Administration > Logging > IPv6 Logging. The IPV6 Logging window opens. STEP 2 Check the box for each logging option that you want to enable, or uncheck the box to disable the specified logging option. • Accepted Packets: This logs packets that were successfully transferred through the segment. This option is useful when the Default Outbound Policy is "Block Always" (see the Firewall Rules page under the Firewall menu). For example, let's say that you want a record of every successful SSH connection from the LAN to the WAN. You would check the LAN to WAN box under Accepted Packets. Whenever a LAN machine makes an SSH connection to the WAN, a message is logged. (This example assumes that your default outbound policy is "Block Always" and you have enabled a firewall rule to allow SSH traffic from the LAN to the WAN. The firewall rule also must allow logging. For more information, see Configuring Firewall Rules to Control Inbound and Outbound Traffic, page 103.) • Dropped Packets: Logs packets that were blocked from being transferred through the segment. This option is useful when the Default Outbound Policy is "Allow Always" (see the Firewall Rules page under the Firewall menu). For example, let's say that you want a record of every blocked SSH connection from the LAN to the WAN. You would check the LAN to WAN box under Dropped Packets. Whenever a machine on the LAN attempts to make an SSH connection to the WAN, a message is logged. This example assumes that your default outbound policy is "Allow Always" and you have enabled a firewall rule to block SSH traffic from the LAN to the WAN. The firewall rule also must allow logging. For more information, see Configuring Firewall Rules to Control Inbound and Outbound Traffic, page 103. STEP 3 Click Apply to save your settings. Cisco SA500 Series Security Appliances Administration Guide 187
-
 1
1 -
2
-
3
-
4
-
5
-
6
-
7
-
8
-
9
-
10
-
11
-
12
-
13
-
14
-
15
-
16
-
17
-
18
-
19
-
20
-
21
-
22
-
23
-
24
-
25
-
26
-
27
-
28
-
29
-
30
-
31
-
32
-
33
-
34
-
35
-
36
-
37
-
38
-
39
-
40
-
41
-
42
-
43
-
44
-
45
-
46
-
47
-
48
-
49
-
50
-
51
-
52
-
53
-
54
-
55
-
56
-
57
-
58
-
59
-
60
-
61
-
62
-
63
-
64
-
65
-
66
-
67
-
68
-
69
-
70
-
71
-
72
-
73
-
74
-
75
-
76
-
77
-
78
-
79
-
80
-
81
-
82
-
83
-
84
-
85
-
86
-
87
-
88
-
89
-
90
-
91
-
92
-
93
-
94
-
95
-
96
-
97
-
98
-
99
-
100
-
101
-
102
-
103
-
104
-
105
-
106
-
107
-
108
-
109
-
110
-
111
-
112
-
113
-
114
-
115
-
116
-
117
-
118
-
119
-
120
-
121
-
122
-
123
-
124
-
125
-
126
-
127
-
128
-
129
-
130
-
131
-
132
-
133
-
134
-
135
-
136
-
137
-
138
-
139
-
140
-
141
-
142
-
143
-
144
-
145
-
146
-
147
-
148
-
149
-
150
-
151
-
152
-
153
-
154
-
155
-
156
-
157
-
158
-
159
-
160
-
161
-
162
-
163
-
164
-
165
-
166
-
167
-
168
-
169
-
170
-
171
-
172
-
173
-
174
-
175
-
176
-
177
-
178
-
179
-
180
-
181
-
 182
182 -
 183
183 -
 184
184 -
 185
185 -
 186
186 -
 187
187 -
 188
188 -
 189
189 -
 190
190 -
 191
191 -
 192
192 -
193
-
194
-
195
-
196
-
197
-
198
-
199
-
200
-
201
-
202
-
203
-
204
-
205
-
206
-
207
-
208
-
209
-
210
-
211
-
212
-
213
-
214
-
215
-
216
-
217
-
218
-
219
-
220
-
221
-
222
-
223
-
224
-
225
-
226
-
227
-
228
-
229
-
230
-
231
-
232
-
233
-
234
-
235
-
236
-
237
-
238
-
239
-
240
 |
 |