Cisco SA520-K9 Administration Guide - Page 52
DHCP Reserved IPs, Apply, Networking, > LAN > DHCP Reserved IPs, WAN & LAN Connectivity
 |
UPC - 882658266744
View all Cisco SA520-K9 manuals
Add to My Manuals
Save this manual to your list of manuals |
Page 52 highlights
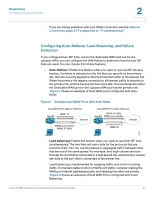
Networking Configuring the LAN 2 This feature is particularly useful in Auto Rollover mode. For example, if the DNS servers for each connection are different, then a link failure may render the DNS servers inaccessible. However, when the DNS proxy is enabled, then clients can make requests to the router and the router, in turn, sends those requests to the DNS servers of the active connection. You also can enable the IGMP proxy on the respective LAN. STEP 6 Click Apply to save your settings. DHCP Reserved IPs Even when the security appliance is configured to act as a DHCP server, you can reserve certain IP addresses always to be assigned to specified devices. To do so, add the MAC address of the device, along with the desired IP address, to the list of DHCP Reserved IPs. Whenever the LAN DHCP server receives a request from a device, the hardware address is compared with the database. If the device is found, then the reserved IP address is used. Otherwise, an IP address is assigned automatically from the DHCP pool. NOTE The reserved IPs need to be outside the pool of the DHCP addresses that the DHCP server assigns dynamically. STEP 1 Click Networking > LAN > DHCP Reserved IPs, or from the Getting Started (Basic) page, under WAN & LAN Connectivity, click DHCP Reserved IPs (Optional). The DHCP Reserved IPs (LAN) window opens. Any existing reserved IPs are listed in the Available DHCP Assigned IPs (LAN) table. STEP 2 To add a reserved IP address, click Add. The DHCP Reserved IP for LAN window opens. Other options: Click the Edit button to edit an entry. To delete an entry, check the box and then click Delete. To select all entries in the table, check the box at the left side of the heading row. STEP 3 Enter the IP address and the MAC address of the device that you want to add. Each reserved IP address should be outside the configured DHCP pool addresses. STEP 4 Click Apply to save your settings. Cisco SA500 Series Security Appliances Administration Guide 52
-
 1
1 -
2
-
3
-
4
-
5
-
6
-
7
-
8
-
9
-
10
-
11
-
12
-
13
-
14
-
15
-
16
-
17
-
18
-
19
-
20
-
21
-
22
-
23
-
24
-
25
-
26
-
27
-
28
-
29
-
30
-
31
-
32
-
33
-
34
-
35
-
36
-
37
-
38
-
39
-
40
-
41
-
42
-
43
-
44
-
45
-
46
-
 47
47 -
 48
48 -
 49
49 -
 50
50 -
 51
51 -
 52
52 -
 53
53 -
 54
54 -
 55
55 -
 56
56 -
 57
57 -
58
-
59
-
60
-
61
-
62
-
63
-
64
-
65
-
66
-
67
-
68
-
69
-
70
-
71
-
72
-
73
-
74
-
75
-
76
-
77
-
78
-
79
-
80
-
81
-
82
-
83
-
84
-
85
-
86
-
87
-
88
-
89
-
90
-
91
-
92
-
93
-
94
-
95
-
96
-
97
-
98
-
99
-
100
-
101
-
102
-
103
-
104
-
105
-
106
-
107
-
108
-
109
-
110
-
111
-
112
-
113
-
114
-
115
-
116
-
117
-
118
-
119
-
120
-
121
-
122
-
123
-
124
-
125
-
126
-
127
-
128
-
129
-
130
-
131
-
132
-
133
-
134
-
135
-
136
-
137
-
138
-
139
-
140
-
141
-
142
-
143
-
144
-
145
-
146
-
147
-
148
-
149
-
150
-
151
-
152
-
153
-
154
-
155
-
156
-
157
-
158
-
159
-
160
-
161
-
162
-
163
-
164
-
165
-
166
-
167
-
168
-
169
-
170
-
171
-
172
-
173
-
174
-
175
-
176
-
177
-
178
-
179
-
180
-
181
-
182
-
183
-
184
-
185
-
186
-
187
-
188
-
189
-
190
-
191
-
192
-
193
-
194
-
195
-
196
-
197
-
198
-
199
-
200
-
201
-
202
-
203
-
204
-
205
-
206
-
207
-
208
-
209
-
210
-
211
-
212
-
213
-
214
-
215
-
216
-
217
-
218
-
219
-
220
-
221
-
222
-
223
-
224
-
225
-
226
-
227
-
228
-
229
-
230
-
231
-
232
-
233
-
234
-
235
-
236
-
237
-
238
-
239
-
240
 |
 |
