Cisco SA520-K9 Administration Guide - Page 145
> IPsec > IKE Policies, Policy Name
 |
UPC - 882658266744
View all Cisco SA520-K9 manuals
Add to My Manuals
Save this manual to your list of manuals |
Page 145 highlights
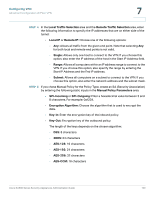
Configuring VPN Advanced Configuration of IPsec VPN 7 STEP 1 Click VPN > IPsec > IKE Policies. The existing entries appear in the List of IKE Policies table. The IKE Policies window opens. Any existing policies are listed in the List of IKE Policies table. STEP 2 Click Edit to edit an entry. Other options: Click Add to add an entry. To delete an entry, check the box, and then click Delete. To select all entries, check the box in the first column of the table heading. After you click Add or Edit, the IKE Policy Configuration window opens. STEP 3 In the General area, enter the following information: • Policy Name: Enter a unique name for identification and management purposes. • Direction/Type: Choose one of the following options: - Initiator: The security appliance initiates the connection to the remote end. - Responder: The security appliance waits passively and responds to remote IKE requests. - Both: The security appliance works in either Initiator or Responder mode. • Exchange Mode: Choose one of the following options: - Main Mode: Choose this option if you want higher security, but with a slower connection. Main Mode relies upon two-way key exchanges between the initiator and the receiver. The key-exchange process slows down the connection but increases security. - Aggressive Mode: Choose this option if you want a faster connection, but with lowered security. In Aggressive Mode there are fewer key exchanges between the initiator and the receiver. Both sides exchange information even before there is a secure channel. This feature creates a faster connection but with less security than Main Mode. NOTE If you choose Main Mode, then you must use an IP address as the identifier type for both the Local device and the Remote device, below. If FQDN, User FQDN or DER ASN1 DN is selected as the identifier type, then Main Mode is disabled and Aggressive Mode is applied. Cisco SA500 Series Security Appliances Administration Guide 145
-
 1
1 -
2
-
3
-
4
-
5
-
6
-
7
-
8
-
9
-
10
-
11
-
12
-
13
-
14
-
15
-
16
-
17
-
18
-
19
-
20
-
21
-
22
-
23
-
24
-
25
-
26
-
27
-
28
-
29
-
30
-
31
-
32
-
33
-
34
-
35
-
36
-
37
-
38
-
39
-
40
-
41
-
42
-
43
-
44
-
45
-
46
-
47
-
48
-
49
-
50
-
51
-
52
-
53
-
54
-
55
-
56
-
57
-
58
-
59
-
60
-
61
-
62
-
63
-
64
-
65
-
66
-
67
-
68
-
69
-
70
-
71
-
72
-
73
-
74
-
75
-
76
-
77
-
78
-
79
-
80
-
81
-
82
-
83
-
84
-
85
-
86
-
87
-
88
-
89
-
90
-
91
-
92
-
93
-
94
-
95
-
96
-
97
-
98
-
99
-
100
-
101
-
102
-
103
-
104
-
105
-
106
-
107
-
108
-
109
-
110
-
111
-
112
-
113
-
114
-
115
-
116
-
117
-
118
-
119
-
120
-
121
-
122
-
123
-
124
-
125
-
126
-
127
-
128
-
129
-
130
-
131
-
132
-
133
-
134
-
135
-
136
-
137
-
138
-
139
-
 140
140 -
 141
141 -
 142
142 -
 143
143 -
 144
144 -
 145
145 -
 146
146 -
 147
147 -
 148
148 -
 149
149 -
 150
150 -
151
-
152
-
153
-
154
-
155
-
156
-
157
-
158
-
159
-
160
-
161
-
162
-
163
-
164
-
165
-
166
-
167
-
168
-
169
-
170
-
171
-
172
-
173
-
174
-
175
-
176
-
177
-
178
-
179
-
180
-
181
-
182
-
183
-
184
-
185
-
186
-
187
-
188
-
189
-
190
-
191
-
192
-
193
-
194
-
195
-
196
-
197
-
198
-
199
-
200
-
201
-
202
-
203
-
204
-
205
-
206
-
207
-
208
-
209
-
210
-
211
-
212
-
213
-
214
-
215
-
216
-
217
-
218
-
219
-
220
-
221
-
222
-
223
-
224
-
225
-
226
-
227
-
228
-
229
-
230
-
231
-
232
-
233
-
234
-
235
-
236
-
237
-
238
-
239
-
240
 |
 |
