Cisco SA520-K9 Administration Guide - Page 139
Configuring an IPsec VPN Tunnel for Remote Access with a VPN Client, Apply, Next steps
 |
UPC - 882658266744
View all Cisco SA520-K9 manuals
Add to My Manuals
Save this manual to your list of manuals |
Page 139 highlights
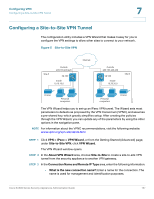
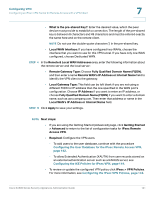
Configuring VPN Configuring an IPsec VPN Tunnel for Remote Access with a VPN Client 7 For the example illustrated in Figure 5, the remote site, Site B, has a subnet mask of 255.0.0.0. NOTE The IP address range used on the remote LAN must be different from the IP address range used on the local LAN. STEP 6 Click Apply to save your settings. The settings are not saved on the Wizard page. The Wizard creates a VPN policy and an IKE policy based on your entries. NOTE Next steps: • If you are using the Getting Started (Advanced) page, click Getting Started > Advanced to return to the list of configuration tasks for Site-to-Site VPN. • To review or update the configured VPN policy click IPsec > VPN Policies. For more information, see Configuring the IPsec VPN Policies, page 148. • To review or update the configured IKE policy, click IPsec > IKE Policies. For more information, see Configuring the IKE Policies for IPsec VPN, page 144. • To configure IPsec passthrough, click IPsec > Passthrough. For more information, see Configuring IPsec Passthrough, page 153. Configuring an IPsec VPN Tunnel for Remote Access with a VPN Client This section describes how to configure an IPsec VPN tunnel for remote access with a VPN client, or by using Standard IPsec (Xauth). The VPN Wizard helps you to set up a tunnel to allow workers to connect to your network from remote locations by using an IPsec VPN client. After creating the policies through the Wizard, you can update any of the parameters by using the other options in the navigation pane. The Wizard sets most parameters to defaults as proposed by the VPN Consortium (VPNC), and assumes a pre-shared key, which greatly simplifies setup For information about the VPNC recommendations, see: www.vpnc.org/vpnstandards.html. Cisco SA500 Series Security Appliances Administration Guide 139
-
 1
1 -
2
-
3
-
4
-
5
-
6
-
7
-
8
-
9
-
10
-
11
-
12
-
13
-
14
-
15
-
16
-
17
-
18
-
19
-
20
-
21
-
22
-
23
-
24
-
25
-
26
-
27
-
28
-
29
-
30
-
31
-
32
-
33
-
34
-
35
-
36
-
37
-
38
-
39
-
40
-
41
-
42
-
43
-
44
-
45
-
46
-
47
-
48
-
49
-
50
-
51
-
52
-
53
-
54
-
55
-
56
-
57
-
58
-
59
-
60
-
61
-
62
-
63
-
64
-
65
-
66
-
67
-
68
-
69
-
70
-
71
-
72
-
73
-
74
-
75
-
76
-
77
-
78
-
79
-
80
-
81
-
82
-
83
-
84
-
85
-
86
-
87
-
88
-
89
-
90
-
91
-
92
-
93
-
94
-
95
-
96
-
97
-
98
-
99
-
100
-
101
-
102
-
103
-
104
-
105
-
106
-
107
-
108
-
109
-
110
-
111
-
112
-
113
-
114
-
115
-
116
-
117
-
118
-
119
-
120
-
121
-
122
-
123
-
124
-
125
-
126
-
127
-
128
-
129
-
130
-
131
-
132
-
133
-
 134
134 -
 135
135 -
 136
136 -
 137
137 -
 138
138 -
 139
139 -
 140
140 -
 141
141 -
 142
142 -
 143
143 -
 144
144 -
145
-
146
-
147
-
148
-
149
-
150
-
151
-
152
-
153
-
154
-
155
-
156
-
157
-
158
-
159
-
160
-
161
-
162
-
163
-
164
-
165
-
166
-
167
-
168
-
169
-
170
-
171
-
172
-
173
-
174
-
175
-
176
-
177
-
178
-
179
-
180
-
181
-
182
-
183
-
184
-
185
-
186
-
187
-
188
-
189
-
190
-
191
-
192
-
193
-
194
-
195
-
196
-
197
-
198
-
199
-
200
-
201
-
202
-
203
-
204
-
205
-
206
-
207
-
208
-
209
-
210
-
211
-
212
-
213
-
214
-
215
-
216
-
217
-
218
-
219
-
220
-
221
-
222
-
223
-
224
-
225
-
226
-
227
-
228
-
229
-
230
-
231
-
232
-
233
-
234
-
235
-
236
-
237
-
238
-
239
-
240
 |
 |
