Cisco SA520-K9 Administration Guide - Page 170
Managing User Credentials for VeriSign Service, Configuring VPN, Users,
 |
UPC - 882658266744
View all Cisco SA520-K9 manuals
Add to My Manuals
Save this manual to your list of manuals |
Page 170 highlights
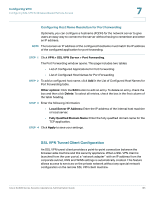
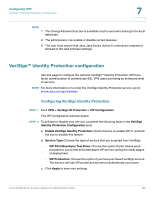
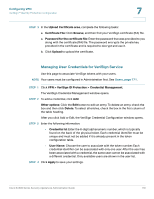
Configuring VPN VeriSign™ Identity Protection configuration 7 STEP 3 In the Upload Certificate area, complete the following tasks: a. Certificate File: Click Browse, and then find your VeriSign certificate (RA) file. a. Password for the certificate file: Enter the password that was provided to you along with the certificate (RA) file. The password encrypts the private key provided in the certificate and is required to decrypt and use it. b. Click Upload to upload the certificate. Managing User Credentials for VeriSign Service Use this page to associate VeriSign tokens with your users. NOTE Your users must be configured in Administration first. See Users, page 171. STEP 1 Click VPN > VeriSign ID Protection > Credential Management. The VeriSign Credential Management window opens. STEP 2 To add a credential, click Add. Other options: Click the Edit button to edit an entry. To delete an entry, check the box and then click Delete. To select all entries, check the box in the first column of the table heading. After you click Add or Edit, the VeriSign Credential Configuration window opens. STEP 3 Enter the following information: • Credential Id: Enter the 6-digit alphanumeric number, which is typically found on the back of the physical token. Each credential identifier must be unique and must not be added if it is already present in the token configuration table. • User Name: Choose the user to associate with the token number. Each credential identifier can be associated with only one user. After the user has been associated with a credential, the same user cannot be associated with a different credential. Only available users are shown in the user list. STEP 4 Click Apply to save your settings. Cisco SA500 Series Security Appliances Administration Guide 170
-
 1
1 -
2
-
3
-
4
-
5
-
6
-
7
-
8
-
9
-
10
-
11
-
12
-
13
-
14
-
15
-
16
-
17
-
18
-
19
-
20
-
21
-
22
-
23
-
24
-
25
-
26
-
27
-
28
-
29
-
30
-
31
-
32
-
33
-
34
-
35
-
36
-
37
-
38
-
39
-
40
-
41
-
42
-
43
-
44
-
45
-
46
-
47
-
48
-
49
-
50
-
51
-
52
-
53
-
54
-
55
-
56
-
57
-
58
-
59
-
60
-
61
-
62
-
63
-
64
-
65
-
66
-
67
-
68
-
69
-
70
-
71
-
72
-
73
-
74
-
75
-
76
-
77
-
78
-
79
-
80
-
81
-
82
-
83
-
84
-
85
-
86
-
87
-
88
-
89
-
90
-
91
-
92
-
93
-
94
-
95
-
96
-
97
-
98
-
99
-
100
-
101
-
102
-
103
-
104
-
105
-
106
-
107
-
108
-
109
-
110
-
111
-
112
-
113
-
114
-
115
-
116
-
117
-
118
-
119
-
120
-
121
-
122
-
123
-
124
-
125
-
126
-
127
-
128
-
129
-
130
-
131
-
132
-
133
-
134
-
135
-
136
-
137
-
138
-
139
-
140
-
141
-
142
-
143
-
144
-
145
-
146
-
147
-
148
-
149
-
150
-
151
-
152
-
153
-
154
-
155
-
156
-
157
-
158
-
159
-
160
-
161
-
162
-
163
-
164
-
 165
165 -
 166
166 -
 167
167 -
 168
168 -
 169
169 -
 170
170 -
 171
171 -
 172
172 -
 173
173 -
 174
174 -
 175
175 -
176
-
177
-
178
-
179
-
180
-
181
-
182
-
183
-
184
-
185
-
186
-
187
-
188
-
189
-
190
-
191
-
192
-
193
-
194
-
195
-
196
-
197
-
198
-
199
-
200
-
201
-
202
-
203
-
204
-
205
-
206
-
207
-
208
-
209
-
210
-
211
-
212
-
213
-
214
-
215
-
216
-
217
-
218
-
219
-
220
-
221
-
222
-
223
-
224
-
225
-
226
-
227
-
228
-
229
-
230
-
231
-
232
-
233
-
234
-
235
-
236
-
237
-
238
-
239
-
240
 |
 |
