Cisco SA520-K9 Administration Guide - Page 156
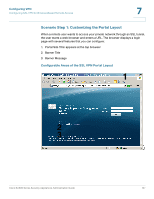
Elements of the SSL VPN, Scenario Step 1: Customizing the Portal Layout,
 |
UPC - 882658266744
View all Cisco SA520-K9 manuals
Add to My Manuals
Save this manual to your list of manuals |
Page 156 highlights
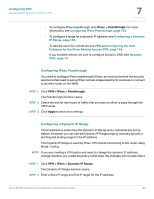
Configuring VPN Configuring SSL VPN for Browser-Based Remote Access 7 Internet. Then, you could configure links to specific targets on the internal network that you want users of Clientless SSL VPN to be able to access. • Educate users. If an SSL-enabled site is not inside the private network, users should not visit this site over a Clientless SSL VPN connection. They should open a separate browser window to visit such sites, and use that browser to view the presented certificate. Elements of the SSL VPN Several elements work together to support SSL VPN. • Portal: To access your network, user starts a web browser and then enters the URL for your portal. The security appliance is pre-configured with a portal that you can use for all users. You can modify title, banner heading, banner message, security settings, and access type (VPN tunnel, port forwarding, or both). In addition, you can create different portal layouts for different groups of users. For example, you could create two portal layouts for two groups that have access to different resources. On each portal layout, you would customize the banner message to provide customized information for the portal users. IMPORTANT: If you plan to create different portal layouts for different user domains, you must create the portal layouts first. In the scenario, start with Scenario Step 1: Customizing the Portal Layout, page 157. If you are not going to create different portal layouts, you can start the scenario with this step so that you can review the default settings and modify, as needed. In addition, the Portal Layouts page shows you the URL that you need to provide to the portal users. • Users: Create your VPN users. You can use the default domain and group or configure your own domains and groups. As you create each user record, be sure to select SSL VPN User as the User Type. Instructions are included in the scenario, or for complete details about domains, groups, and users, see Chapter 8, "Administration.". • VPN Policies: The default VPN policies should be sufficient for most purposes. As needed, you can create more complex policies. See Creating the SSL VPN Policies, page 160. • Port Forwarding: You can configure port forwarding to allow access to a limited set of resources. For example, you may want the SSL VPN users to access the email service only. See Configuring SSL VPN Port Forwarding, page 163. Cisco SA500 Series Security Appliances Administration Guide 156
-
 1
1 -
2
-
3
-
4
-
5
-
6
-
7
-
8
-
9
-
10
-
11
-
12
-
13
-
14
-
15
-
16
-
17
-
18
-
19
-
20
-
21
-
22
-
23
-
24
-
25
-
26
-
27
-
28
-
29
-
30
-
31
-
32
-
33
-
34
-
35
-
36
-
37
-
38
-
39
-
40
-
41
-
42
-
43
-
44
-
45
-
46
-
47
-
48
-
49
-
50
-
51
-
52
-
53
-
54
-
55
-
56
-
57
-
58
-
59
-
60
-
61
-
62
-
63
-
64
-
65
-
66
-
67
-
68
-
69
-
70
-
71
-
72
-
73
-
74
-
75
-
76
-
77
-
78
-
79
-
80
-
81
-
82
-
83
-
84
-
85
-
86
-
87
-
88
-
89
-
90
-
91
-
92
-
93
-
94
-
95
-
96
-
97
-
98
-
99
-
100
-
101
-
102
-
103
-
104
-
105
-
106
-
107
-
108
-
109
-
110
-
111
-
112
-
113
-
114
-
115
-
116
-
117
-
118
-
119
-
120
-
121
-
122
-
123
-
124
-
125
-
126
-
127
-
128
-
129
-
130
-
131
-
132
-
133
-
134
-
135
-
136
-
137
-
138
-
139
-
140
-
141
-
142
-
143
-
144
-
145
-
146
-
147
-
148
-
149
-
150
-
 151
151 -
 152
152 -
 153
153 -
 154
154 -
 155
155 -
 156
156 -
 157
157 -
 158
158 -
 159
159 -
 160
160 -
 161
161 -
162
-
163
-
164
-
165
-
166
-
167
-
168
-
169
-
170
-
171
-
172
-
173
-
174
-
175
-
176
-
177
-
178
-
179
-
180
-
181
-
182
-
183
-
184
-
185
-
186
-
187
-
188
-
189
-
190
-
191
-
192
-
193
-
194
-
195
-
196
-
197
-
198
-
199
-
200
-
201
-
202
-
203
-
204
-
205
-
206
-
207
-
208
-
209
-
210
-
211
-
212
-
213
-
214
-
215
-
216
-
217
-
218
-
219
-
220
-
221
-
222
-
223
-
224
-
225
-
226
-
227
-
228
-
229
-
230
-
231
-
232
-
233
-
234
-
235
-
236
-
237
-
238
-
239
-
240
 |
 |
