D-Link DGS-3200-10 Product Manual - Page 138
IMPB Global Settings, IMPB Global Settings window, Parameter, Description, Trap / Log
 |
UPC - 790069306310
View all D-Link DGS-3200-10 manuals
Add to My Manuals
Save this manual to your list of manuals |
Page 138 highlights
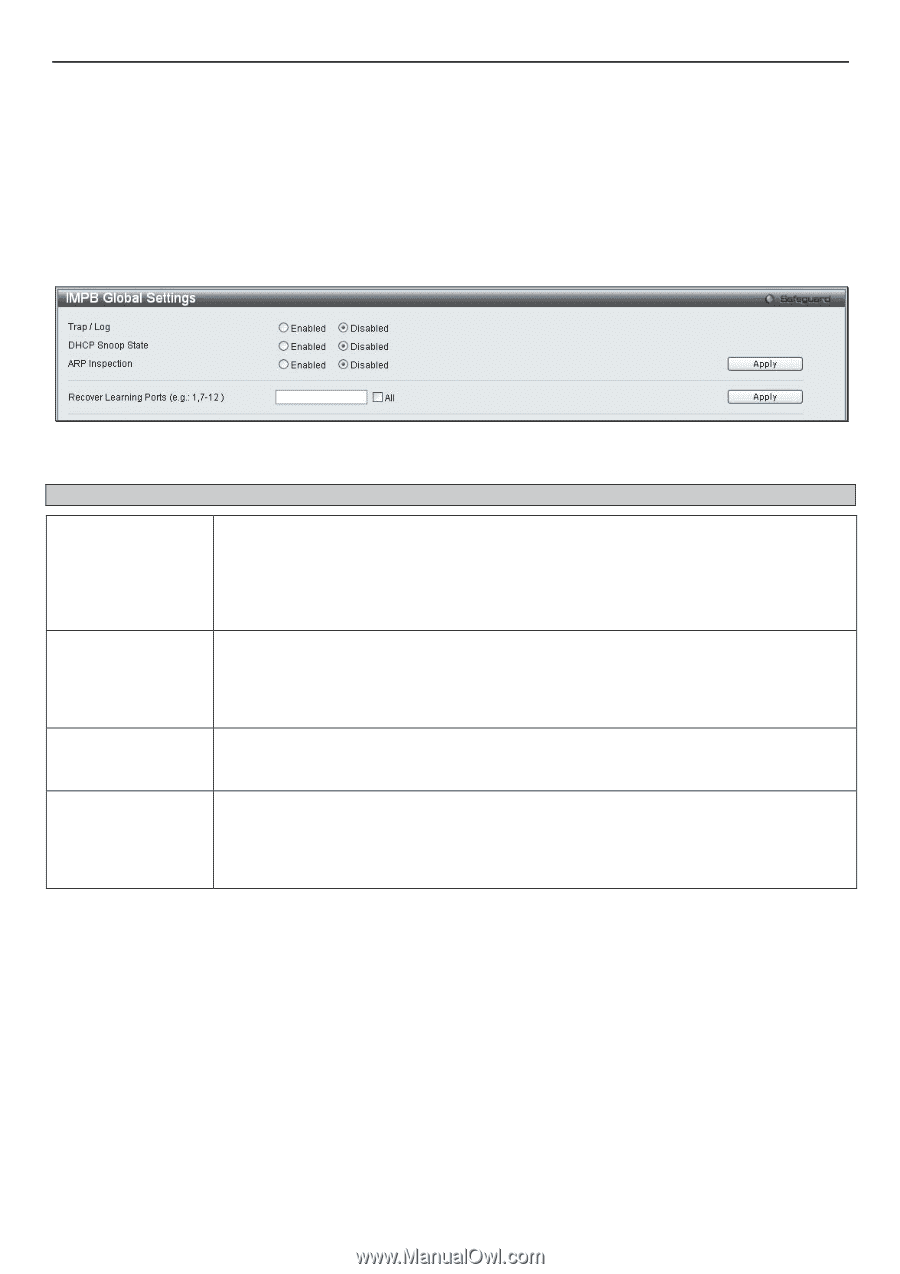
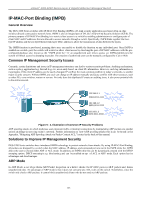
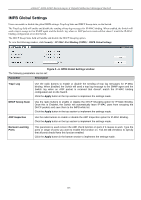
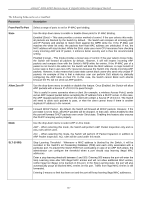
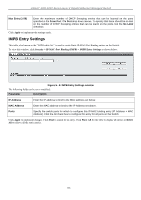
xStack® DGS-3200 Series Layer 2 Gigabit Ethernet Managed Switch IMPB Global Settings Users can enable or disable the global IMPB settings: Trap Log State and DHCP Snoop state, on the Switch. The Trap/Log field will enable and disable the sending of trap log messages for IP-MAC binding. When enabled, the Switch will send a trap m essage to t he SNMP a gent a nd t he Switch log when a n ARP pac ket is receive d th at doesn't m atch the IP-MAC binding configuration set on the Switch. The DHCP Snoop State field will enable and disable the DHCP Snooping option. To view the following window, click Security > IP-MAC-Port Binding (IMPB) > IMPB Global Settings: Figure 5 - 6. IMPB Global Settings window The following parameters can be set: Parameter Description Trap / Log Use the radio buttons to enable or disable the sending of trap log messages for IP-MAC binding. When Enabled, the Switch will send a trap log message to the SNMP agent and the Switch log when an ARP packet is received that doesn't match the IP-MAC binding configuration set on the Switch. Click the Apply button in the top section to implement the settings made. DHCP Snoop State Use the radio buttons to enable or disable the DHCP Snooping option for IP-MAC Binding. Once this is Enabled, the Switch will automatically learn IP-MAC pairs from snooping the DHCP packets and save them to the IMPB white list. Click the Apply button in the top section to implement the settings made. ARP Inspection Use the radio buttons to enable or disable the ARP Inspection option for IP-MAC Binding. Click the Apply button in the top section to implement the settings made. Recover Learning Ports This parameter is used recover the ARP check function on ports if it ceases to work. Type the ports or range of ports you want to enable this function on. Tick the All checkbox to specify that all ports should have this function enabled. Click the Apply button in the bottom section to implement the settings made. 125
-
 1
1 -
2
-
3
-
4
-
5
-
6
-
7
-
8
-
9
-
10
-
11
-
12
-
13
-
14
-
15
-
16
-
17
-
18
-
19
-
20
-
21
-
22
-
23
-
24
-
25
-
26
-
27
-
28
-
29
-
30
-
31
-
32
-
33
-
34
-
35
-
36
-
37
-
38
-
39
-
40
-
41
-
42
-
43
-
44
-
45
-
46
-
47
-
48
-
49
-
50
-
51
-
52
-
53
-
54
-
55
-
56
-
57
-
58
-
59
-
60
-
61
-
62
-
63
-
64
-
65
-
66
-
67
-
68
-
69
-
70
-
71
-
72
-
73
-
74
-
75
-
76
-
77
-
78
-
79
-
80
-
81
-
82
-
83
-
84
-
85
-
86
-
87
-
88
-
89
-
90
-
91
-
92
-
93
-
94
-
95
-
96
-
97
-
98
-
99
-
100
-
101
-
102
-
103
-
104
-
105
-
106
-
107
-
108
-
109
-
110
-
111
-
112
-
113
-
114
-
115
-
116
-
117
-
118
-
119
-
120
-
121
-
122
-
123
-
124
-
125
-
126
-
127
-
128
-
129
-
130
-
131
-
132
-
 133
133 -
 134
134 -
 135
135 -
 136
136 -
 137
137 -
 138
138 -
 139
139 -
 140
140 -
 141
141 -
 142
142 -
 143
143 -
144
-
145
-
146
-
147
-
148
-
149
-
150
-
151
-
152
-
153
-
154
-
155
-
156
-
157
-
158
-
159
-
160
-
161
-
162
-
163
-
164
-
165
-
166
-
167
-
168
-
169
-
170
-
171
-
172
-
173
-
174
-
175
-
176
-
177
-
178
-
179
-
180
-
181
-
182
-
183
-
184
-
185
-
186
-
187
-
188
-
189
-
190
-
191
-
192
-
193
-
194
-
195
-
196
-
197
-
198
-
199
-
200
-
201
-
202
-
203
-
204
-
205
-
206
-
207
-
208
-
209
-
210
-
211
-
212
-
213
-
214
-
215
-
216
-
217
-
218
-
219
-
220
-
221
-
222
-
223
-
224
-
225
-
226
-
227
-
228
-
229
-
230
-
231
-
232
-
233
-
234
-
235
-
236
-
237
-
238
-
239
-
240
-
241
-
242
-
243
-
244
-
245
-
246
-
247
-
248
-
249
-
250
-
251
-
252
-
253
-
254
-
255
-
256
-
257
-
258
-
259
-
260
-
261
-
262
-
263
-
264
-
265
-
266
-
267
-
268
-
269
-
270
-
271
-
272
-
273
-
274
-
275
-
276
-
277
-
278
-
279
-
280
-
281
-
282
-
283
-
284
-
285
-
286
-
287
-
288
-
289
-
290
-
291
-
292
-
293
-
294
-
295
-
296
-
297
-
298
-
299
-
300
-
301
-
302
 |
 |