D-Link DGS-3200-10 Product Manual - Page 90
v Protocol VLAN Settings, L2 Features, 1v Protocol VLAN - xstack manual
 |
UPC - 790069306310
View all D-Link DGS-3200-10 manuals
Add to My Manuals
Save this manual to your list of manuals |
Page 90 highlights
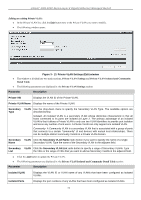
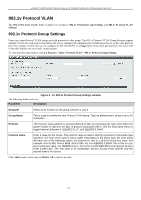
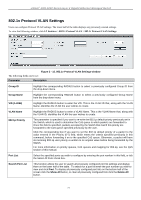
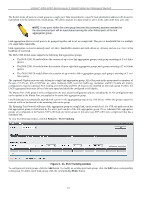
xStack® DGS-3200 Series Layer 2 Gigabit Ethernet Managed Switch 802.1v Protocol VLAN Settings Users can configure Protocol VLAN settings. The lower half of the table displays any previously created settings. To view the following window, click L2 Features > 802.1v Protocol VLAN > 802.1v Protocol VLAN Settings: Figure 3 - 15. 802.1v Protocol VLAN Settings window The following fields can be set: Parameter Description Group ID Highlight the corresponding RADIUS button to select a previously configured Group ID from the drop-down menu. Group Name Highlight the corresponding RADIUS button to select a previously configured Group Name from the drop-down menu. VID (1-4094) Highlight the RADIUS button to enter the VID. This is the VLAN ID that, along with the VLAN Name, identifies the VLAN the user wishes to create. VLAN Name 802.1p Priority Highlight the RADIUS button to enter a VLAN Name. This is the VLAN Name that, along with the VLAN ID, identifies the VLAN the user wishes to create. This parameter is specified if you want to re-write the 802.1p default priority previously set in the Switch, which is used to determine the CoS queue to which packets are forwarded to. Once this field is specified, packets accepted by the Switch that match this priority are forwarded to the CoS queue specified previously by the user. Click the corresponding box if you want to set the 802.1p default priority of a packet to the value entered in the Priority (0-7) field, which meets the criteria specified previously in this command, before forwarding it on to the specified CoS queue. Otherwise, a packet will have its incoming 802.1p user priority re-written to its original value before being forwarded by the Switch. For more information on priority queues, CoS queues and mapping for 802.1p, see the QoS section of this manual. Port List Select the specified ports you wish to configure by entering the port number in this field, or tick the Select All Ports check box. Search Port List This function allows the user to search all previously configured port list settings and display them on the lower half of the table. To search for a port list enter the port number you wish to view and click Find. To display all previously configured port lists on the bottom half of the screen click the Show All button, to clear all previously configured lists click the Delete All button. 77
-
 1
1 -
2
-
3
-
4
-
5
-
6
-
7
-
8
-
9
-
10
-
11
-
12
-
13
-
14
-
15
-
16
-
17
-
18
-
19
-
20
-
21
-
22
-
23
-
24
-
25
-
26
-
27
-
28
-
29
-
30
-
31
-
32
-
33
-
34
-
35
-
36
-
37
-
38
-
39
-
40
-
41
-
42
-
43
-
44
-
45
-
46
-
47
-
48
-
49
-
50
-
51
-
52
-
53
-
54
-
55
-
56
-
57
-
58
-
59
-
60
-
61
-
62
-
63
-
64
-
65
-
66
-
67
-
68
-
69
-
70
-
71
-
72
-
73
-
74
-
75
-
76
-
77
-
78
-
79
-
80
-
81
-
82
-
83
-
84
-
 85
85 -
 86
86 -
 87
87 -
 88
88 -
 89
89 -
 90
90 -
 91
91 -
 92
92 -
 93
93 -
 94
94 -
 95
95 -
96
-
97
-
98
-
99
-
100
-
101
-
102
-
103
-
104
-
105
-
106
-
107
-
108
-
109
-
110
-
111
-
112
-
113
-
114
-
115
-
116
-
117
-
118
-
119
-
120
-
121
-
122
-
123
-
124
-
125
-
126
-
127
-
128
-
129
-
130
-
131
-
132
-
133
-
134
-
135
-
136
-
137
-
138
-
139
-
140
-
141
-
142
-
143
-
144
-
145
-
146
-
147
-
148
-
149
-
150
-
151
-
152
-
153
-
154
-
155
-
156
-
157
-
158
-
159
-
160
-
161
-
162
-
163
-
164
-
165
-
166
-
167
-
168
-
169
-
170
-
171
-
172
-
173
-
174
-
175
-
176
-
177
-
178
-
179
-
180
-
181
-
182
-
183
-
184
-
185
-
186
-
187
-
188
-
189
-
190
-
191
-
192
-
193
-
194
-
195
-
196
-
197
-
198
-
199
-
200
-
201
-
202
-
203
-
204
-
205
-
206
-
207
-
208
-
209
-
210
-
211
-
212
-
213
-
214
-
215
-
216
-
217
-
218
-
219
-
220
-
221
-
222
-
223
-
224
-
225
-
226
-
227
-
228
-
229
-
230
-
231
-
232
-
233
-
234
-
235
-
236
-
237
-
238
-
239
-
240
-
241
-
242
-
243
-
244
-
245
-
246
-
247
-
248
-
249
-
250
-
251
-
252
-
253
-
254
-
255
-
256
-
257
-
258
-
259
-
260
-
261
-
262
-
263
-
264
-
265
-
266
-
267
-
268
-
269
-
270
-
271
-
272
-
273
-
274
-
275
-
276
-
277
-
278
-
279
-
280
-
281
-
282
-
283
-
284
-
285
-
286
-
287
-
288
-
289
-
290
-
291
-
292
-
293
-
294
-
295
-
296
-
297
-
298
-
299
-
300
-
301
-
302
 |
 |
