D-Link DGS-3200-10 Product Manual - Page 71
Firmware Upgrade, Configuration File Backup/Restore, Upload Log File - des
 |
UPC - 790069306310
View all D-Link DGS-3200-10 manuals
Add to My Manuals
Save this manual to your list of manuals |
Page 71 highlights
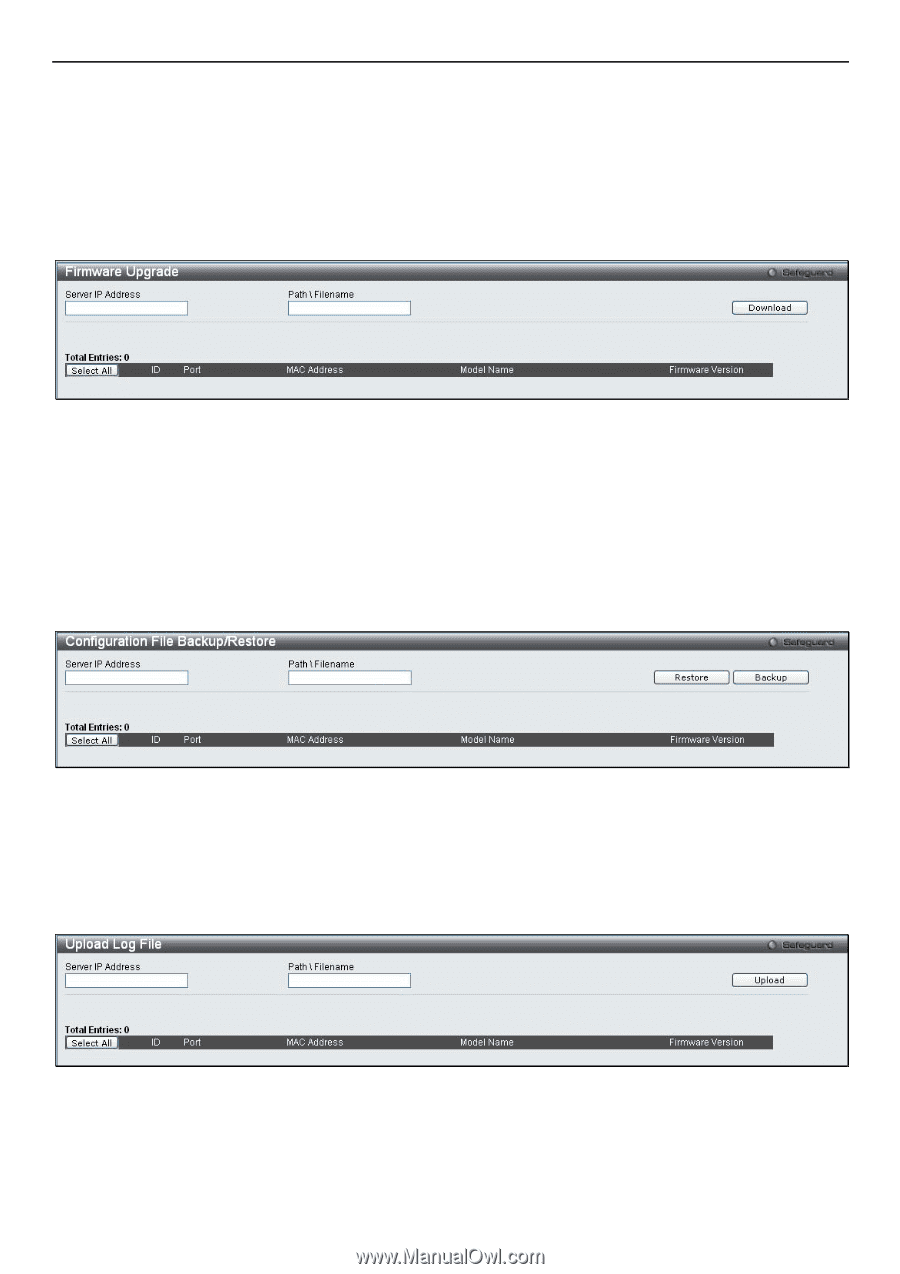
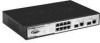
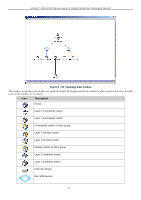
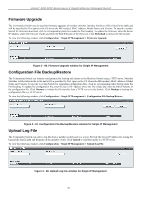
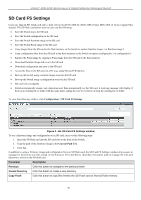
xStack® DGS-3200 Series Layer 2 Gigabit Ethernet Managed Switch Firmware Upgrade The Commander Switch may be used for firmware upgrades of member switches. Member Switches will be listed in the table and will be specified by Port (port o n the CS wh ere the MS resides), MAC Address, Model Nam e and Version. To specify a certain Switch for firmware download, click its corresponding check box under the Port heading. To update the firmware, enter the Server IP Address where the firmware resides and enter the Path/Filename of the firmware. Click Download to initiate the file transfer. To view the following window, click Configuration > Single IP Management > Firmware Upgrade: Figure 2 - 66. Firmware Upgrade window for Single IP Management Configuration File Backup/Restore The Commander Switch can instruct configuration file backup and restore to the Mem ber Switch using a TFTP server. Mem ber Switches will be listed in the ta ble and will b e specified by Port (port on the CS where the MS resi des), MAC Address, Model Name and Version. To sp ecify a cer tain Switch for upgrading configuration files, click its corresponding radio button under the Port heading. To update the configuration file, enter the Server IP Address where the file resides and enter the Pat h/Filename of the configuration file. Click Restore to initiate the file tran sfer from a TFTP serv er to the Switch. Click Backup to backup the configuration file to a TFTP server. To view the following window, click Configuration > Single IP Management > Configuration File Backup/Restore: Figure 2 - 67. Configuration File Backup/Restore window for Single IP Management Upload Log File The Commander Switch can order a log file from a member switch sent to a server. Provide the Server IP address for storing the log and the log file path and filename on the member switch. Click Upload to send the log file to a TFTP server. To view the following window, click Configuration > Single IP Management > Upload Log File: Figure 2 - 68. Upload Log File window for Single IP Management 58
-
 1
1 -
2
-
3
-
4
-
5
-
6
-
7
-
8
-
9
-
10
-
11
-
12
-
13
-
14
-
15
-
16
-
17
-
18
-
19
-
20
-
21
-
22
-
23
-
24
-
25
-
26
-
27
-
28
-
29
-
30
-
31
-
32
-
33
-
34
-
35
-
36
-
37
-
38
-
39
-
40
-
41
-
42
-
43
-
44
-
45
-
46
-
47
-
48
-
49
-
50
-
51
-
52
-
53
-
54
-
55
-
56
-
57
-
58
-
59
-
60
-
61
-
62
-
63
-
64
-
65
-
 66
66 -
 67
67 -
 68
68 -
 69
69 -
 70
70 -
 71
71 -
 72
72 -
 73
73 -
 74
74 -
 75
75 -
 76
76 -
77
-
78
-
79
-
80
-
81
-
82
-
83
-
84
-
85
-
86
-
87
-
88
-
89
-
90
-
91
-
92
-
93
-
94
-
95
-
96
-
97
-
98
-
99
-
100
-
101
-
102
-
103
-
104
-
105
-
106
-
107
-
108
-
109
-
110
-
111
-
112
-
113
-
114
-
115
-
116
-
117
-
118
-
119
-
120
-
121
-
122
-
123
-
124
-
125
-
126
-
127
-
128
-
129
-
130
-
131
-
132
-
133
-
134
-
135
-
136
-
137
-
138
-
139
-
140
-
141
-
142
-
143
-
144
-
145
-
146
-
147
-
148
-
149
-
150
-
151
-
152
-
153
-
154
-
155
-
156
-
157
-
158
-
159
-
160
-
161
-
162
-
163
-
164
-
165
-
166
-
167
-
168
-
169
-
170
-
171
-
172
-
173
-
174
-
175
-
176
-
177
-
178
-
179
-
180
-
181
-
182
-
183
-
184
-
185
-
186
-
187
-
188
-
189
-
190
-
191
-
192
-
193
-
194
-
195
-
196
-
197
-
198
-
199
-
200
-
201
-
202
-
203
-
204
-
205
-
206
-
207
-
208
-
209
-
210
-
211
-
212
-
213
-
214
-
215
-
216
-
217
-
218
-
219
-
220
-
221
-
222
-
223
-
224
-
225
-
226
-
227
-
228
-
229
-
230
-
231
-
232
-
233
-
234
-
235
-
236
-
237
-
238
-
239
-
240
-
241
-
242
-
243
-
244
-
245
-
246
-
247
-
248
-
249
-
250
-
251
-
252
-
253
-
254
-
255
-
256
-
257
-
258
-
259
-
260
-
261
-
262
-
263
-
264
-
265
-
266
-
267
-
268
-
269
-
270
-
271
-
272
-
273
-
274
-
275
-
276
-
277
-
278
-
279
-
280
-
281
-
282
-
283
-
284
-
285
-
286
-
287
-
288
-
289
-
290
-
291
-
292
-
293
-
294
-
295
-
296
-
297
-
298
-
299
-
300
-
301
-
302
 |
 |