Dell PowerConnect W Clearpass 100 Software 3.7 Deployment Guide - Page 181
Customizing Self Provisioned Access, Self-Registration Sequence Diagram, Boolean - Enabled/Disabled
 |
View all Dell PowerConnect W Clearpass 100 Software manuals
Add to My Manuals
Save this manual to your list of manuals |
Page 181 highlights
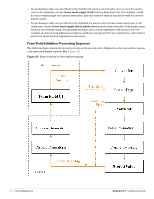
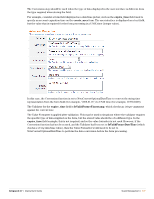
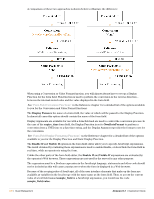
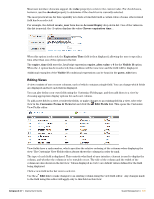
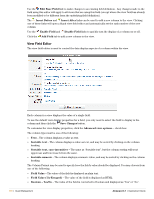
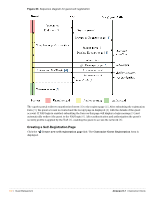
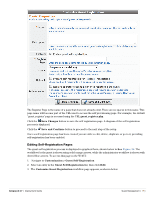
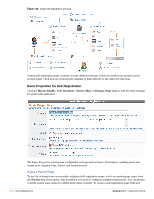
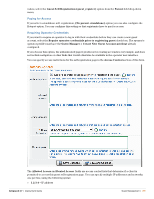
Boolean - Enabled/Disabled - The value of the field is converted to Boolean and displayed as "Enabled" or "Disabled". Boolean - On/Off - The value of the field is converted to Boolean and displayed as "On" or "Off". Date - The value of the field is assumed to be a UNIX timestamp value and is displayed as a date and time. Duration (from seconds) - The value of the field is assumed to be a time period measured in seconds and is displayed as a duration (for example, "23 seconds", "45 minutes") Duration (from minutes) - The value of the field is assumed to be a time period measured in minutes and is displayed as a duration (for example, "45 minutes", "12 hours") Use form options - The value of the field is assumed to be one of the keys from the field's option list. The value displayed is the corresponding value for the key. Custom expression... - The Display Expression text area is displayed allowing a custom JavaScript expression to be entered. See "View Display Expression Technical Reference" in the Reference chapter for technical information about this display expression and a list of the functions that are available to format the value. The Display Expression is a JavaScript expression that is used to generate the contents of the column. Generally, this is a simple expression that returns an appropriate piece of data for display, but more complex expressions can be used to perform arbitrary data processing and formatting tasks. Customizing Self Provisioned Access Guest self-registration allows an administrator to customize the process for guests to create their own visitor accounts. The registration process consists of a data collection step (the 'register page') and a confirmation step (the 'receipt page'). You can define what information is collected from visitors on the registration page. New fields and data validation rules can be defined with the custom form editor. Specific details about the type of visitor accounts created are also set here. The receipt page also includes a form, although typically this form will only contain static information about the guest account. Several different actions can be included on the receipt page, enabling visitors to obtain their receipt in different ways. The receipt page can also be used to automatically log the guest into a Network Access Server, enabling them to start using the network immediately. Detailed user interface customization can be performed for all parts of the self-registration process. You can define page titles, template code for the page header and footer, and choose a skin that controls the overall look and feel of self-registration. The default user interface customization can be disabled. Self-Registration Sequence Diagram To set up a captive portal with guest self-registration, configure your Network Access Servers to redirect guests to the URL of the 'Go To' link. To complete the portal, ensure that the NAS is configured to authorize users with the Amigopod RADIUS server, and set up the self-registration NAS login to redirect registered guests back to the NAS. This process is shown as follows. See Figure 23. Amigopod 3.7 | Deployment Guide Guest Management | 181
-
 1
1 -
2
-
3
-
4
-
5
-
6
-
7
-
8
-
9
-
10
-
11
-
12
-
13
-
14
-
15
-
16
-
17
-
18
-
19
-
20
-
21
-
22
-
23
-
24
-
25
-
26
-
27
-
28
-
29
-
30
-
31
-
32
-
33
-
34
-
35
-
36
-
37
-
38
-
39
-
40
-
41
-
42
-
43
-
44
-
45
-
46
-
47
-
48
-
49
-
50
-
51
-
52
-
53
-
54
-
55
-
56
-
57
-
58
-
59
-
60
-
61
-
62
-
63
-
64
-
65
-
66
-
67
-
68
-
69
-
70
-
71
-
72
-
73
-
74
-
75
-
76
-
77
-
78
-
79
-
80
-
81
-
82
-
83
-
84
-
85
-
86
-
87
-
88
-
89
-
90
-
91
-
92
-
93
-
94
-
95
-
96
-
97
-
98
-
99
-
100
-
101
-
102
-
103
-
104
-
105
-
106
-
107
-
108
-
109
-
110
-
111
-
112
-
113
-
114
-
115
-
116
-
117
-
118
-
119
-
120
-
121
-
122
-
123
-
124
-
125
-
126
-
127
-
128
-
129
-
130
-
131
-
132
-
133
-
134
-
135
-
136
-
137
-
138
-
139
-
140
-
141
-
142
-
143
-
144
-
145
-
146
-
147
-
148
-
149
-
150
-
151
-
152
-
153
-
154
-
155
-
156
-
157
-
158
-
159
-
160
-
161
-
162
-
163
-
164
-
165
-
166
-
167
-
168
-
169
-
170
-
171
-
172
-
173
-
174
-
175
-
 176
176 -
 177
177 -
 178
178 -
 179
179 -
 180
180 -
 181
181 -
 182
182 -
 183
183 -
 184
184 -
 185
185 -
 186
186 -
187
-
188
-
189
-
190
-
191
-
192
-
193
-
194
-
195
-
196
-
197
-
198
-
199
-
200
-
201
-
202
-
203
-
204
-
205
-
206
-
207
-
208
-
209
-
210
-
211
-
212
-
213
-
214
-
215
-
216
-
217
-
218
-
219
-
220
-
221
-
222
-
223
-
224
-
225
-
226
-
227
-
228
-
229
-
230
-
231
-
232
-
233
-
234
-
235
-
236
-
237
-
238
-
239
-
240
-
241
-
242
-
243
-
244
-
245
-
246
-
247
-
248
-
249
-
250
-
251
-
252
-
253
-
254
-
255
-
256
-
257
-
258
-
259
-
260
-
261
-
262
-
263
-
264
-
265
-
266
-
267
-
268
-
269
-
270
-
271
-
272
-
273
-
274
-
275
-
276
-
277
-
278
-
279
-
280
-
281
-
282
-
283
-
284
-
285
-
286
-
287
-
288
-
289
-
290
-
291
-
292
-
293
-
294
-
295
-
296
-
297
-
298
-
299
-
300
-
301
-
302
-
303
-
304
-
305
-
306
-
307
-
308
-
309
-
310
-
311
-
312
-
313
-
314
-
315
-
316
-
317
-
318
-
319
-
320
-
321
-
322
-
323
-
324
-
325
-
326
-
327
-
328
-
329
-
330
-
331
-
332
-
333
-
334
-
335
-
336
-
337
-
338
-
339
-
340
-
341
-
342
-
343
-
344
-
345
-
346
-
347
-
348
-
349
-
350
-
351
-
352
-
353
-
354
-
355
-
356
-
357
-
358
-
359
-
360
-
361
-
362
-
363
-
364
-
365
-
366
-
367
-
368
-
369
-
370
-
371
-
372
-
373
-
374
-
375
-
376
-
377
-
378
-
379
-
380
-
381
-
382
-
383
-
384
-
385
-
386
-
387
-
388
-
389
-
390
-
391
-
392
-
393
-
394
-
395
-
396
-
397
-
398
-
399
-
400
-
401
-
402
-
403
-
404
-
405
-
406
-
407
-
408
-
409
-
410
-
411
-
412
-
413
-
414
-
415
-
416
-
417
-
418
-
419
-
420
-
421
-
422
-
423
-
424
-
425
-
426
-
427
-
428
-
429
-
430
-
431
-
432
-
433
-
434
-
435
-
436
-
437
-
438
 |
 |