Dell PowerConnect W Clearpass 100 Software 3.7 Deployment Guide - Page 212
Creating Devices During Guest Self-Registration - MAC Only, Customization > Forms and Views
 |
View all Dell PowerConnect W Clearpass 100 Software manuals
Add to My Manuals
Save this manual to your list of manuals |
Page 212 highlights
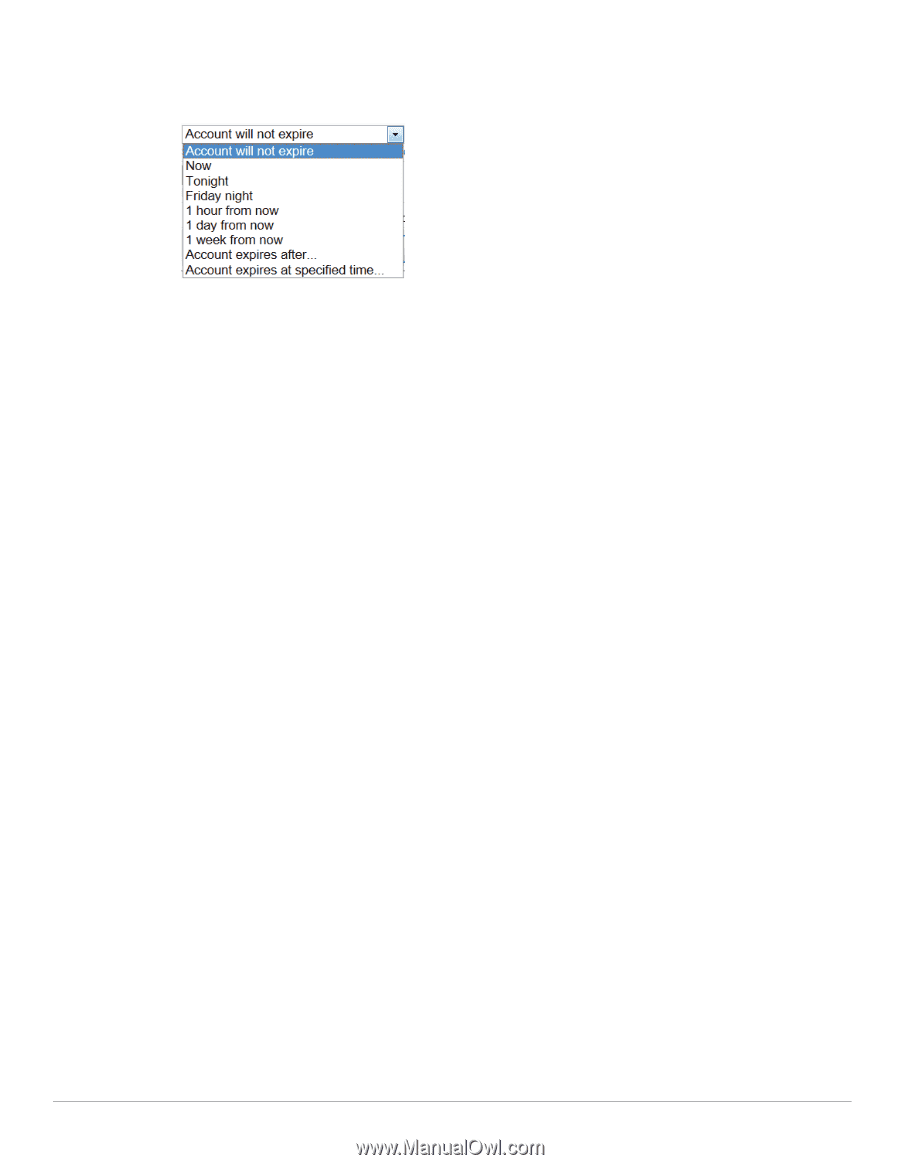
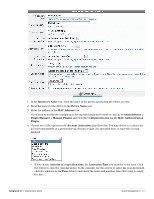
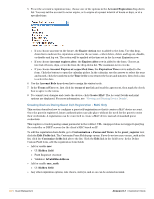
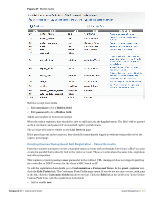
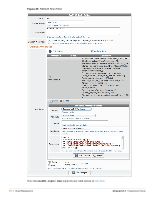
5. To set the account's expiration time, choose one of the options in the Account Expiration drop-down list. You may set the account to never expire, or to expire at a preset interval of hours or days, or at a specified time. If you choose any time in the future, the Expire Action row is added to the form. Use this dropdown list to indicate the expiration action for the account-either delete, delete and log out, disable, or disable and log out. The action will be applied at the time set in the Account Expiration row. If you choose Account expires after, the Expires After row is added to the form. Choose an interval of hours, days, or weeks from the drop-down list. The maximum is two weeks. If you choose Account Expires at a specified time, the Expiration Time row is added to the form. Click the button to open the calendar picker. In the calendar, use the arrows to select the year and month, click the numbers in the Time fields to increment the hours and minutes, then click a day to select the date. 6. Use the Account Role drop-down list to assign the visitor's role. 7. In the Terms of Use row, first click the terms of use link and read the agreement, then mark the check box to agree to the terms. 8. To commit your changes and create the device, click Create MAC. The Account Details and print options are displayed. For more information, see "Viewing and Printing Device Details". Creating Devices During Guest Self-Registration - MAC Only This section describes how to configure a guest self-registration so that it creates a MAC device account. Once the guest is registered, future authentication can take place without the need for the guest to enter their credentials. A registration can be converted to create a MAC device instead of standard guest credentials. This requires a vendor passing a mac parameter in the redirect URL. Amigopod does not support querying the controller or DHCP servers for the client's MAC based on IP. To edit the registration form fields, go to Customization > Forms and Views. In the guest_register row, click the Edit Fields link. The Customize Form Fields page opens. If you do not see mac or mac_auth in the list, click the Customize fields link above the list. Click the Edit link in the field's row. In the Define Custom Field form, edit the registration form fields: Add or enable mac UI: Hidden field Field Required: checked Validator: IsValidMacAddress Add or enable mac_auth UI: Hidden field Any other expiration options, role choice, surveys, and so on can be entered as usual. 212 | Guest Management Amigopod 3.7 | Deployment Guide
-
 1
1 -
2
-
3
-
4
-
5
-
6
-
7
-
8
-
9
-
10
-
11
-
12
-
13
-
14
-
15
-
16
-
17
-
18
-
19
-
20
-
21
-
22
-
23
-
24
-
25
-
26
-
27
-
28
-
29
-
30
-
31
-
32
-
33
-
34
-
35
-
36
-
37
-
38
-
39
-
40
-
41
-
42
-
43
-
44
-
45
-
46
-
47
-
48
-
49
-
50
-
51
-
52
-
53
-
54
-
55
-
56
-
57
-
58
-
59
-
60
-
61
-
62
-
63
-
64
-
65
-
66
-
67
-
68
-
69
-
70
-
71
-
72
-
73
-
74
-
75
-
76
-
77
-
78
-
79
-
80
-
81
-
82
-
83
-
84
-
85
-
86
-
87
-
88
-
89
-
90
-
91
-
92
-
93
-
94
-
95
-
96
-
97
-
98
-
99
-
100
-
101
-
102
-
103
-
104
-
105
-
106
-
107
-
108
-
109
-
110
-
111
-
112
-
113
-
114
-
115
-
116
-
117
-
118
-
119
-
120
-
121
-
122
-
123
-
124
-
125
-
126
-
127
-
128
-
129
-
130
-
131
-
132
-
133
-
134
-
135
-
136
-
137
-
138
-
139
-
140
-
141
-
142
-
143
-
144
-
145
-
146
-
147
-
148
-
149
-
150
-
151
-
152
-
153
-
154
-
155
-
156
-
157
-
158
-
159
-
160
-
161
-
162
-
163
-
164
-
165
-
166
-
167
-
168
-
169
-
170
-
171
-
172
-
173
-
174
-
175
-
176
-
177
-
178
-
179
-
180
-
181
-
182
-
183
-
184
-
185
-
186
-
187
-
188
-
189
-
190
-
191
-
192
-
193
-
194
-
195
-
196
-
197
-
198
-
199
-
200
-
201
-
202
-
203
-
204
-
205
-
206
-
 207
207 -
 208
208 -
 209
209 -
 210
210 -
 211
211 -
 212
212 -
 213
213 -
 214
214 -
 215
215 -
 216
216 -
 217
217 -
218
-
219
-
220
-
221
-
222
-
223
-
224
-
225
-
226
-
227
-
228
-
229
-
230
-
231
-
232
-
233
-
234
-
235
-
236
-
237
-
238
-
239
-
240
-
241
-
242
-
243
-
244
-
245
-
246
-
247
-
248
-
249
-
250
-
251
-
252
-
253
-
254
-
255
-
256
-
257
-
258
-
259
-
260
-
261
-
262
-
263
-
264
-
265
-
266
-
267
-
268
-
269
-
270
-
271
-
272
-
273
-
274
-
275
-
276
-
277
-
278
-
279
-
280
-
281
-
282
-
283
-
284
-
285
-
286
-
287
-
288
-
289
-
290
-
291
-
292
-
293
-
294
-
295
-
296
-
297
-
298
-
299
-
300
-
301
-
302
-
303
-
304
-
305
-
306
-
307
-
308
-
309
-
310
-
311
-
312
-
313
-
314
-
315
-
316
-
317
-
318
-
319
-
320
-
321
-
322
-
323
-
324
-
325
-
326
-
327
-
328
-
329
-
330
-
331
-
332
-
333
-
334
-
335
-
336
-
337
-
338
-
339
-
340
-
341
-
342
-
343
-
344
-
345
-
346
-
347
-
348
-
349
-
350
-
351
-
352
-
353
-
354
-
355
-
356
-
357
-
358
-
359
-
360
-
361
-
362
-
363
-
364
-
365
-
366
-
367
-
368
-
369
-
370
-
371
-
372
-
373
-
374
-
375
-
376
-
377
-
378
-
379
-
380
-
381
-
382
-
383
-
384
-
385
-
386
-
387
-
388
-
389
-
390
-
391
-
392
-
393
-
394
-
395
-
396
-
397
-
398
-
399
-
400
-
401
-
402
-
403
-
404
-
405
-
406
-
407
-
408
-
409
-
410
-
411
-
412
-
413
-
414
-
415
-
416
-
417
-
418
-
419
-
420
-
421
-
422
-
423
-
424
-
425
-
426
-
427
-
428
-
429
-
430
-
431
-
432
-
433
-
434
-
435
-
436
-
437
-
438
 |
 |