Dell PowerConnect W Clearpass 100 Software 3.7 Deployment Guide - Page 83
Installing a Server Certificate from a Certificate Authority
 |
View all Dell PowerConnect W Clearpass 100 Software manuals
Add to My Manuals
Save this manual to your list of manuals |
Page 83 highlights
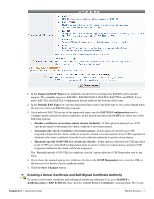
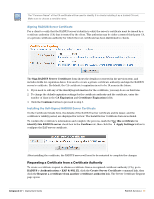
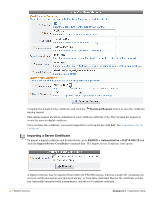
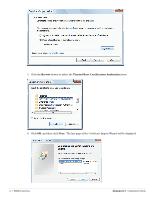
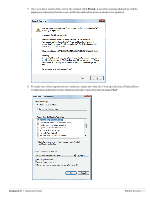
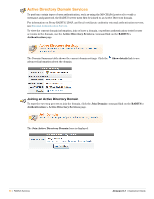
Complete the form with the details for your certificate, and click Continue to proceed to Step 2. Installing a Server Certificate from a Certificate Authority The Install Server Certificate form is used to install a digital certificate you have obtained from a thirdparty certificate authority. This certificate should correspond to a certificate signing request that you previously created using the New Certificate Request form. Select the certificate file and the certificate authority's root certificate, and click the Upload Certificate button. Installing an Imported Server Certificate In step 2, the details of the imported RADIUS server certificate and its issuer are shown, including the certificate's validity period. Select the Use this certificate to identify this RADIUS server check box and click the Apply Settings button to complete the import process and configure the EAP server certificate . After importing the certificate, the RADIUS server will need to be restarted to complete the changes. Exporting Server Certificates The Export Server Certificate form is used to export the RADIUS server's digital certificate, or the certificate authority's root certificate, in several different formats. Select one of these options to export a certificate file: Server certificate and CA issuer certificate (PKCS#7) - use this option to download a file containing the certificates for the CA and the server. Server certificate chain including private key (PKCS#12) - use this option if you are backing up the server's certificate, or moving it to another server. A passphrase is strongly recommended to protect the private key. Server certificate only - use this option to download just the RADIUS server's certificate, in either PKCS#7, Base-64 encoded (PEM), or binary (DER) formats. CA issuer certificate only - use this option to download the root certificate for the certificate authority. PEAP Sample Configuration To enable the common case of PEAPv0/MS-CHAPv2 (broadly supported by all wireless clients that implement 802.1X), follow the process described below: 1. Create or import a RADIUS server certificate. See "Creating a Server Certificate and Self-Signed Certificate Authority" and "Importing a Server Certificate" in this chapter for details. 2. Select the appropriate PEAP options in the EAP Configuration form, as shown below: Amigopod 3.7 | Deployment Guide RADIUS Services | 83
-
 1
1 -
2
-
3
-
4
-
5
-
6
-
7
-
8
-
9
-
10
-
11
-
12
-
13
-
14
-
15
-
16
-
17
-
18
-
19
-
20
-
21
-
22
-
23
-
24
-
25
-
26
-
27
-
28
-
29
-
30
-
31
-
32
-
33
-
34
-
35
-
36
-
37
-
38
-
39
-
40
-
41
-
42
-
43
-
44
-
45
-
46
-
47
-
48
-
49
-
50
-
51
-
52
-
53
-
54
-
55
-
56
-
57
-
58
-
59
-
60
-
61
-
62
-
63
-
64
-
65
-
66
-
67
-
68
-
69
-
70
-
71
-
72
-
73
-
74
-
75
-
76
-
77
-
 78
78 -
 79
79 -
 80
80 -
 81
81 -
 82
82 -
 83
83 -
 84
84 -
 85
85 -
 86
86 -
 87
87 -
 88
88 -
89
-
90
-
91
-
92
-
93
-
94
-
95
-
96
-
97
-
98
-
99
-
100
-
101
-
102
-
103
-
104
-
105
-
106
-
107
-
108
-
109
-
110
-
111
-
112
-
113
-
114
-
115
-
116
-
117
-
118
-
119
-
120
-
121
-
122
-
123
-
124
-
125
-
126
-
127
-
128
-
129
-
130
-
131
-
132
-
133
-
134
-
135
-
136
-
137
-
138
-
139
-
140
-
141
-
142
-
143
-
144
-
145
-
146
-
147
-
148
-
149
-
150
-
151
-
152
-
153
-
154
-
155
-
156
-
157
-
158
-
159
-
160
-
161
-
162
-
163
-
164
-
165
-
166
-
167
-
168
-
169
-
170
-
171
-
172
-
173
-
174
-
175
-
176
-
177
-
178
-
179
-
180
-
181
-
182
-
183
-
184
-
185
-
186
-
187
-
188
-
189
-
190
-
191
-
192
-
193
-
194
-
195
-
196
-
197
-
198
-
199
-
200
-
201
-
202
-
203
-
204
-
205
-
206
-
207
-
208
-
209
-
210
-
211
-
212
-
213
-
214
-
215
-
216
-
217
-
218
-
219
-
220
-
221
-
222
-
223
-
224
-
225
-
226
-
227
-
228
-
229
-
230
-
231
-
232
-
233
-
234
-
235
-
236
-
237
-
238
-
239
-
240
-
241
-
242
-
243
-
244
-
245
-
246
-
247
-
248
-
249
-
250
-
251
-
252
-
253
-
254
-
255
-
256
-
257
-
258
-
259
-
260
-
261
-
262
-
263
-
264
-
265
-
266
-
267
-
268
-
269
-
270
-
271
-
272
-
273
-
274
-
275
-
276
-
277
-
278
-
279
-
280
-
281
-
282
-
283
-
284
-
285
-
286
-
287
-
288
-
289
-
290
-
291
-
292
-
293
-
294
-
295
-
296
-
297
-
298
-
299
-
300
-
301
-
302
-
303
-
304
-
305
-
306
-
307
-
308
-
309
-
310
-
311
-
312
-
313
-
314
-
315
-
316
-
317
-
318
-
319
-
320
-
321
-
322
-
323
-
324
-
325
-
326
-
327
-
328
-
329
-
330
-
331
-
332
-
333
-
334
-
335
-
336
-
337
-
338
-
339
-
340
-
341
-
342
-
343
-
344
-
345
-
346
-
347
-
348
-
349
-
350
-
351
-
352
-
353
-
354
-
355
-
356
-
357
-
358
-
359
-
360
-
361
-
362
-
363
-
364
-
365
-
366
-
367
-
368
-
369
-
370
-
371
-
372
-
373
-
374
-
375
-
376
-
377
-
378
-
379
-
380
-
381
-
382
-
383
-
384
-
385
-
386
-
387
-
388
-
389
-
390
-
391
-
392
-
393
-
394
-
395
-
396
-
397
-
398
-
399
-
400
-
401
-
402
-
403
-
404
-
405
-
406
-
407
-
408
-
409
-
410
-
411
-
412
-
413
-
414
-
415
-
416
-
417
-
418
-
419
-
420
-
421
-
422
-
423
-
424
-
425
-
426
-
427
-
428
-
429
-
430
-
431
-
432
-
433
-
434
-
435
-
436
-
437
-
438
 |
 |