Dell V505w All In One Wireless Inkjet Printer User Guide - Page 108
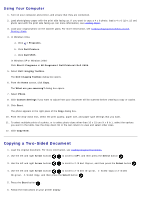
Copying a Two-Sided Document, Using Your Computer
 |
View all Dell V505w All In One Wireless Inkjet Printer manuals
Add to My Manuals
Save this manual to your list of manuals |
Page 108 highlights
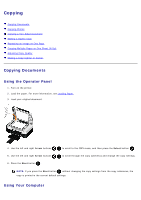
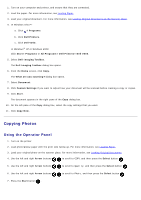
Using Your Computer 1. Turn on your computer and printer, and ensure that they are connected. 2. Load photo/glossy paper with the print side facing up. If you want to copy a 4 x 6 photo, load a 4 x 6 (10 x 15 cm) photo card with the print side facing up. For more information, see Loading Paper. 3. Load your original photo on the scanner glass. For more information, see Loading Original Documents on the Scanner Glass. 4. In Windows Vista: a. Click ® Programs. b. Click Dell Printers. c. Click Dell V505. In Windows XP or Windows 2000: Click Start® Programs or All Programs® Dell Printers® Dell V505. 5. Select Dell Imaging Toolbox. The Dell Imaging Toolbox dialog box opens. 6. From the Home screen, click Copy. The What are you scanning? dialog box opens. 7. Select Photo. 8. Click Custom Settings if you want to adjust how your document will be scanned before creating a copy or copies. 9. Click Start. The photo appears in the right pane of the Copy dialog box. 10. From the drop-down lists, select the print quality, paper size, and paper type settings that you want. 11. To select multiple prints of a photo, or to select photo sizes other than 10 x 15 cm (4 x 6 in.), select the options you want in the table. Use the drop-down list in the last column to view and select other sizes. 12. Click Copy Now. Copying a Two-Sided Document 1. Load the original document. For more information, see Loading Original Documents. 2. Use the left and right Arrow buttons to scroll to COPY, and then press the Select button . 3. Use the left and right Arrow buttons to scroll to 2-Sided Copies, and then press the Select button . 4. Use the left and right Arrow buttons to scroll to 2-Sided Original, 1-Sided Copy or 2-Sided Original, 2-Sided Copy, and then press the Select button . 5. Press the Start button . 6. Follow the instructions on your printer display.
-
 1
1 -
2
-
3
-
4
-
5
-
6
-
7
-
8
-
9
-
10
-
11
-
12
-
13
-
14
-
15
-
16
-
17
-
18
-
19
-
20
-
21
-
22
-
23
-
24
-
25
-
26
-
27
-
28
-
29
-
30
-
31
-
32
-
33
-
34
-
35
-
36
-
37
-
38
-
39
-
40
-
41
-
42
-
43
-
44
-
45
-
46
-
47
-
48
-
49
-
50
-
51
-
52
-
53
-
54
-
55
-
56
-
57
-
58
-
59
-
60
-
61
-
62
-
63
-
64
-
65
-
66
-
67
-
68
-
69
-
70
-
71
-
72
-
73
-
74
-
75
-
76
-
77
-
78
-
79
-
80
-
81
-
82
-
83
-
84
-
85
-
86
-
87
-
88
-
89
-
90
-
91
-
92
-
93
-
94
-
95
-
96
-
97
-
98
-
99
-
100
-
101
-
102
-
 103
103 -
 104
104 -
 105
105 -
 106
106 -
 107
107 -
 108
108 -
 109
109 -
 110
110 -
 111
111 -
 112
112 -
 113
113 -
114
-
115
-
116
-
117
-
118
-
119
-
120
-
121
-
122
-
123
-
124
-
125
-
126
-
127
-
128
-
129
-
130
-
131
-
132
-
133
-
134
-
135
-
136
-
137
-
138
-
139
-
140
-
141
-
142
-
143
-
144
-
145
-
146
-
147
-
148
-
149
-
150
-
151
-
152
-
153
-
154
-
155
-
156
-
157
-
158
-
159
-
160
-
161
-
162
-
163
-
164
-
165
 |
 |