Dell V505w All In One Wireless Inkjet Printer User Guide - Page 38
Arrow, Select, Fit Fax
 |
View all Dell V505w All In One Wireless Inkjet Printer manuals
Add to My Manuals
Save this manual to your list of manuals |
Page 38 highlights
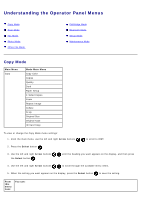
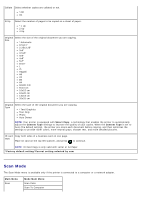
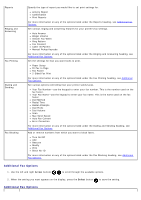
Fax Printing Dialing and Sending Fax Blocking Fax Forward Caller ID Pattern Manual Pickup Keycode Paper Setup Fit Fax to Page Fax Footer 2-Sided Fax Print Your Fax Number Your Fax Name Dial Method Redial Time Redial Attempts Dial Prefix Dial Volume Scan Max Send Speed Auto Fax Convert Error Correction Turn On/Off Add Remove Modify Print Block No-ID To view or change the Fax Mode menu settings: 1. From the main menu, use the left and right Arrow buttons to scroll to FAX. 2. Press the Select button . 3. The display asks for a phone number. Press the Select button . 4. Press the right Arrow button button . until the heading you want appears on the display, and then press the Select 5. Use the left and right Arrow buttons to scroll through the available menu items. 6. When the setting you want appears on the display, press the Select button submenu. In order for faxing to function properly: to save the setting or enter the The printer's FAX connector ( -lower connector) must be connected to an active telephone line. See Setting Up the Printer With External Devices for setup details. NOTE: You cannot fax with a DSL (digital subscriber line) or ISDN (integrated signature digital network)
-
 1
1 -
2
-
3
-
4
-
5
-
6
-
7
-
8
-
9
-
10
-
11
-
12
-
13
-
14
-
15
-
16
-
17
-
18
-
19
-
20
-
21
-
22
-
23
-
24
-
25
-
26
-
27
-
28
-
29
-
30
-
31
-
32
-
 33
33 -
 34
34 -
 35
35 -
 36
36 -
 37
37 -
 38
38 -
 39
39 -
 40
40 -
 41
41 -
 42
42 -
 43
43 -
44
-
45
-
46
-
47
-
48
-
49
-
50
-
51
-
52
-
53
-
54
-
55
-
56
-
57
-
58
-
59
-
60
-
61
-
62
-
63
-
64
-
65
-
66
-
67
-
68
-
69
-
70
-
71
-
72
-
73
-
74
-
75
-
76
-
77
-
78
-
79
-
80
-
81
-
82
-
83
-
84
-
85
-
86
-
87
-
88
-
89
-
90
-
91
-
92
-
93
-
94
-
95
-
96
-
97
-
98
-
99
-
100
-
101
-
102
-
103
-
104
-
105
-
106
-
107
-
108
-
109
-
110
-
111
-
112
-
113
-
114
-
115
-
116
-
117
-
118
-
119
-
120
-
121
-
122
-
123
-
124
-
125
-
126
-
127
-
128
-
129
-
130
-
131
-
132
-
133
-
134
-
135
-
136
-
137
-
138
-
139
-
140
-
141
-
142
-
143
-
144
-
145
-
146
-
147
-
148
-
149
-
150
-
151
-
152
-
153
-
154
-
155
-
156
-
157
-
158
-
159
-
160
-
161
-
162
-
163
-
164
-
165
 |
 |