Dell V505w All In One Wireless Inkjet Printer User Guide - Page 73
Printing a Banner, Printing Collated Copies of Your Document, Select s to Print
 |
View all Dell V505w All In One Wireless Inkjet Printer manuals
Add to My Manuals
Save this manual to your list of manuals |
Page 73 highlights
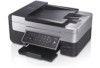
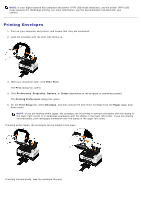
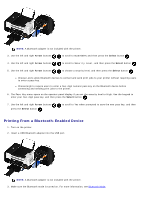
9. Click OK or Print. NOTE: To reprint a poster page individually, click Select Pages to Print from the Advanced tab. Click tiles to select or deselect pages to print, and then click OK. Printing a Banner 1. Turn on your computer and printer, and make sure they are connected. 2. Load the paper. For more information, see Loading Paper. 3. With your document open, click File® Print. 4. Click Preferences, Properties, Options, or Setup (depending on the program or operating system). The Printing Preferences dialog box opens. 5. On the Advanced tab, select Banner from the Layout drop-down list, and then select Letter Banner or A4 Banner from the Banner Paper Size drop-down list. 6. On the Print Setup and Advanced tabs, make any additional changes for your document. 7. After customizing your settings, click OK. The Printing Preferences dialog box closes. 8. Click OK or Print. NOTE: Once the printer begins printing, wait until you can see the leading edge of the banner exiting the printer, and then carefully unfold the paper down to the floor in front of the printer. Printing Collated Copies of Your Document 1. Turn on your computer and printer, and make sure they are connected. 2. Load the paper. For more information, see Loading Paper. 3. With your document open, click File® Print. The Print dialog box opens. 4. Click Preferences, Properties, Options, or Setup (depending on the program or operating system). The Printing Preferences dialog box opens. 5. On the Print Setup tab, specify the number of copies to print. NOTE: You must specify more than one copy for the Collate copies check box to become active. 6. Select the Collate copies check box. 7. On the Print Setup and Advanced tabs, make any additional changes for your document. 8. After customizing your settings, click OK. The Printing Preferences dialog box closes. 9. Click OK or Print.
-
 1
1 -
2
-
3
-
4
-
5
-
6
-
7
-
8
-
9
-
10
-
11
-
12
-
13
-
14
-
15
-
16
-
17
-
18
-
19
-
20
-
21
-
22
-
23
-
24
-
25
-
26
-
27
-
28
-
29
-
30
-
31
-
32
-
33
-
34
-
35
-
36
-
37
-
38
-
39
-
40
-
41
-
42
-
43
-
44
-
45
-
46
-
47
-
48
-
49
-
50
-
51
-
52
-
53
-
54
-
55
-
56
-
57
-
58
-
59
-
60
-
61
-
62
-
63
-
64
-
65
-
66
-
67
-
 68
68 -
 69
69 -
 70
70 -
 71
71 -
 72
72 -
 73
73 -
 74
74 -
 75
75 -
 76
76 -
 77
77 -
 78
78 -
79
-
80
-
81
-
82
-
83
-
84
-
85
-
86
-
87
-
88
-
89
-
90
-
91
-
92
-
93
-
94
-
95
-
96
-
97
-
98
-
99
-
100
-
101
-
102
-
103
-
104
-
105
-
106
-
107
-
108
-
109
-
110
-
111
-
112
-
113
-
114
-
115
-
116
-
117
-
118
-
119
-
120
-
121
-
122
-
123
-
124
-
125
-
126
-
127
-
128
-
129
-
130
-
131
-
132
-
133
-
134
-
135
-
136
-
137
-
138
-
139
-
140
-
141
-
142
-
143
-
144
-
145
-
146
-
147
-
148
-
149
-
150
-
151
-
152
-
153
-
154
-
155
-
156
-
157
-
158
-
159
-
160
-
161
-
162
-
163
-
164
-
165
 |
 |