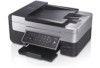
Dell V505w All In One Wireless Inkjet Printer User Guide - Page 31
Changing DHCP Settings, Changing Wireless Settings after Installation, Arrow, Select, Address, TCP/IP
 |
View all Dell V505w All In One Wireless Inkjet Printer manuals
Add to My Manuals
Save this manual to your list of manuals |
Page 31 highlights
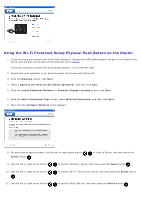
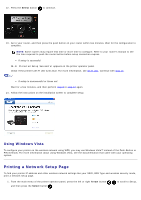
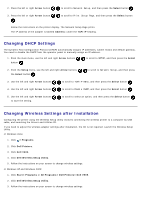
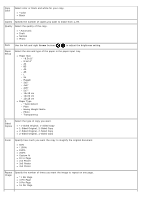
2. Press the left or right Arrow button to scroll to Network Setup, and then press the Select button . 3. Press the left or right Arrow button . to scroll to Print Setup Page, and then press the Select button Follow the instructions on the printer display. The Network Setup Page prints. The IP address of the adapter is labeled Address: under the TCP/IP heading. Changing DHCP Settings The Dynamic Host Configuration Protocol (DHCP) automatically assigns IP addresses, subnet masks and default gateway. You need to disable the DHCP from the operator panel to manually assign an IP address. 1. From the main menu, use the left and right Arrow buttons button . to scroll to SETUP, and then press the Select 2. From the Setup menu, use the left and right Arrow buttons the Select button . to scroll to Network Setup, and then press 3. Use the left and right Arrow buttons to scroll to TCP/IP Menu, and then press the Select button . 4. Use the left and right Arrow buttons to scroll to Enable DHCP, and then press the Select button . 5. Use the left and right Arrow buttons to save the setting. to scroll to select an option, and then press the Select button Changing Wireless Settings after Installation Configuring the printer using the Wireless Setup Utility involves connecting the wireless printer to a computer by USB cable, and launching the Drivers and Utilities CD. If you need to adjust the wireless adapter settings after installation, the CD is not required. Launch the Wireless Setup Utility. In Windows Vista: 1. Click ® Programs. 2. Click Dell Printers. 3. Click Dell V505. 4. Click Dell Wireless Setup Utility. 5. Follow the instructions on your screen to change wireless settings. In Windows XP and Windows 2000: 1. Click Start® Programs or All Programs® Dell Printers® Dell V505. 2. Click Dell Wireless Setup Utility. 3. Follow the instructions on your screen to change wireless settings.
-
 1
1 -
2
-
3
-
4
-
5
-
6
-
7
-
8
-
9
-
10
-
11
-
12
-
13
-
14
-
15
-
16
-
17
-
18
-
19
-
20
-
21
-
22
-
23
-
24
-
25
-
 26
26 -
 27
27 -
 28
28 -
 29
29 -
 30
30 -
 31
31 -
 32
32 -
 33
33 -
 34
34 -
 35
35 -
 36
36 -
37
-
38
-
39
-
40
-
41
-
42
-
43
-
44
-
45
-
46
-
47
-
48
-
49
-
50
-
51
-
52
-
53
-
54
-
55
-
56
-
57
-
58
-
59
-
60
-
61
-
62
-
63
-
64
-
65
-
66
-
67
-
68
-
69
-
70
-
71
-
72
-
73
-
74
-
75
-
76
-
77
-
78
-
79
-
80
-
81
-
82
-
83
-
84
-
85
-
86
-
87
-
88
-
89
-
90
-
91
-
92
-
93
-
94
-
95
-
96
-
97
-
98
-
99
-
100
-
101
-
102
-
103
-
104
-
105
-
106
-
107
-
108
-
109
-
110
-
111
-
112
-
113
-
114
-
115
-
116
-
117
-
118
-
119
-
120
-
121
-
122
-
123
-
124
-
125
-
126
-
127
-
128
-
129
-
130
-
131
-
132
-
133
-
134
-
135
-
136
-
137
-
138
-
139
-
140
-
141
-
142
-
143
-
144
-
145
-
146
-
147
-
148
-
149
-
150
-
151
-
152
-
153
-
154
-
155
-
156
-
157
-
158
-
159
-
160
-
161
-
162
-
163
-
164
-
165
 |
 |