Dell V505w All In One Wireless Inkjet Printer User Guide - Page 36
Arrow, Select, You can, Scan To Memory Device
 |
View all Dell V505w All In One Wireless Inkjet Printer manuals
Add to My Manuals
Save this manual to your list of manuals |
Page 36 highlights
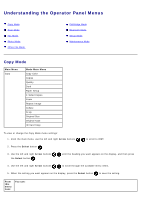
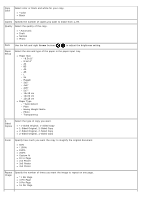
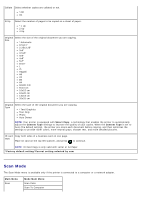
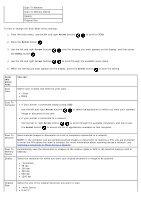
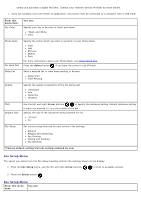
Scan To Network Scan To Memory Device Quality Original Size To view or change the Scan Mode menu settings: 1. From the main menu, use the left and right Arrow buttons to scroll to SCAN. 2. Press the Select button . 3. Use the left and right Arrow buttons the Select button . until the heading you want appears on the display, and then press 4. Use the left and right Arrow buttons to scroll through the available menu items. 5. When the setting you want appears on the display, press the Select button to save the setting. From this menu item: Scan Color You can: Select color or black and white for your copy. *Color Black Scan To Computer If your printer is connected locally (using USB): Use the left and right Arrow buttons image or document to be sent. to select the application to which you want your scanned If your printer is connected to a network: Use the left or right Arrow button to scroll through the available computers, and then press the Select button to access the list of applications available on that computer. Scan To Network Scan To Memory Device Quality Send scanned images or documents to a list of computers connected to a network. NOTE: If the computer you are sending scanned images or documents to requires a PIN, you are prompted to enter the PIN before the scan is initiated. For more information about scanning across a network, see Scanning a Document or Photo Across a Network. Automatically save the documents or images on the scanner glass or ADF to the inserted memory card or USB key. Select the resolution for which you want your original document or image to be scanned. *Automatic 75 dpi 150 dpi 300 dpi 600 dpi 1200 dpi Original Size Select the size of the original document you want to scan. *Auto Detect 8.5x11"
-
 1
1 -
2
-
3
-
4
-
5
-
6
-
7
-
8
-
9
-
10
-
11
-
12
-
13
-
14
-
15
-
16
-
17
-
18
-
19
-
20
-
21
-
22
-
23
-
24
-
25
-
26
-
27
-
28
-
29
-
30
-
 31
31 -
 32
32 -
 33
33 -
 34
34 -
 35
35 -
 36
36 -
 37
37 -
 38
38 -
 39
39 -
 40
40 -
 41
41 -
42
-
43
-
44
-
45
-
46
-
47
-
48
-
49
-
50
-
51
-
52
-
53
-
54
-
55
-
56
-
57
-
58
-
59
-
60
-
61
-
62
-
63
-
64
-
65
-
66
-
67
-
68
-
69
-
70
-
71
-
72
-
73
-
74
-
75
-
76
-
77
-
78
-
79
-
80
-
81
-
82
-
83
-
84
-
85
-
86
-
87
-
88
-
89
-
90
-
91
-
92
-
93
-
94
-
95
-
96
-
97
-
98
-
99
-
100
-
101
-
102
-
103
-
104
-
105
-
106
-
107
-
108
-
109
-
110
-
111
-
112
-
113
-
114
-
115
-
116
-
117
-
118
-
119
-
120
-
121
-
122
-
123
-
124
-
125
-
126
-
127
-
128
-
129
-
130
-
131
-
132
-
133
-
134
-
135
-
136
-
137
-
138
-
139
-
140
-
141
-
142
-
143
-
144
-
145
-
146
-
147
-
148
-
149
-
150
-
151
-
152
-
153
-
154
-
155
-
156
-
157
-
158
-
159
-
160
-
161
-
162
-
163
-
164
-
165
 |
 |