Dell V505w All In One Wireless Inkjet Printer User Guide - Page 116
Scanning, Scanning Single- Documents and Single Photos
 |
View all Dell V505w All In One Wireless Inkjet Printer manuals
Add to My Manuals
Save this manual to your list of manuals |
Page 116 highlights
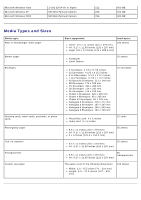
Scanning Scanning Single-Page Documents and Single Photos Scanning Multi-Page Documents Using the ADF Scanning Multiple Photos Into a Single File Scanning a Document or Photo Across a Network Scanning Documents for Editing Scanning Photos for Editing Saving Photos on Your Computer Resizing Images or Documents E-Mailing Documents or Photos Creating a PDF Customizing Scan Settings Scanning Single-Page Documents and Single Photos Using the Operator Panel 1. Turn on your computer and printer, and make sure they are connected. If you want to scan over the network, make sure your printer is connected to the network. 2. Load your original document. For more information, see Loading Original Documents. NOTE: Do not load postcards, photo cards, photo paper, or small images in the Automatic Document Feeder (ADF). Place these items on the scanner glass. 3. Use the left and right Arrow buttons to scroll to SCAN, and then press the Select button . 4. If your printer is connected locally (using USB): a. Use the left and right Arrow buttons button . to scroll to Scan To Computer, and then press the Select b. The printer downloads the application list from the computer. Use the left and right Arrow buttons can be sent. to scroll through the available applications to which your scan c. When the application you want to use appears on the display, press the Select button . If your printer is connected to a network: NOTE: This printer can only be attached to a network using a Dell™ Internal Network Adapter 1150 (sold separately). a. Use the left and right Arrow buttons button . to scroll to Scan To Network, and then press the Select b. Use the left and right Arrow buttons can be sent. to scroll through the available computers to which your scan
-
 1
1 -
2
-
3
-
4
-
5
-
6
-
7
-
8
-
9
-
10
-
11
-
12
-
13
-
14
-
15
-
16
-
17
-
18
-
19
-
20
-
21
-
22
-
23
-
24
-
25
-
26
-
27
-
28
-
29
-
30
-
31
-
32
-
33
-
34
-
35
-
36
-
37
-
38
-
39
-
40
-
41
-
42
-
43
-
44
-
45
-
46
-
47
-
48
-
49
-
50
-
51
-
52
-
53
-
54
-
55
-
56
-
57
-
58
-
59
-
60
-
61
-
62
-
63
-
64
-
65
-
66
-
67
-
68
-
69
-
70
-
71
-
72
-
73
-
74
-
75
-
76
-
77
-
78
-
79
-
80
-
81
-
82
-
83
-
84
-
85
-
86
-
87
-
88
-
89
-
90
-
91
-
92
-
93
-
94
-
95
-
96
-
97
-
98
-
99
-
100
-
101
-
102
-
103
-
104
-
105
-
106
-
107
-
108
-
109
-
110
-
 111
111 -
 112
112 -
 113
113 -
 114
114 -
 115
115 -
 116
116 -
 117
117 -
 118
118 -
 119
119 -
 120
120 -
 121
121 -
122
-
123
-
124
-
125
-
126
-
127
-
128
-
129
-
130
-
131
-
132
-
133
-
134
-
135
-
136
-
137
-
138
-
139
-
140
-
141
-
142
-
143
-
144
-
145
-
146
-
147
-
148
-
149
-
150
-
151
-
152
-
153
-
154
-
155
-
156
-
157
-
158
-
159
-
160
-
161
-
162
-
163
-
164
-
165
 |
 |