Dell V505w All In One Wireless Inkjet Printer User Guide - Page 139
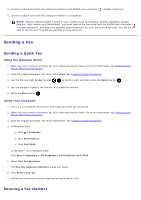
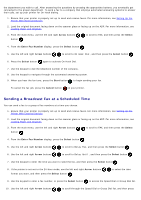
Sending a Broadcast Fax at a Scheduled Time, Arrow, Select, Enter Fax Number, Start, Cancel
 |
View all Dell V505w All In One Wireless Inkjet Printer manuals
Add to My Manuals
Save this manual to your list of manuals |
Page 139 highlights
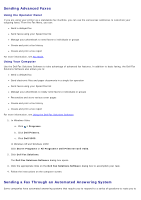
the department you wish to call. After answering the questions by pressing the appropriate buttons, you eventually get connected to the proper department. To send a fax to a company that employs automated answering systems to answer their calls, set up your printer for On Hook dialing. 1. Ensure that your printer is properly set up to send and receive faxes. For more information, see Setting Up the Printer With External Devices. 2. Load the original document facing down on the scanner glass or facing up on the ADF. For more information, see Loading Paper and Originals. 3. From the main menu, use the left and right Arrow buttons button . to scroll to FAX, and then press the Select 4. From the Enter Fax Number display, press the Select button . 5. Use the left and right Arrow buttons to scroll to On Hook Dial, and then press the Select button . 6. Press the Select button again to activate On Hook Dial. 7. Use the keypad to dial the telephone number of the company. 8. Use the keypad to navigate through the automated answering system. 9. When you hear the fax tone, press the Start button to begin sending your fax. To cancel the fax job, press the Cancel button on your printer. Sending a Broadcast Fax at a Scheduled Time You can send a fax to a group of fax numbers at a time you choose. 1. Ensure that your printer is properly set up to send and receive faxes. For more information, see Setting Up the Printer With External Devices. 2. Load the original document facing down on the scanner glass or facing up on the ADF. For more information, see Loading Paper and Originals. 3. From the main menu, use the left and right Arrow buttons button . to scroll to FAX, and then press the Select 4. From the Enter Fax Number display, press the Select button . 5. Use the left and right Arrow buttons to scroll to Delay Fax, and then press the Select button . 6. Use the left and right Arrow buttons to scroll to Delay Until, and then press the Select button . 7. Use the keypad to enter the time you want to send the fax, and then press the Select button . 8. If the printer is not set to the 24-hour mode, use the left and right Arrow buttons format you want, and then press the Select button . to select the time 9. Use the keypad to enter a fax number, or press the Select button to access the Speed Dial or Group Dial list. 10. Use the left and right Arrow buttons to scroll through the Speed Dial or Group Dial list, and then press
-
 1
1 -
2
-
3
-
4
-
5
-
6
-
7
-
8
-
9
-
10
-
11
-
12
-
13
-
14
-
15
-
16
-
17
-
18
-
19
-
20
-
21
-
22
-
23
-
24
-
25
-
26
-
27
-
28
-
29
-
30
-
31
-
32
-
33
-
34
-
35
-
36
-
37
-
38
-
39
-
40
-
41
-
42
-
43
-
44
-
45
-
46
-
47
-
48
-
49
-
50
-
51
-
52
-
53
-
54
-
55
-
56
-
57
-
58
-
59
-
60
-
61
-
62
-
63
-
64
-
65
-
66
-
67
-
68
-
69
-
70
-
71
-
72
-
73
-
74
-
75
-
76
-
77
-
78
-
79
-
80
-
81
-
82
-
83
-
84
-
85
-
86
-
87
-
88
-
89
-
90
-
91
-
92
-
93
-
94
-
95
-
96
-
97
-
98
-
99
-
100
-
101
-
102
-
103
-
104
-
105
-
106
-
107
-
108
-
109
-
110
-
111
-
112
-
113
-
114
-
115
-
116
-
117
-
118
-
119
-
120
-
121
-
122
-
123
-
124
-
125
-
126
-
127
-
128
-
129
-
130
-
131
-
132
-
133
-
 134
134 -
 135
135 -
 136
136 -
 137
137 -
 138
138 -
 139
139 -
 140
140 -
 141
141 -
 142
142 -
 143
143 -
 144
144 -
145
-
146
-
147
-
148
-
149
-
150
-
151
-
152
-
153
-
154
-
155
-
156
-
157
-
158
-
159
-
160
-
161
-
162
-
163
-
164
-
165
 |
 |