Dell V505w All In One Wireless Inkjet Printer User Guide - Page 29
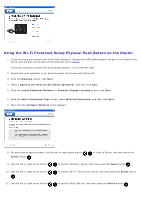
Using the Wi-Fi Protected Setup Physical Push Button on the Router
 |
View all Dell V505w All In One Wireless Inkjet Printer manuals
Add to My Manuals
Save this manual to your list of manuals |
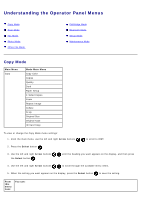
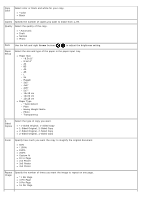
Page 29 highlights
Using the Wi-Fi Protected Setup Physical Push Button on the Router 1. If you are using your printer with a new Dell computer: Connect the USB cable between the port on the back of the printer and the port on the back of the computer. Go to step 6. If you are using your printer with an existing computer: Go to the next step. 2. Ensure that your computer is on, and then insert the Drivers and Utilities CD. 3. From the Welcome screen, click Next. 4. Select I Agree to the terms of this license agreement, and then click Next. 5. From the Install Additional Software or Software Already Installed screen, click Next. 6. From the Select Connection Type screen, select Wireless Connection, and then click Next. 7. Wait until the Configure Wireless screen appears. 8. On your printer operator panel, use the left or right arrow button Select button . to scroll to Setup, and then press the 9. Use the left or right arrow button to scroll to Network Setup, and then press the Select button . 10. Use the left or right arrow button . to scroll to Wi-Fi Protected Setup, and then press the Select button 11. Use the left or right arrow button to scroll to Push Button, and then press the Select button .
-
 1
1 -
2
-
3
-
4
-
5
-
6
-
7
-
8
-
9
-
10
-
11
-
12
-
13
-
14
-
15
-
16
-
17
-
18
-
19
-
20
-
21
-
22
-
23
-
 24
24 -
 25
25 -
 26
26 -
 27
27 -
 28
28 -
 29
29 -
 30
30 -
 31
31 -
 32
32 -
 33
33 -
 34
34 -
35
-
36
-
37
-
38
-
39
-
40
-
41
-
42
-
43
-
44
-
45
-
46
-
47
-
48
-
49
-
50
-
51
-
52
-
53
-
54
-
55
-
56
-
57
-
58
-
59
-
60
-
61
-
62
-
63
-
64
-
65
-
66
-
67
-
68
-
69
-
70
-
71
-
72
-
73
-
74
-
75
-
76
-
77
-
78
-
79
-
80
-
81
-
82
-
83
-
84
-
85
-
86
-
87
-
88
-
89
-
90
-
91
-
92
-
93
-
94
-
95
-
96
-
97
-
98
-
99
-
100
-
101
-
102
-
103
-
104
-
105
-
106
-
107
-
108
-
109
-
110
-
111
-
112
-
113
-
114
-
115
-
116
-
117
-
118
-
119
-
120
-
121
-
122
-
123
-
124
-
125
-
126
-
127
-
128
-
129
-
130
-
131
-
132
-
133
-
134
-
135
-
136
-
137
-
138
-
139
-
140
-
141
-
142
-
143
-
144
-
145
-
146
-
147
-
148
-
149
-
150
-
151
-
152
-
153
-
154
-
155
-
156
-
157
-
158
-
159
-
160
-
161
-
162
-
163
-
164
-
165
 |
 |
