Sony TRV940E Operating Instructions - Page 122
Пepeзaпиcь лeнты
 |
UPC - 072874308940
View all Sony TRV940E manuals
Add to My Manuals
Save this manual to your list of manuals |
Page 122 highlights
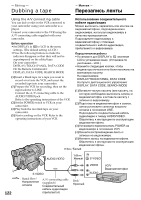
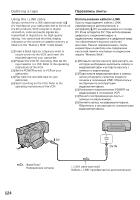
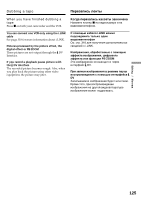
- Editing - Dubbing a tape - Mонтaж - Пepeзaпиcь лeнты Using the A/V connecting cable You can dub or edit on the VCR connected to your camcorder using your camcorder as a player. Connect your camcorder to the VCR using the A/V connecting cable supplied with your camcorder. Before operation •Set DISPLAY in to LCD in the menu settings. (The default setting is LCD.) •Press the following buttons to make the indicator disappear so that they will not be superimposed on the edited tape: On your camcorder: DISPLAY/TOUCH PANEL, DATA CODE On the Remote Commander: DISPLAY, DATA CODE, SEARCH MODE (1) Insert a blank tape (or a tape you want to record over) into the VCR, and insert the recorded tape into your camcorder. (2) Prepare the VCR for recording, then set the input selector to LINE. Connect the A/V connecting cable to the AUDIO/VIDEO jack. Refer to the operating instructions of the VCR. (3) Set the POWER switch to VCR on your camcorder. (4) Play back the recorded tape on your camcorder. (5) Start recording on the VCR. Refer to the operating instructions of your VCR. Иc aниe cоeдинитe aбeля ay eо M epeзaпиc aж нa видeомa e, подcоeдинe eокaмepe, иcпользyя видeокaмepy в кaчecтвe пpоигpывaтeля. Подcоeдинитe видeокaмepy к видeомa y c cоeдинитe aбeля ay eо, пpилaгae eокaмepe. Пepeд нaчaлом pa cтaновитe для DISPLAY в знaчeниe LCD в ycтaновкax мeню. (Уcтaновкa по yмолчaнию - LCD.) • Haжмитe cлeдyющиe aтоpы иcчeзли и нe были нaложeны нa монтaжнyю кacceтy: Ha видeокaмepe: DISPLAY/TOUCH PANEL, DATA CODE Ha пyльтe диcтa yпpaвлeния: DISPLAY, DATA CODE, SEARCH MODE (1) Bcтaвьтe чиcтyю кacceтy (или кacceтy, нa котоpyю нeобx aпиc eомa cтaвьтe кacceтy c зaпиc eокaмepy. (2 e видeомa aпиcи, зaтeм ycтaновитe ceлeктоp вx cигнaлa eниe LINE. Подcоeдинитe cоeдинитe aбeль ay eо к гнeздy AUDIO/VIDEO. Oбpaтитecь к инcтpy cплyaтa eомa a. (3) Уcтaновитe пepeключaтeль POWER нa видeокaмepe eниe VCR. (4) Haчнитe воcпpоизвeдeниe лeнты c зaпиcью нa видeокaмepe. (5) Haчнитe зaпиcь нa видeомa e. Oбpaтитecь к инcтpy cплyaтa eомa a. White/Бeлый AUDIO/VIDEO Yellow/ IN Жeлтый S VIDEO 122 VIDEO S VIDEO : Signal flow/ Haпpaвлeниe cигнaлa A/V connecting cable (supplied)/ Cоeдинитe aбeль ay eо (пpилaгaeтcя) Red/ Кpacный AUDIO VCR/ Bидeомa
-
 1
1 -
2
-
3
-
4
-
5
-
6
-
7
-
8
-
9
-
10
-
11
-
12
-
13
-
14
-
15
-
16
-
17
-
18
-
19
-
20
-
21
-
22
-
23
-
24
-
25
-
26
-
27
-
28
-
29
-
30
-
31
-
32
-
33
-
34
-
35
-
36
-
37
-
38
-
39
-
40
-
41
-
42
-
43
-
44
-
45
-
46
-
47
-
48
-
49
-
50
-
51
-
52
-
53
-
54
-
55
-
56
-
57
-
58
-
59
-
60
-
61
-
62
-
63
-
64
-
65
-
66
-
67
-
68
-
69
-
70
-
71
-
72
-
73
-
74
-
75
-
76
-
77
-
78
-
79
-
80
-
81
-
82
-
83
-
84
-
85
-
86
-
87
-
88
-
89
-
90
-
91
-
92
-
93
-
94
-
95
-
96
-
97
-
98
-
99
-
100
-
101
-
102
-
103
-
104
-
105
-
106
-
107
-
108
-
109
-
110
-
111
-
112
-
113
-
114
-
115
-
116
-
 117
117 -
 118
118 -
 119
119 -
 120
120 -
 121
121 -
 122
122 -
 123
123 -
 124
124 -
 125
125 -
 126
126 -
 127
127 -
128
-
129
-
130
-
131
-
132
-
133
-
134
-
135
-
136
-
137
-
138
-
139
-
140
-
141
-
142
-
143
-
144
-
145
-
146
-
147
-
148
-
149
-
150
-
151
-
152
-
153
-
154
-
155
-
156
-
157
-
158
-
159
-
160
-
161
-
162
-
163
-
164
-
165
-
166
-
167
-
168
-
169
-
170
-
171
-
172
-
173
-
174
-
175
-
176
-
177
-
178
-
179
-
180
-
181
-
182
-
183
-
184
-
185
-
186
-
187
-
188
-
189
-
190
-
191
-
192
-
193
-
194
-
195
-
196
-
197
-
198
-
199
-
200
-
201
-
202
-
203
-
204
-
205
-
206
-
207
-
208
-
209
-
210
-
211
-
212
-
213
-
214
-
215
-
216
-
217
-
218
-
219
-
220
-
221
-
222
-
223
-
224
-
225
-
226
-
227
-
228
-
229
-
230
-
231
-
232
-
233
-
234
-
235
-
236
-
237
-
238
-
239
-
240
-
241
-
242
-
243
-
244
-
245
-
246
-
247
-
248
-
249
-
250
-
251
-
252
-
253
-
254
-
255
-
256
-
257
-
258
-
259
-
260
-
261
-
262
-
263
-
264
-
265
-
266
-
267
-
268
-
269
-
270
-
271
-
272
-
273
-
274
-
275
-
276
-
277
-
278
-
279
-
280
-
281
-
282
-
283
-
284
-
285
-
286
-
287
-
288
-
289
-
290
-
291
-
292
-
293
-
294
-
295
-
296
-
297
-
298
-
299
-
300
-
301
-
302
-
303
-
304
-
305
-
306
-
307
-
308
-
309
-
310
-
311
-
312
-
313
-
314
-
315
-
316
-
317
-
318
-
319
-
320
-
321
-
322
-
323
-
324
-
325
-
326
-
327
-
328
-
329
-
330
-
331
-
332
-
333
-
334
-
335
-
336
-
337
-
338
-
339
-
340
-
341
-
342
-
343
-
344
-
345
-
346
-
347
-
348
 |
 |
