Yamaha AW4416 Owner's Manual - Page 109
Using the Solo function
 |
View all Yamaha AW4416 manuals
Add to My Manuals
Save this manual to your list of manuals |
Page 109 highlights
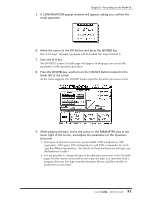
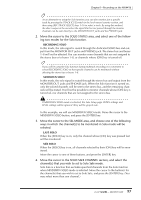
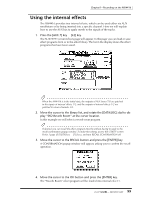
Chapter5-Recording on the AW4416 6. Raise the STEREO fader to the 0 dB position. 7. Make sure that [ON] keys 1-16 and the STEREO [ON] key are lit, play back the song from the beginning, and use faders 1-16 to set the level of each track. At this time, watch the L/R level meter of the level meter/counter, and do not allow the red 0 dB segment to light. 8. To adjust the EQ of a specific channel, use the [SEL] key to select the channel and operate the EQ [HIGH]/[HI-MID]/[LO-MID]/[LOW] keys and the EQ [Q]/[F]/[G] controls. 9. To use the dynamics processor of a specific channel, use the [SEL] key to select the channel and press [DYN] key ¡ [F2] key to load the desired dynamics program. For the procedure of loading a dynamics program, refer to page 92. To edit the dynamics processor parameters, press the MIXER section [DYN] key ¡ [F1] key to access the DYN/DLY screen Dyn.Edit page. Using the Solo function The AW4416 provides a flexible Solo function. By pressing the top panel [SOLO] during recording or playback and using one of the [ON] keys to select a desired channel, you can monitor only the corresponding channel. Here we will explain how you can use the Solo function to monitor only the desired track during mixdown. 1. Press the [SETUP] key ¡ [F3] key. The SET UP screen Solo Setup page will appear. In this page you can make various settings for the Solo function. If the Solo Setup tab is not assigned to the [F3] key, press the [SHIFT] key + [F1] key to switch the tab, and then press the [F3] key. 96 - Operation Guide
-
 1
1 -
2
-
3
-
4
-
5
-
6
-
7
-
8
-
9
-
10
-
11
-
12
-
13
-
14
-
15
-
16
-
17
-
18
-
19
-
20
-
21
-
22
-
23
-
24
-
25
-
26
-
27
-
28
-
29
-
30
-
31
-
32
-
33
-
34
-
35
-
36
-
37
-
38
-
39
-
40
-
41
-
42
-
43
-
44
-
45
-
46
-
47
-
48
-
49
-
50
-
51
-
52
-
53
-
54
-
55
-
56
-
57
-
58
-
59
-
60
-
61
-
62
-
63
-
64
-
65
-
66
-
67
-
68
-
69
-
70
-
71
-
72
-
73
-
74
-
75
-
76
-
77
-
78
-
79
-
80
-
81
-
82
-
83
-
84
-
85
-
86
-
87
-
88
-
89
-
90
-
91
-
92
-
93
-
94
-
95
-
96
-
97
-
98
-
99
-
100
-
101
-
102
-
103
-
 104
104 -
 105
105 -
 106
106 -
 107
107 -
 108
108 -
 109
109 -
 110
110 -
 111
111 -
 112
112 -
 113
113 -
 114
114 -
115
-
116
-
117
-
118
-
119
-
120
-
121
-
122
-
123
-
124
-
125
-
126
-
127
-
128
-
129
-
130
-
131
-
132
-
133
-
134
-
135
-
136
-
137
-
138
-
139
-
140
-
141
-
142
-
143
-
144
-
145
-
146
-
147
-
148
-
149
-
150
-
151
-
152
-
153
-
154
-
155
-
156
-
157
-
158
-
159
-
160
-
161
-
162
-
163
-
164
-
165
-
166
-
167
-
168
-
169
-
170
-
171
-
172
-
173
-
174
-
175
-
176
-
177
-
178
-
179
-
180
-
181
-
182
-
183
-
184
-
185
-
186
-
187
-
188
-
189
-
190
-
191
-
192
-
193
-
194
-
195
-
196
-
197
-
198
-
199
-
200
-
201
-
202
-
203
-
204
-
205
-
206
-
207
-
208
-
209
-
210
-
211
-
212
-
213
-
214
-
215
-
216
-
217
-
218
-
219
-
220
-
221
-
222
-
223
-
224
-
225
-
226
-
227
-
228
-
229
-
230
-
231
-
232
-
233
-
234
-
235
-
236
-
237
-
238
-
239
-
240
-
241
-
242
-
243
-
244
-
245
-
246
-
247
-
248
-
249
-
250
-
251
-
252
-
253
-
254
-
255
-
256
-
257
-
258
-
259
-
260
-
261
-
262
-
263
-
264
-
265
-
266
-
267
-
268
-
269
-
270
-
271
-
272
-
273
-
274
-
275
-
276
-
277
-
278
-
279
 |
 |