Yamaha AW4416 Owner's Manual - Page 257
DATA/JOG] dial to select the sound that you wish to backup.
 |
View all Yamaha AW4416 manuals
Add to My Manuals
Save this manual to your list of manuals |
Page 257 highlights
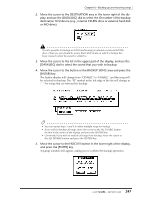
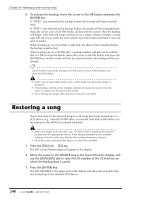
Chapter16-Backing up and restoring songs 2. Move the cursor to the DESTINATION area in the lower right of the display, and use the [DATA/JOG] dial to select the ID number of the backup destination SCSI device (e.g., internal CD-RW drive or external hard disk or MO drive). It is also possible to backup on CD-R media using an internal or external CD-RW drive. However, you should be aware that CD-R media on which a backup has been created cannot be erased or added to. 3. Move the cursor to the list in the upper part of the display, and use the [DATA/JOG] dial to select the sound that you wish to backup. 4. Move the cursor to the button in the BACKUP SONG area and press the [ENTER] key. The button display will change from "DISABLE" to "ENABLE," and the song will be selected for backup. The "O" symbol at the left edge of the list will change to "q" for songs that are selected for backup. Tip! • You can repeat steps 3 and 4 to select multiple songs for backup. • If you wish to backup all songs, move the cursor to the ALL ENABLE button located in the center of the display, and press the [ENTER] key. • Conversely if you wish to exclude all songs from backup, move the cursor to the ALL DISABLE button and press the [ENTER] key. 5. Move the cursor to the EXECUTE button in the lower right of the display, and press the [ENTER] key. A popup window will appear, asking you to confirm the backup operation. 247 - Operation Guide
-
 1
1 -
2
-
3
-
4
-
5
-
6
-
7
-
8
-
9
-
10
-
11
-
12
-
13
-
14
-
15
-
16
-
17
-
18
-
19
-
20
-
21
-
22
-
23
-
24
-
25
-
26
-
27
-
28
-
29
-
30
-
31
-
32
-
33
-
34
-
35
-
36
-
37
-
38
-
39
-
40
-
41
-
42
-
43
-
44
-
45
-
46
-
47
-
48
-
49
-
50
-
51
-
52
-
53
-
54
-
55
-
56
-
57
-
58
-
59
-
60
-
61
-
62
-
63
-
64
-
65
-
66
-
67
-
68
-
69
-
70
-
71
-
72
-
73
-
74
-
75
-
76
-
77
-
78
-
79
-
80
-
81
-
82
-
83
-
84
-
85
-
86
-
87
-
88
-
89
-
90
-
91
-
92
-
93
-
94
-
95
-
96
-
97
-
98
-
99
-
100
-
101
-
102
-
103
-
104
-
105
-
106
-
107
-
108
-
109
-
110
-
111
-
112
-
113
-
114
-
115
-
116
-
117
-
118
-
119
-
120
-
121
-
122
-
123
-
124
-
125
-
126
-
127
-
128
-
129
-
130
-
131
-
132
-
133
-
134
-
135
-
136
-
137
-
138
-
139
-
140
-
141
-
142
-
143
-
144
-
145
-
146
-
147
-
148
-
149
-
150
-
151
-
152
-
153
-
154
-
155
-
156
-
157
-
158
-
159
-
160
-
161
-
162
-
163
-
164
-
165
-
166
-
167
-
168
-
169
-
170
-
171
-
172
-
173
-
174
-
175
-
176
-
177
-
178
-
179
-
180
-
181
-
182
-
183
-
184
-
185
-
186
-
187
-
188
-
189
-
190
-
191
-
192
-
193
-
194
-
195
-
196
-
197
-
198
-
199
-
200
-
201
-
202
-
203
-
204
-
205
-
206
-
207
-
208
-
209
-
210
-
211
-
212
-
213
-
214
-
215
-
216
-
217
-
218
-
219
-
220
-
221
-
222
-
223
-
224
-
225
-
226
-
227
-
228
-
229
-
230
-
231
-
232
-
233
-
234
-
235
-
236
-
237
-
238
-
239
-
240
-
241
-
242
-
243
-
244
-
245
-
246
-
247
-
248
-
249
-
250
-
251
-
 252
252 -
 253
253 -
 254
254 -
 255
255 -
 256
256 -
 257
257 -
 258
258 -
 259
259 -
 260
260 -
 261
261 -
 262
262 -
263
-
264
-
265
-
266
-
267
-
268
-
269
-
270
-
271
-
272
-
273
-
274
-
275
-
276
-
277
-
278
-
279
 |
 |
