Yamaha AW4416 Owner's Manual - Page 229
Overwriting events
 |
View all Yamaha AW4416 manuals
Add to My Manuals
Save this manual to your list of manuals |
Page 229 highlights
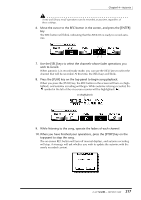
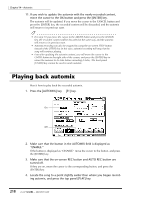
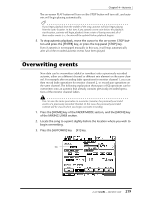
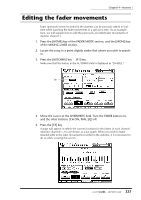
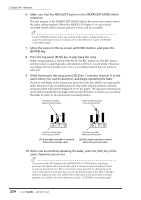
Chapter14-Automix The on-screen PLAY button will turn on (the STOP button will turn off), and automix will begin playing automatically. Note If you begin playback from the middle of the song, automix will also begin playing from the same location. At this time if any automix events exist before the playback start location, automix will begin playback from a state of having executed all of these earlier events (i.e., the mix will be updated before playback begins). 5. To stop automix playback, move the cursor to the on-screen STOP button and press the [ENTER] key, or press the top panel [STOP] key. Even if automix is not stopped manually in this way, it will stop automatically after all of the recorded automix events have been played. Overwriting events New data can be overwritten (added or rewritten) onto a previously-recorded automix, either on a different channel or different mix element on the same channel. For example after recording fader operations for monitor channel 1, you can then record fader operations for monitor channel 2, or record pan operations on the same channel. The following explanation shows pan or EQ operations can be overwritten onto an automix that already contains previously-recorded operations of the monitor channel faders. You can use the same procedure to overwrite (rewrite) the previously-recorded events of a previously-recorded channel. In this case, the previously-recorded content will be erased when you begin overwrite-recording. 1. Press the [HOME] key of the FADER MODE section, and the [MONI] key of the MIXING LAYER section. 2. Locate the song to a point slightly before the location where you wish to begin overwriting. 3. Press the [AUTOMIX] key ¡ [F1] key. On 219 - Operation Guide
-
 1
1 -
2
-
3
-
4
-
5
-
6
-
7
-
8
-
9
-
10
-
11
-
12
-
13
-
14
-
15
-
16
-
17
-
18
-
19
-
20
-
21
-
22
-
23
-
24
-
25
-
26
-
27
-
28
-
29
-
30
-
31
-
32
-
33
-
34
-
35
-
36
-
37
-
38
-
39
-
40
-
41
-
42
-
43
-
44
-
45
-
46
-
47
-
48
-
49
-
50
-
51
-
52
-
53
-
54
-
55
-
56
-
57
-
58
-
59
-
60
-
61
-
62
-
63
-
64
-
65
-
66
-
67
-
68
-
69
-
70
-
71
-
72
-
73
-
74
-
75
-
76
-
77
-
78
-
79
-
80
-
81
-
82
-
83
-
84
-
85
-
86
-
87
-
88
-
89
-
90
-
91
-
92
-
93
-
94
-
95
-
96
-
97
-
98
-
99
-
100
-
101
-
102
-
103
-
104
-
105
-
106
-
107
-
108
-
109
-
110
-
111
-
112
-
113
-
114
-
115
-
116
-
117
-
118
-
119
-
120
-
121
-
122
-
123
-
124
-
125
-
126
-
127
-
128
-
129
-
130
-
131
-
132
-
133
-
134
-
135
-
136
-
137
-
138
-
139
-
140
-
141
-
142
-
143
-
144
-
145
-
146
-
147
-
148
-
149
-
150
-
151
-
152
-
153
-
154
-
155
-
156
-
157
-
158
-
159
-
160
-
161
-
162
-
163
-
164
-
165
-
166
-
167
-
168
-
169
-
170
-
171
-
172
-
173
-
174
-
175
-
176
-
177
-
178
-
179
-
180
-
181
-
182
-
183
-
184
-
185
-
186
-
187
-
188
-
189
-
190
-
191
-
192
-
193
-
194
-
195
-
196
-
197
-
198
-
199
-
200
-
201
-
202
-
203
-
204
-
205
-
206
-
207
-
208
-
209
-
210
-
211
-
212
-
213
-
214
-
215
-
216
-
217
-
218
-
219
-
220
-
221
-
222
-
223
-
 224
224 -
 225
225 -
 226
226 -
 227
227 -
 228
228 -
 229
229 -
 230
230 -
 231
231 -
 232
232 -
 233
233 -
 234
234 -
235
-
236
-
237
-
238
-
239
-
240
-
241
-
242
-
243
-
244
-
245
-
246
-
247
-
248
-
249
-
250
-
251
-
252
-
253
-
254
-
255
-
256
-
257
-
258
-
259
-
260
-
261
-
262
-
263
-
264
-
265
-
266
-
267
-
268
-
269
-
270
-
271
-
272
-
273
-
274
-
275
-
276
-
277
-
278
-
279
 |
 |