Yamaha AW4416 Owner's Manual - Page 156
Recorder Mixer Input, patch, Recorder, Press the [TRACK] key
 |
View all Yamaha AW4416 manuals
Add to My Manuals
Save this manual to your list of manuals |
Page 156 highlights
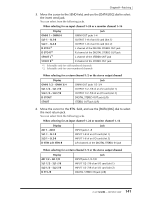
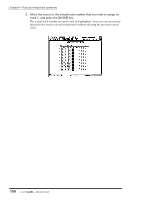
Chapter8-Patching 3. Move the cursor to the EXECUTE button in the lower right of the display, and press the [ENTER] key. A popup window will appear, asking you to confirm execution of Quick Rec. 4. To execute the Quick Rec settings, move the cursor to the OK button and press the [ENTER] key. All [REC TRACK SELECT] keys will blink, and the input patch settings and mix parameters of each channel will be reset. At this time, the signal flow will be as follows. Recorder Input Input OPTION I/O patch Mixer section patch Recorder section I/O card slot 1 ×8 OPTION I/O Input channels 1-8 Tracks 1-8 I/O card slot 2 ×8 Input channels 9-16 Tracks 9-16 Tip! • If you decide to cancel without executing Quick Rec, move the cursor to the CANCEL button and press the [ENTER] key. • At this time, you can also turn off the blinking [REC TRACK SELECT] buttons to limit the number of recording tracks, or re-adjust the mix parameters and input patch settings of each channel. 5. Press the [TRACK] key ¡ [F1] key. The display will show the TRACK screen TR View page. As you can see from the display shown below, executing Quick Rec will turn input monitor on (I field= q) for all tracks, and will mute (M field= q) all tracks. 144 - Operation Guide
-
 1
1 -
2
-
3
-
4
-
5
-
6
-
7
-
8
-
9
-
10
-
11
-
12
-
13
-
14
-
15
-
16
-
17
-
18
-
19
-
20
-
21
-
22
-
23
-
24
-
25
-
26
-
27
-
28
-
29
-
30
-
31
-
32
-
33
-
34
-
35
-
36
-
37
-
38
-
39
-
40
-
41
-
42
-
43
-
44
-
45
-
46
-
47
-
48
-
49
-
50
-
51
-
52
-
53
-
54
-
55
-
56
-
57
-
58
-
59
-
60
-
61
-
62
-
63
-
64
-
65
-
66
-
67
-
68
-
69
-
70
-
71
-
72
-
73
-
74
-
75
-
76
-
77
-
78
-
79
-
80
-
81
-
82
-
83
-
84
-
85
-
86
-
87
-
88
-
89
-
90
-
91
-
92
-
93
-
94
-
95
-
96
-
97
-
98
-
99
-
100
-
101
-
102
-
103
-
104
-
105
-
106
-
107
-
108
-
109
-
110
-
111
-
112
-
113
-
114
-
115
-
116
-
117
-
118
-
119
-
120
-
121
-
122
-
123
-
124
-
125
-
126
-
127
-
128
-
129
-
130
-
131
-
132
-
133
-
134
-
135
-
136
-
137
-
138
-
139
-
140
-
141
-
142
-
143
-
144
-
145
-
146
-
147
-
148
-
149
-
150
-
 151
151 -
 152
152 -
 153
153 -
 154
154 -
 155
155 -
 156
156 -
 157
157 -
 158
158 -
 159
159 -
 160
160 -
 161
161 -
162
-
163
-
164
-
165
-
166
-
167
-
168
-
169
-
170
-
171
-
172
-
173
-
174
-
175
-
176
-
177
-
178
-
179
-
180
-
181
-
182
-
183
-
184
-
185
-
186
-
187
-
188
-
189
-
190
-
191
-
192
-
193
-
194
-
195
-
196
-
197
-
198
-
199
-
200
-
201
-
202
-
203
-
204
-
205
-
206
-
207
-
208
-
209
-
210
-
211
-
212
-
213
-
214
-
215
-
216
-
217
-
218
-
219
-
220
-
221
-
222
-
223
-
224
-
225
-
226
-
227
-
228
-
229
-
230
-
231
-
232
-
233
-
234
-
235
-
236
-
237
-
238
-
239
-
240
-
241
-
242
-
243
-
244
-
245
-
246
-
247
-
248
-
249
-
250
-
251
-
252
-
253
-
254
-
255
-
256
-
257
-
258
-
259
-
260
-
261
-
262
-
263
-
264
-
265
-
266
-
267
-
268
-
269
-
270
-
271
-
272
-
273
-
274
-
275
-
276
-
277
-
278
-
279
 |
 |
