Yamaha AW4416 Owner's Manual - Page 116
L/R level meter, nished recording, press the [STOP]
 |
View all Yamaha AW4416 manuals
Add to My Manuals
Save this manual to your list of manuals |
Page 116 highlights
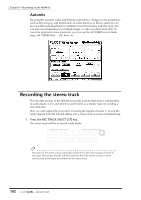
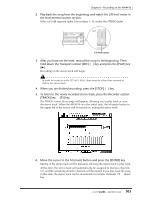
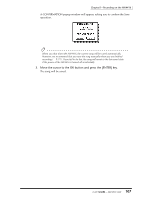
Chapter5-Recording on the AW4416 2. Play back the song from the beginning, and watch the L/R level meter in the level meters/counter section. If the red 0 dB segment lights, lower faders 1-16 and/or the STEREO fader. E H M S F ms WORD CLOCK MTC SCENE REMAIN ABS 44.1k 48k LOCK MASTER REL INT EXT VARI SLAVE E -dB 0 FINE 2 -dB 0 FINE 2 6 6 10 12 10 12 14 20 14 20 18 30 20 42 18 30 20 42 26 60 26 60 1 2 3 4 5 6 7 8 9 10 11 12 13 14 15 16 LR READY READY INPUT INPUT -dB 0 FINE 2 6 10 12 14 20 18 30 20 42 26 60 LR READY INPUT L/R level meter 3. After you have set the level, rewind the song to the beginning. Then hold down the Transport section [REC] (q) key and press the [PLAY] key (®). Recording on the stereo track will begin. In order to create an audio CD (44.1 kHz), there must be at least four seconds of data in the stereo track. 4. When you are finished recording, press the [STOP] (s) key. 5. To listen to the newly recorded stereo track, press the Recorder section [TRACK] key ¡ [F3] key. The TRACK screen Stereo page will appear, allowing you to play back or erase the stereo track. When the AW4416 is in the initial state, the M (mute) button in the upper left of the screen will be turned on, muting the stereo track. 6. Move the cursor to the M (mute) button and press the [ENTER] key. Muting of the stereo track will be defeated, allowing the stereo track to play back. At this time, the stereo track will automatically be assigned to monitor channels 1/2, and the remaining monitor channels will be muted. If you play back the song in this state, the stereo track can be monitored via monitor channels 1/2 ¡ stereo bus. 103 - Operation Guide
-
 1
1 -
2
-
3
-
4
-
5
-
6
-
7
-
8
-
9
-
10
-
11
-
12
-
13
-
14
-
15
-
16
-
17
-
18
-
19
-
20
-
21
-
22
-
23
-
24
-
25
-
26
-
27
-
28
-
29
-
30
-
31
-
32
-
33
-
34
-
35
-
36
-
37
-
38
-
39
-
40
-
41
-
42
-
43
-
44
-
45
-
46
-
47
-
48
-
49
-
50
-
51
-
52
-
53
-
54
-
55
-
56
-
57
-
58
-
59
-
60
-
61
-
62
-
63
-
64
-
65
-
66
-
67
-
68
-
69
-
70
-
71
-
72
-
73
-
74
-
75
-
76
-
77
-
78
-
79
-
80
-
81
-
82
-
83
-
84
-
85
-
86
-
87
-
88
-
89
-
90
-
91
-
92
-
93
-
94
-
95
-
96
-
97
-
98
-
99
-
100
-
101
-
102
-
103
-
104
-
105
-
106
-
107
-
108
-
109
-
110
-
 111
111 -
 112
112 -
 113
113 -
 114
114 -
 115
115 -
 116
116 -
 117
117 -
 118
118 -
 119
119 -
 120
120 -
 121
121 -
122
-
123
-
124
-
125
-
126
-
127
-
128
-
129
-
130
-
131
-
132
-
133
-
134
-
135
-
136
-
137
-
138
-
139
-
140
-
141
-
142
-
143
-
144
-
145
-
146
-
147
-
148
-
149
-
150
-
151
-
152
-
153
-
154
-
155
-
156
-
157
-
158
-
159
-
160
-
161
-
162
-
163
-
164
-
165
-
166
-
167
-
168
-
169
-
170
-
171
-
172
-
173
-
174
-
175
-
176
-
177
-
178
-
179
-
180
-
181
-
182
-
183
-
184
-
185
-
186
-
187
-
188
-
189
-
190
-
191
-
192
-
193
-
194
-
195
-
196
-
197
-
198
-
199
-
200
-
201
-
202
-
203
-
204
-
205
-
206
-
207
-
208
-
209
-
210
-
211
-
212
-
213
-
214
-
215
-
216
-
217
-
218
-
219
-
220
-
221
-
222
-
223
-
224
-
225
-
226
-
227
-
228
-
229
-
230
-
231
-
232
-
233
-
234
-
235
-
236
-
237
-
238
-
239
-
240
-
241
-
242
-
243
-
244
-
245
-
246
-
247
-
248
-
249
-
250
-
251
-
252
-
253
-
254
-
255
-
256
-
257
-
258
-
259
-
260
-
261
-
262
-
263
-
264
-
265
-
266
-
267
-
268
-
269
-
270
-
271
-
272
-
273
-
274
-
275
-
276
-
277
-
278
-
279
 |
 |
