Yamaha AW4416 Owner's Manual - Page 135
Adjusting the location of a locate point
 |
View all Yamaha AW4416 manuals
Add to My Manuals
Save this manual to your list of manuals |
Page 135 highlights
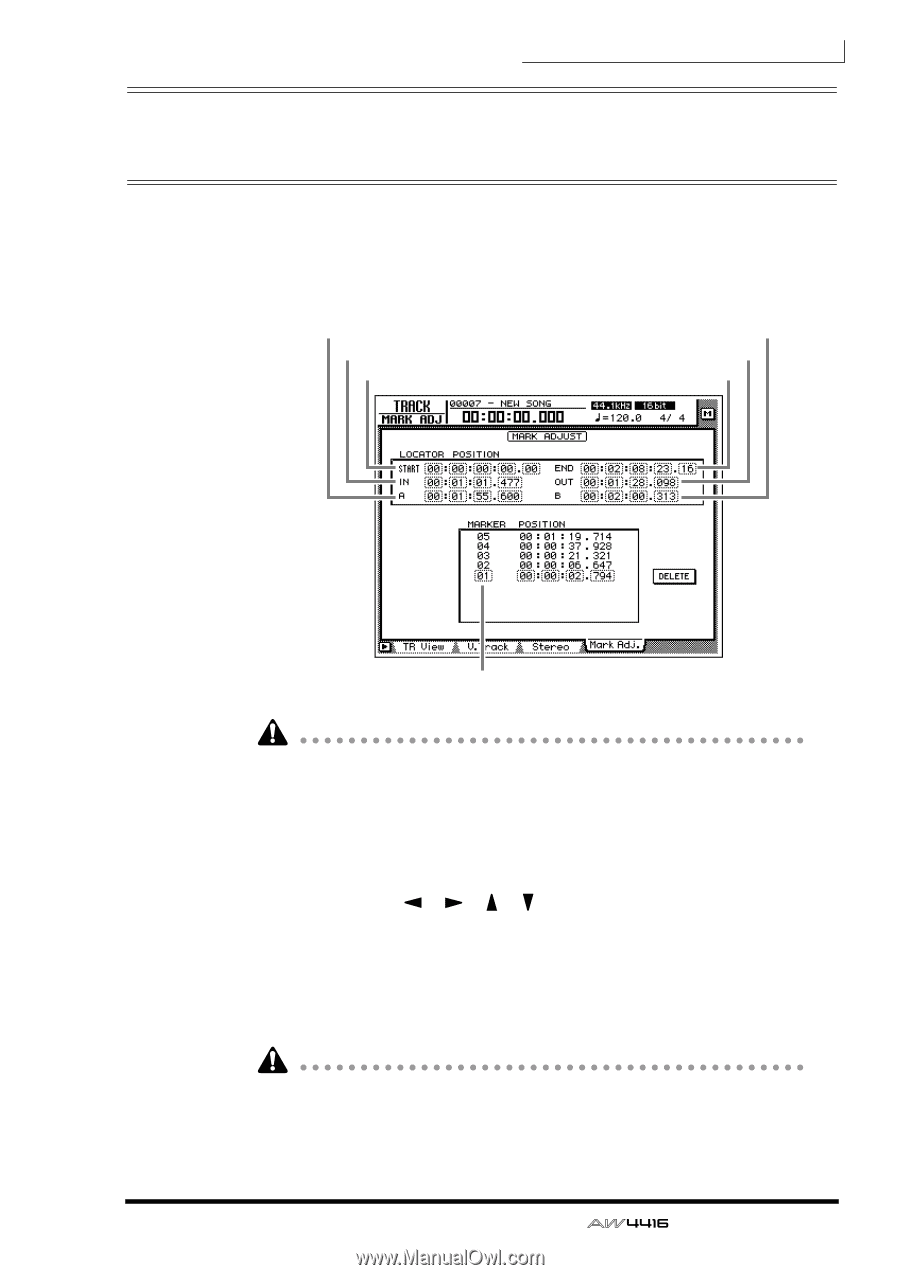
Chapter6-Transport/locate operations Adjusting the location of a locate point The location of the Start/End points, A/B points, In/Out points, and Markers can be adjusted as desired. 1. Press the [TRACK] key ¡ [F4] key. A screen will appear in which you can adjust the various locate points. A point In point Start Point B point Out point End point Marker number • Except for the Start/End points, the displayed location of the locate points will differ depending on the currently selected counter display type (Time, Time Code, Measure). The Start point and End point are always displayed as time code, regardless of the currently selected display method. • The automix of the AW4416 operates according to the absolute time of the song. Be aware that if you change the start point after recording events in the automix, the song will no longer be synchronized with the automix. 2. Use the CURSOR keys to move the cursor, and use the [DATA/JOG] dial to adjust the location of each locate point. When you change the Start point, the absolute time zero of the song will change. For example if you change the Start point to "00:00:05:00.00," the location five seconds after the beginning of the song will be specified as absolute time zero. (If you press the [RTZ] key when absolute time is displayed, you will move to this point.) • The smallest unit of adjustment will be a "millisecond" if time (SECOND) is selected as the counter display method, "sub-frame" if time code display (TIME CODE) is selected, or "beats" if measure display (MEASURE) is selected. • When adjusting the location of a marker, it is not possible to move the marker beyond the preceding or following marker. 123 - Operation Guide
-
 1
1 -
2
-
3
-
4
-
5
-
6
-
7
-
8
-
9
-
10
-
11
-
12
-
13
-
14
-
15
-
16
-
17
-
18
-
19
-
20
-
21
-
22
-
23
-
24
-
25
-
26
-
27
-
28
-
29
-
30
-
31
-
32
-
33
-
34
-
35
-
36
-
37
-
38
-
39
-
40
-
41
-
42
-
43
-
44
-
45
-
46
-
47
-
48
-
49
-
50
-
51
-
52
-
53
-
54
-
55
-
56
-
57
-
58
-
59
-
60
-
61
-
62
-
63
-
64
-
65
-
66
-
67
-
68
-
69
-
70
-
71
-
72
-
73
-
74
-
75
-
76
-
77
-
78
-
79
-
80
-
81
-
82
-
83
-
84
-
85
-
86
-
87
-
88
-
89
-
90
-
91
-
92
-
93
-
94
-
95
-
96
-
97
-
98
-
99
-
100
-
101
-
102
-
103
-
104
-
105
-
106
-
107
-
108
-
109
-
110
-
111
-
112
-
113
-
114
-
115
-
116
-
117
-
118
-
119
-
120
-
121
-
122
-
123
-
124
-
125
-
126
-
127
-
128
-
129
-
 130
130 -
 131
131 -
 132
132 -
 133
133 -
 134
134 -
 135
135 -
 136
136 -
 137
137 -
 138
138 -
 139
139 -
 140
140 -
141
-
142
-
143
-
144
-
145
-
146
-
147
-
148
-
149
-
150
-
151
-
152
-
153
-
154
-
155
-
156
-
157
-
158
-
159
-
160
-
161
-
162
-
163
-
164
-
165
-
166
-
167
-
168
-
169
-
170
-
171
-
172
-
173
-
174
-
175
-
176
-
177
-
178
-
179
-
180
-
181
-
182
-
183
-
184
-
185
-
186
-
187
-
188
-
189
-
190
-
191
-
192
-
193
-
194
-
195
-
196
-
197
-
198
-
199
-
200
-
201
-
202
-
203
-
204
-
205
-
206
-
207
-
208
-
209
-
210
-
211
-
212
-
213
-
214
-
215
-
216
-
217
-
218
-
219
-
220
-
221
-
222
-
223
-
224
-
225
-
226
-
227
-
228
-
229
-
230
-
231
-
232
-
233
-
234
-
235
-
236
-
237
-
238
-
239
-
240
-
241
-
242
-
243
-
244
-
245
-
246
-
247
-
248
-
249
-
250
-
251
-
252
-
253
-
254
-
255
-
256
-
257
-
258
-
259
-
260
-
261
-
262
-
263
-
264
-
265
-
266
-
267
-
268
-
269
-
270
-
271
-
272
-
273
-
274
-
275
-
276
-
277
-
278
-
279
 |
 |