Yamaha AW4416 Owner's Manual - Page 250
Using MIDI Clock to synchronize the AW4416 and a MIDI sequencer
 |
View all Yamaha AW4416 manuals
Add to My Manuals
Save this manual to your list of manuals |
Page 250 highlights
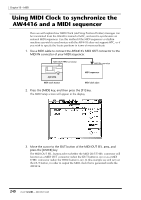
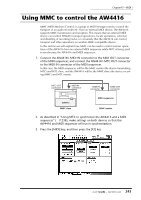
Chapter15-MIDI Using MIDI Clock to synchronize the AW4416 and a MIDI sequencer Here we will explain how MIDI Clock (and Song Position Pointer) messages can be transmitted from the AW4416 instead of MTC, and used to synchronize an external MIDI sequencer. Use this method if the MIDI sequencer or rhythm machine you wish to synchronize with the AW4416 does not support MTC, or if you wish to specify the locate positions in terms of measures/beats. 1. Use a MIDI cable to connect the AW4416's MIDI OUT connector to the MIDI IN connector of your MIDI sequencer. MIDI OUT/THRU connector PROFESSIONAL AUDIO WORKSTATION MIDI IN connector AW4416 MIDI clock master MIDI sequencer MIDI clock slave 2. Press the [MIDI] key, and then press the [F1] key. The MIDI Setup screen will appear in the display. 3. Move the cursor to the OUT button of the MIDI OUT SEL. area, and press the [ENTER] key. The MIDI OUT SEL. buttons select whether the MIDI OUT/THRU connector will function as a MIDI OUT connector (when the OUT button is on) or as a MIDI THRU connector (when the THRU button is on). In this example we will turn on the OUT button, in order to output the MIDI clock that is generated inside the AW4416. 240 - Operation Guide
-
 1
1 -
2
-
3
-
4
-
5
-
6
-
7
-
8
-
9
-
10
-
11
-
12
-
13
-
14
-
15
-
16
-
17
-
18
-
19
-
20
-
21
-
22
-
23
-
24
-
25
-
26
-
27
-
28
-
29
-
30
-
31
-
32
-
33
-
34
-
35
-
36
-
37
-
38
-
39
-
40
-
41
-
42
-
43
-
44
-
45
-
46
-
47
-
48
-
49
-
50
-
51
-
52
-
53
-
54
-
55
-
56
-
57
-
58
-
59
-
60
-
61
-
62
-
63
-
64
-
65
-
66
-
67
-
68
-
69
-
70
-
71
-
72
-
73
-
74
-
75
-
76
-
77
-
78
-
79
-
80
-
81
-
82
-
83
-
84
-
85
-
86
-
87
-
88
-
89
-
90
-
91
-
92
-
93
-
94
-
95
-
96
-
97
-
98
-
99
-
100
-
101
-
102
-
103
-
104
-
105
-
106
-
107
-
108
-
109
-
110
-
111
-
112
-
113
-
114
-
115
-
116
-
117
-
118
-
119
-
120
-
121
-
122
-
123
-
124
-
125
-
126
-
127
-
128
-
129
-
130
-
131
-
132
-
133
-
134
-
135
-
136
-
137
-
138
-
139
-
140
-
141
-
142
-
143
-
144
-
145
-
146
-
147
-
148
-
149
-
150
-
151
-
152
-
153
-
154
-
155
-
156
-
157
-
158
-
159
-
160
-
161
-
162
-
163
-
164
-
165
-
166
-
167
-
168
-
169
-
170
-
171
-
172
-
173
-
174
-
175
-
176
-
177
-
178
-
179
-
180
-
181
-
182
-
183
-
184
-
185
-
186
-
187
-
188
-
189
-
190
-
191
-
192
-
193
-
194
-
195
-
196
-
197
-
198
-
199
-
200
-
201
-
202
-
203
-
204
-
205
-
206
-
207
-
208
-
209
-
210
-
211
-
212
-
213
-
214
-
215
-
216
-
217
-
218
-
219
-
220
-
221
-
222
-
223
-
224
-
225
-
226
-
227
-
228
-
229
-
230
-
231
-
232
-
233
-
234
-
235
-
236
-
237
-
238
-
239
-
240
-
241
-
242
-
243
-
244
-
 245
245 -
 246
246 -
 247
247 -
 248
248 -
 249
249 -
 250
250 -
 251
251 -
 252
252 -
 253
253 -
 254
254 -
 255
255 -
256
-
257
-
258
-
259
-
260
-
261
-
262
-
263
-
264
-
265
-
266
-
267
-
268
-
269
-
270
-
271
-
272
-
273
-
274
-
275
-
276
-
277
-
278
-
279
 |
 |
