Yamaha AW4416 Owner's Manual - Page 82
Word clock settings
 |
View all Yamaha AW4416 manuals
Add to My Manuals
Save this manual to your list of manuals |
Page 82 highlights
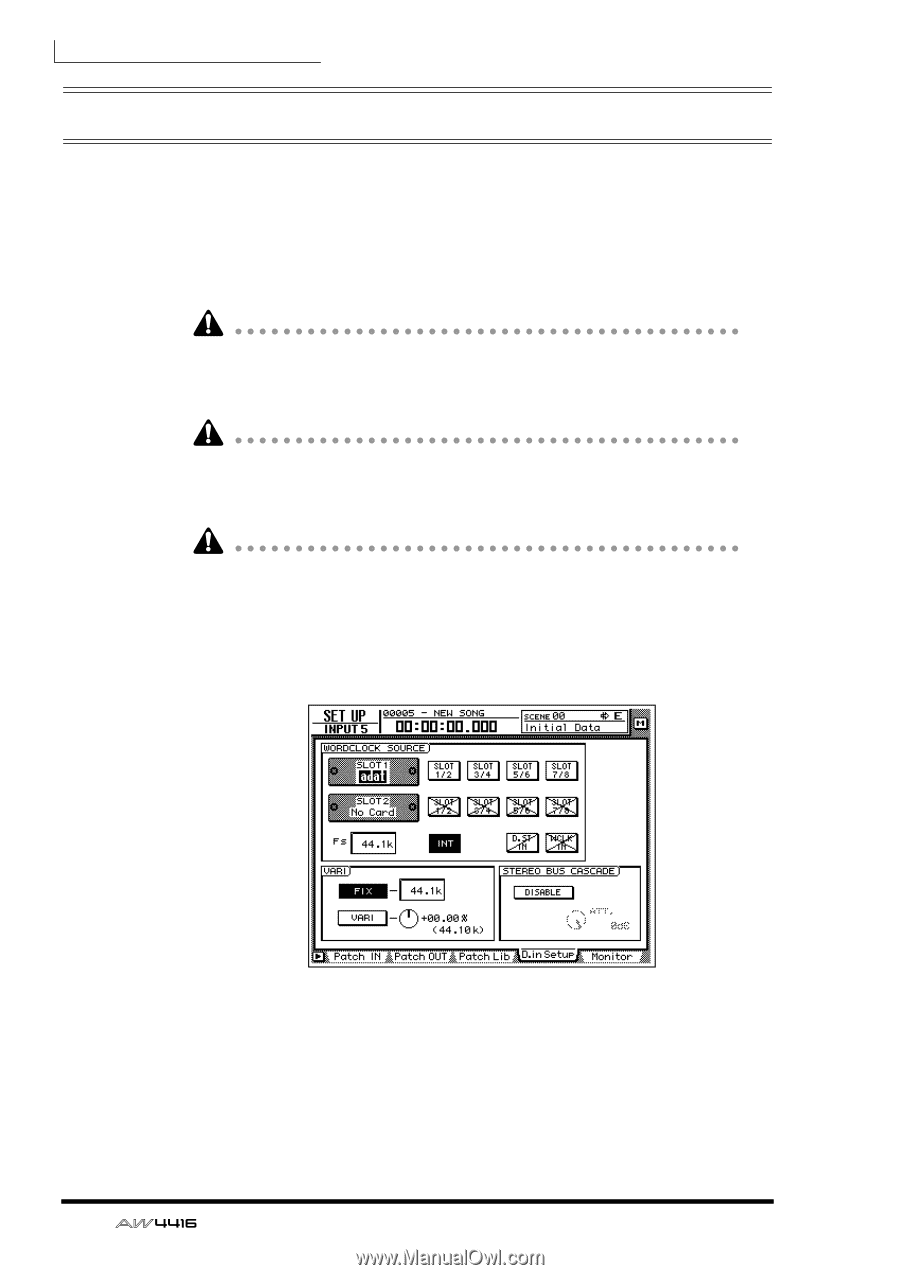
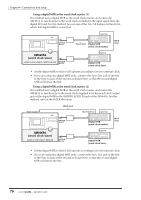
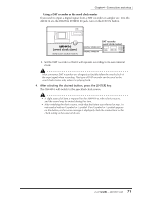
Chapter4-Connections and setup Word clock settings If a device such as a digital MTR or DAT recorder is digitally connected to the AW4416, the clock that controls the timing at which digital audio is processed (referred to as the "word clock") must be synchronized. To do so, you must select one of the devices as the word clock master, and set the remaining devices so that they will follow the word clock supplied from the master device. Here we will explain how to select the clock source to which the AW4416 will synchronize. Be aware that if the system includes an unsynchronized device, drop-outs and click noise will occur. 1. Turn on the power of the external digital device and of the AW4416. If an external device is connected to the SCSI connector of the AW4416, you must turn on the power in the order of external SCSI device ¡ AW4416. If the power of the external SCSI device is off when you turn on the AW4416, it may not start up correctly. If the D.in Setup tab is not assigned to the [F4] key when you press the [SETUP] key, press the [SHIFT] key + [F1] key to switch the tab, and then press the [F4] key. 2. 2. Press the [SETUP] key ¡ [F4] key. The SETUP UP screen D.in Setup page will appear, allowing you to make word clock settings. In the WORD CLOCK SOURCE area of this screen you can select one of the following as the clock source to which the AW4416 will synchronize. ❍ SLOT 1 1/2-7/8 ❍ SLOT 2 1/2-7/8 An input signal from a digital I/O card installed in OPTION I/O slot 1/2 will be the clock source. You can select one pair from input channels 1/2-7/8 of the digital I/O card, and the AW4416 will synchronize to the word clock data included in the input signal of the corresponding channel. 68 - Operation Guide
-
 1
1 -
2
-
3
-
4
-
5
-
6
-
7
-
8
-
9
-
10
-
11
-
12
-
13
-
14
-
15
-
16
-
17
-
18
-
19
-
20
-
21
-
22
-
23
-
24
-
25
-
26
-
27
-
28
-
29
-
30
-
31
-
32
-
33
-
34
-
35
-
36
-
37
-
38
-
39
-
40
-
41
-
42
-
43
-
44
-
45
-
46
-
47
-
48
-
49
-
50
-
51
-
52
-
53
-
54
-
55
-
56
-
57
-
58
-
59
-
60
-
61
-
62
-
63
-
64
-
65
-
66
-
67
-
68
-
69
-
70
-
71
-
72
-
73
-
74
-
75
-
76
-
 77
77 -
 78
78 -
 79
79 -
 80
80 -
 81
81 -
 82
82 -
 83
83 -
 84
84 -
 85
85 -
 86
86 -
 87
87 -
88
-
89
-
90
-
91
-
92
-
93
-
94
-
95
-
96
-
97
-
98
-
99
-
100
-
101
-
102
-
103
-
104
-
105
-
106
-
107
-
108
-
109
-
110
-
111
-
112
-
113
-
114
-
115
-
116
-
117
-
118
-
119
-
120
-
121
-
122
-
123
-
124
-
125
-
126
-
127
-
128
-
129
-
130
-
131
-
132
-
133
-
134
-
135
-
136
-
137
-
138
-
139
-
140
-
141
-
142
-
143
-
144
-
145
-
146
-
147
-
148
-
149
-
150
-
151
-
152
-
153
-
154
-
155
-
156
-
157
-
158
-
159
-
160
-
161
-
162
-
163
-
164
-
165
-
166
-
167
-
168
-
169
-
170
-
171
-
172
-
173
-
174
-
175
-
176
-
177
-
178
-
179
-
180
-
181
-
182
-
183
-
184
-
185
-
186
-
187
-
188
-
189
-
190
-
191
-
192
-
193
-
194
-
195
-
196
-
197
-
198
-
199
-
200
-
201
-
202
-
203
-
204
-
205
-
206
-
207
-
208
-
209
-
210
-
211
-
212
-
213
-
214
-
215
-
216
-
217
-
218
-
219
-
220
-
221
-
222
-
223
-
224
-
225
-
226
-
227
-
228
-
229
-
230
-
231
-
232
-
233
-
234
-
235
-
236
-
237
-
238
-
239
-
240
-
241
-
242
-
243
-
244
-
245
-
246
-
247
-
248
-
249
-
250
-
251
-
252
-
253
-
254
-
255
-
256
-
257
-
258
-
259
-
260
-
261
-
262
-
263
-
264
-
265
-
266
-
267
-
268
-
269
-
270
-
271
-
272
-
273
-
274
-
275
-
276
-
277
-
278
-
279
 |
 |