Yamaha AW4416 Owner's Manual - Page 77
Selecting channels
 |
View all Yamaha AW4416 manuals
Add to My Manuals
Save this manual to your list of manuals |
Page 77 highlights
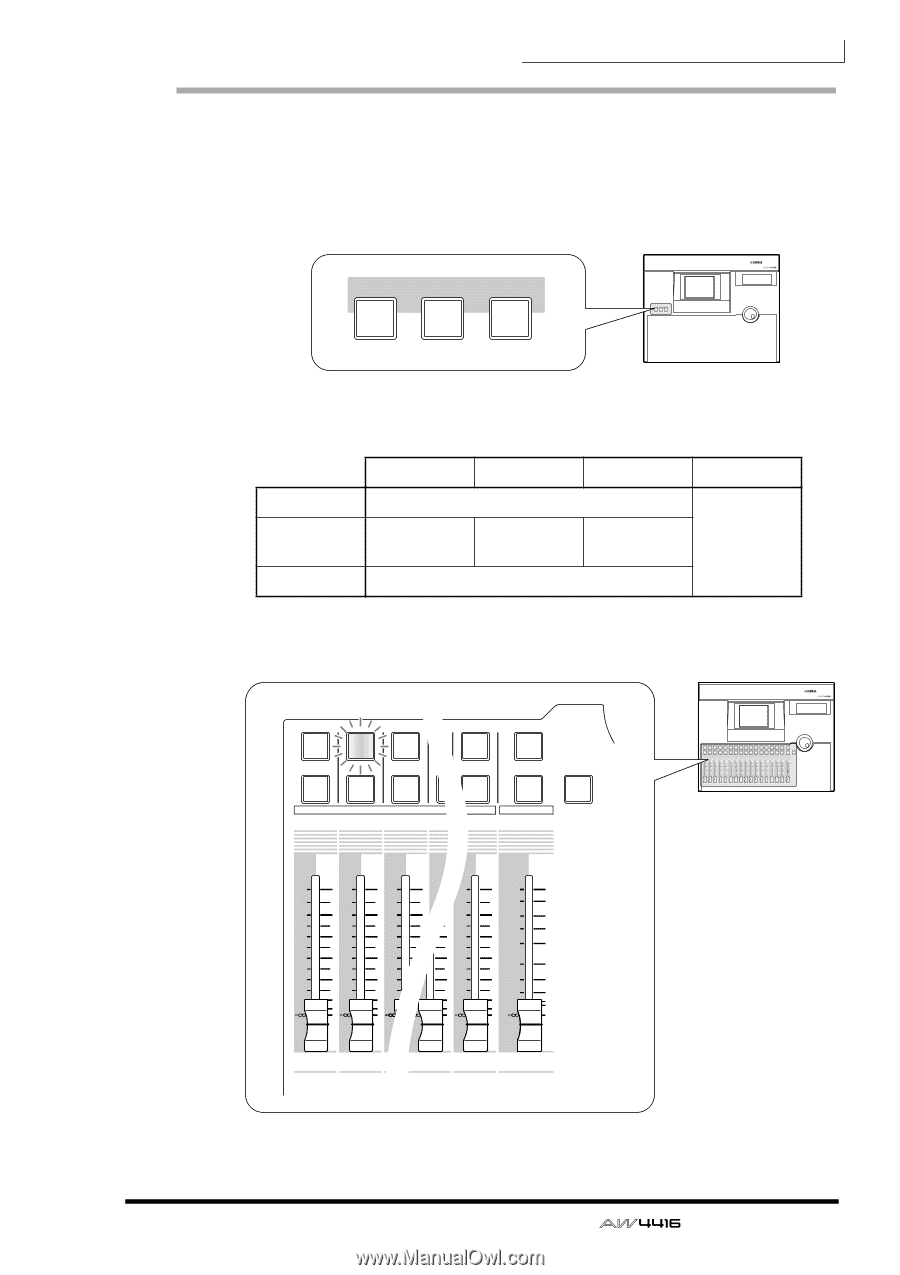
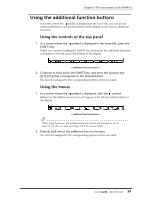
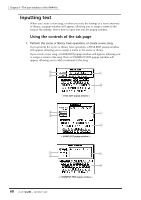
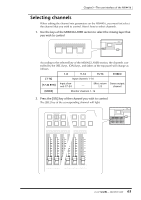
Chapter3-The user interface of the AW4416 Selecting channels When editing the channel mix parameters on the AW4416, you must first select the channel that you wish to control. Here's how to select channels. 1. Use the keys of the MIXING LAYER section to select the mixing layer that you wish to control MIXING LAYER 1-16 INPUT 17-24 RTN INPUT MONI RECORDER MIXING LAYER 1-16 INPUT 17-24 RTN INPUT MONI RECORDER PROFESSIONAL AUDIO WORKSTATION According to the selected key of the MIXING LAYER section, the channels controlled by the [SEL] keys, [ON] keys, and faders of the top panel will change as follows. 1-8 9-14 15/16 STEREO [1-16] Input channels 1-16 [17-24 RTN] Input channels 17-24 - Effect return Stereo output 1/2 channel [MONI] Monitor channels 1-16 2. Press the [SEL] key of the channel you wish to control. The [SEL] key of the corresponding channel will light. PROFESSIONAL AUDIO WORKSTATION SEL SEL SEL ON ON ON 17 18 19 1 2 3 SEL ON 2 16 SEL ON SOLO SEL SEL SEL SEL SEL SEL SEL SEL SEL SEL SEL SEL SEL SEL SEL SEL ON ON ON ON ON ON ON ON ON ON ON ON ON ON ON ON 17 18 19 20 21 22 23 24 1 RTN 2 1 2 3 4 5 6 7 8 9 10 11 12 13 14 15 16 SEL ON SOLO +6 +6 +6 +6 +6 +6 +6 +6 +6 +6 +6 +6 +6 +6 +6 +6 0 5 0 0 0 0 0 0 0 0 0 0 0 0 0 0 0 0 10 15 5 5 5 5 5 5 5 5 5 5 5 5 5 5 5 5 20 10 10 10 10 10 10 10 10 10 10 10 10 10 10 10 10 30 20 20 20 20 20 20 20 20 20 20 20 20 20 20 20 20 40 50 40 40 40 40 40 40 40 40 40 40 40 40 40 40 40 40 60 60 60 60 60 60 60 60 60 60 60 60 60 60 60 60 70 1 2 3 4 5 6 7 8 9 10 11 12 13 14 15 16 STEREO +6 +6 +6 +6 +6 0 5 0 0 0 0 10 5 5 5 15 5 20 10 10 10 10 30 20 20 20 20 20 40 50 40 40 40 40 40 60 60 60 60 60 70 1 2 15 16 STEREO 63 - Operation Guide
-
 1
1 -
2
-
3
-
4
-
5
-
6
-
7
-
8
-
9
-
10
-
11
-
12
-
13
-
14
-
15
-
16
-
17
-
18
-
19
-
20
-
21
-
22
-
23
-
24
-
25
-
26
-
27
-
28
-
29
-
30
-
31
-
32
-
33
-
34
-
35
-
36
-
37
-
38
-
39
-
40
-
41
-
42
-
43
-
44
-
45
-
46
-
47
-
48
-
49
-
50
-
51
-
52
-
53
-
54
-
55
-
56
-
57
-
58
-
59
-
60
-
61
-
62
-
63
-
64
-
65
-
66
-
67
-
68
-
69
-
70
-
71
-
 72
72 -
 73
73 -
 74
74 -
 75
75 -
 76
76 -
 77
77 -
 78
78 -
 79
79 -
 80
80 -
 81
81 -
 82
82 -
83
-
84
-
85
-
86
-
87
-
88
-
89
-
90
-
91
-
92
-
93
-
94
-
95
-
96
-
97
-
98
-
99
-
100
-
101
-
102
-
103
-
104
-
105
-
106
-
107
-
108
-
109
-
110
-
111
-
112
-
113
-
114
-
115
-
116
-
117
-
118
-
119
-
120
-
121
-
122
-
123
-
124
-
125
-
126
-
127
-
128
-
129
-
130
-
131
-
132
-
133
-
134
-
135
-
136
-
137
-
138
-
139
-
140
-
141
-
142
-
143
-
144
-
145
-
146
-
147
-
148
-
149
-
150
-
151
-
152
-
153
-
154
-
155
-
156
-
157
-
158
-
159
-
160
-
161
-
162
-
163
-
164
-
165
-
166
-
167
-
168
-
169
-
170
-
171
-
172
-
173
-
174
-
175
-
176
-
177
-
178
-
179
-
180
-
181
-
182
-
183
-
184
-
185
-
186
-
187
-
188
-
189
-
190
-
191
-
192
-
193
-
194
-
195
-
196
-
197
-
198
-
199
-
200
-
201
-
202
-
203
-
204
-
205
-
206
-
207
-
208
-
209
-
210
-
211
-
212
-
213
-
214
-
215
-
216
-
217
-
218
-
219
-
220
-
221
-
222
-
223
-
224
-
225
-
226
-
227
-
228
-
229
-
230
-
231
-
232
-
233
-
234
-
235
-
236
-
237
-
238
-
239
-
240
-
241
-
242
-
243
-
244
-
245
-
246
-
247
-
248
-
249
-
250
-
251
-
252
-
253
-
254
-
255
-
256
-
257
-
258
-
259
-
260
-
261
-
262
-
263
-
264
-
265
-
266
-
267
-
268
-
269
-
270
-
271
-
272
-
273
-
274
-
275
-
276
-
277
-
278
-
279
 |
 |