Yamaha AW4416 Owner's Manual - Page 95
Set the tracks to record-ready mode
 |
View all Yamaha AW4416 manuals
Add to My Manuals
Save this manual to your list of manuals |
Page 95 highlights
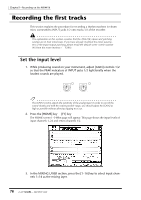
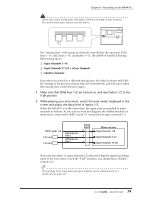
Chapter5-Recording on the AW4416 Note that the level when the PAN knob is positioned at full left or full right will differ between paired and unpaired channels. The level of a channel that is not paired will rise 3 dB when the PAN knob is positioned at full left (L16) or full right (R16). 4. In the same way, move the cursor to the input channel 2 area, and set the PAN knob to far right (R16). Even for paired channels, the PAN knobs will not operate in tandem if the MODE area Pan parameter is set to INDIVIDUAL (default setting). The PAN knobs will move in tandem if this parameter is set to GANG or INVERTED GANG. Set the tracks to record-ready mode Next we will set tracks 1/2 of the recorder to record-ready mode, and adjust the input level of each track. 1. In the level meters/counter section, press [REC TRACK SELECT] keys 1 and 2. REC TRACK SELECT 1 2 3 4 5 6 7 8 ST 9 10 11 12 13 14 15 16 [REC TRACK SELECT] keys 1 and 2 will begin blinking. In the level meters/ counter section, REC READY indicators 1 and 2 will blink red. This indicates that tracks 1/2 are in record-ready mode. 14 20 18 30 20 42 26 60 H M S F ms WORD CLOCK MTC SCENE REMAIN ABS 44.1k 48k LOCK MASTER REL INT EXT VARI SLAVE E 1 2 3 -dB 0 FINE 2 -dB 0 FINE 2 READY NPUT 6 10 12 14 20 6 10 12 14 20 18 30 20 42 18 30 20 42 26 60 26 60 1 2 3 4 5 6 7 8 9 10 11 12 13 14 15 16 LR READY READY INPUT INPUT 2. While producing sound on your instrument, watch level meters 1/2 in the level meters/counter section. The level of the signals being input to tracks 1/2 (which are in record-ready mode) will be shown in level meters 1/2. If the red segment at the 0 dB position lights for level meters 1/2, lower faders 1/2 (input channel 1/2 input levels). In this example, tracks 1/2 are paired, so be sure to operate only one of the faders. Tip! When the AW4416 is in its initial state, the input monitor mode of each track is set to "AUTO." For tracks that are currently in record-ready mode, the level meters will show the level of the input signal while the recorder is stopped, and the level of the track playback signal when the recorder is playing back. 82 - Operation Guide
-
 1
1 -
2
-
3
-
4
-
5
-
6
-
7
-
8
-
9
-
10
-
11
-
12
-
13
-
14
-
15
-
16
-
17
-
18
-
19
-
20
-
21
-
22
-
23
-
24
-
25
-
26
-
27
-
28
-
29
-
30
-
31
-
32
-
33
-
34
-
35
-
36
-
37
-
38
-
39
-
40
-
41
-
42
-
43
-
44
-
45
-
46
-
47
-
48
-
49
-
50
-
51
-
52
-
53
-
54
-
55
-
56
-
57
-
58
-
59
-
60
-
61
-
62
-
63
-
64
-
65
-
66
-
67
-
68
-
69
-
70
-
71
-
72
-
73
-
74
-
75
-
76
-
77
-
78
-
79
-
80
-
81
-
82
-
83
-
84
-
85
-
86
-
87
-
88
-
89
-
 90
90 -
 91
91 -
 92
92 -
 93
93 -
 94
94 -
 95
95 -
 96
96 -
 97
97 -
 98
98 -
 99
99 -
 100
100 -
101
-
102
-
103
-
104
-
105
-
106
-
107
-
108
-
109
-
110
-
111
-
112
-
113
-
114
-
115
-
116
-
117
-
118
-
119
-
120
-
121
-
122
-
123
-
124
-
125
-
126
-
127
-
128
-
129
-
130
-
131
-
132
-
133
-
134
-
135
-
136
-
137
-
138
-
139
-
140
-
141
-
142
-
143
-
144
-
145
-
146
-
147
-
148
-
149
-
150
-
151
-
152
-
153
-
154
-
155
-
156
-
157
-
158
-
159
-
160
-
161
-
162
-
163
-
164
-
165
-
166
-
167
-
168
-
169
-
170
-
171
-
172
-
173
-
174
-
175
-
176
-
177
-
178
-
179
-
180
-
181
-
182
-
183
-
184
-
185
-
186
-
187
-
188
-
189
-
190
-
191
-
192
-
193
-
194
-
195
-
196
-
197
-
198
-
199
-
200
-
201
-
202
-
203
-
204
-
205
-
206
-
207
-
208
-
209
-
210
-
211
-
212
-
213
-
214
-
215
-
216
-
217
-
218
-
219
-
220
-
221
-
222
-
223
-
224
-
225
-
226
-
227
-
228
-
229
-
230
-
231
-
232
-
233
-
234
-
235
-
236
-
237
-
238
-
239
-
240
-
241
-
242
-
243
-
244
-
245
-
246
-
247
-
248
-
249
-
250
-
251
-
252
-
253
-
254
-
255
-
256
-
257
-
258
-
259
-
260
-
261
-
262
-
263
-
264
-
265
-
266
-
267
-
268
-
269
-
270
-
271
-
272
-
273
-
274
-
275
-
276
-
277
-
278
-
279
 |
 |